
Building an aviary bird cage is one of the most rewarding DIY projects you can do for your birds, but getting it right means thinking through legal requirements, safe materials, correct dimensions for your species, and weatherproofing before you cut a single board. This guide walks you through the entire process, from checking local laws to finishing a double-door flight aviary, with specific build notes for cockatiels, parakeets, and canaries. Whether you are planning a compact indoor flight cage or a full outdoor walk-in aviary, everything here is designed to be practical, scalable, and species-appropriate.
How to Build Aviary Bird Cage: DIY Guide for Cockatiels

Maya Bennett
12 Aug 2026
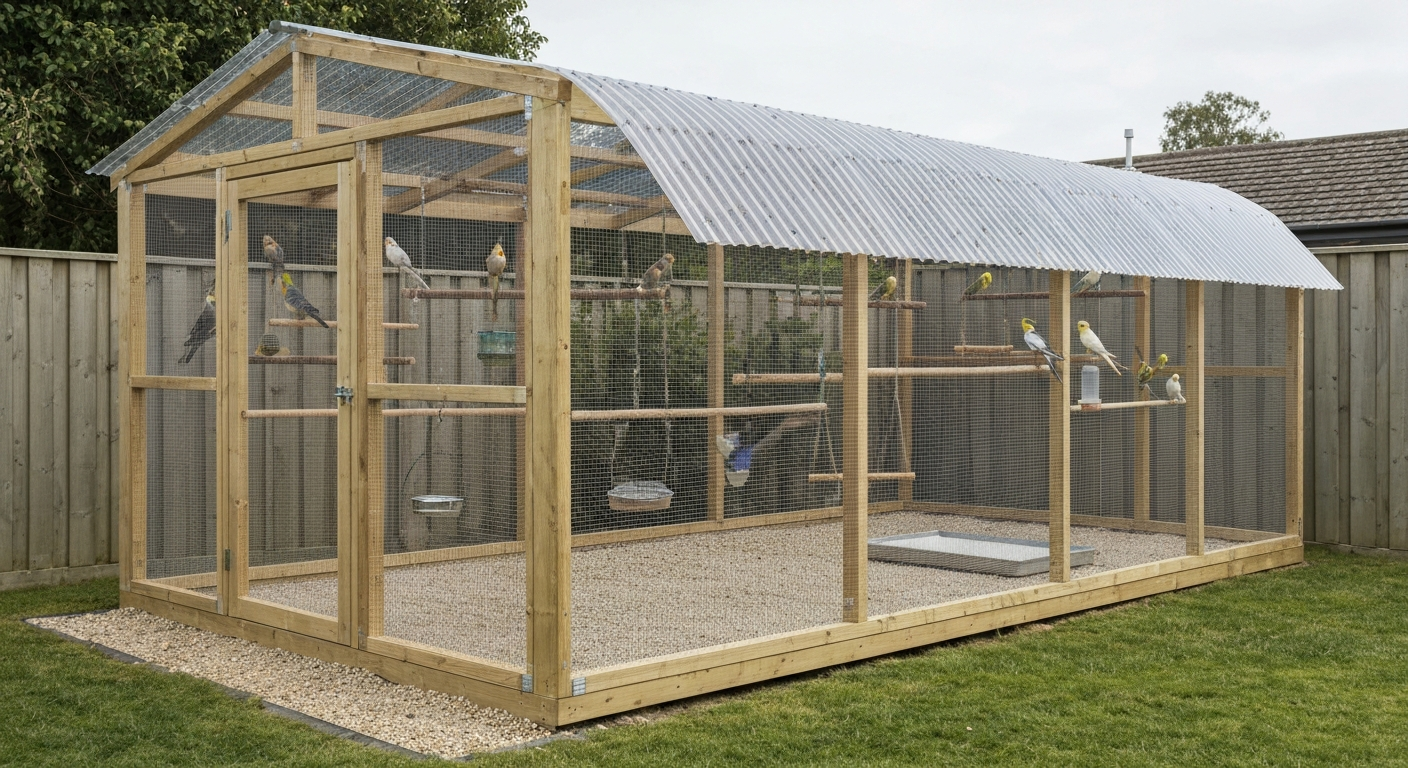
Who this guide is for and what you will build
This guide is written for home bird owners and DIYers who want to move beyond store-bought cages and build something sized correctly for their birds. You might be upgrading a single cockatiel from a cramped starter cage, housing a flock of budgies in a proper flight cage, or constructing a full outdoor aviary for canaries. The safety-first goal throughout is simple: no toxic materials, no gaps that trap feet or heads, no construction shortcuts that put your birds at risk. I have made most of these mistakes myself, so each section flags the common errors and explains exactly why they matter.
Legal, zoning and permit checklist
Before you spend a dollar on lumber or wire, you need to check the rules that govern what you are building and how many birds you keep. This step gets skipped constantly, and it can create real problems once a structure is already built.
Federal rules (US builders)
The US Animal Welfare Act, enforced by USDA APHIS, now includes specific bird welfare standards that began phasing in during 2023 and 2024. These standards define covered pet bird species, including canaries, cockatiels, and budgerigars, and set licensing and inspection thresholds for anyone who sells, exhibits, or breeds birds above certain numbers. If you are building a breeder setup or plan to sell birds, check whether you need a USDA license and whether your housing must meet AWA minimum standards before an inspector visits. Keeping birds for personal enjoyment in smaller numbers generally falls below the threshold, but confirm this with APHIS directly because the rules changed recently.
Local and HOA checks
- Contact your city or county zoning office to confirm whether an outdoor aviary structure requires a building permit (many jurisdictions treat anything over a certain square footage as a permanent structure requiring a permit).
- Check HOA covenants if applicable, as many prohibit outbuildings or livestock/poultry even if city rules allow them.
- Confirm noise ordinances, especially for outdoor aviaries housing vocal species like cockatiels.
- If you keep any wild-caught native birds, confirm state wildlife permits, noting that most US native species require a federal Migratory Bird Treaty Act permit to keep legally.
- Outside the US, check your national and regional equivalents, such as CITES permits for certain exotic species and local council planning rules for outdoor structures.
Getting permits and keeping records is not just bureaucratic overhead. It protects you if a neighbor complains, and it ensures your build meets structural standards that also happen to be good for bird safety.
Planning your aviary project
Clarifying your purpose before you design saves a huge amount of rework. An aviary for a single pet cockatiel looks very different from a breeding setup for 10 pairs of budgies or a walk-in outdoor flight for canaries. Ask yourself these questions up front.
- Is this primarily a pet habitat or a breeding operation? Breeding setups need nest box access, separate compartments, and easy visual monitoring.
- Will it be indoor, outdoor, or a covered outdoor structure? Each changes your weatherproofing, material, and ventilation requirements significantly.
- How many birds will use the space, and will the number grow? Design for your projected flock size, not just today's count.
- Do you want a walk-in aviary or a handled flight cage? Walk-in structures require a double-door vestibule; smaller flight cages do not, but they still need solid latching.
- What is your realistic budget and skill level? A simple timber-frame and stainless-mesh indoor flight cage is achievable for most DIYers in a weekend; a poured-concrete-base outdoor aviary is a multi-week project.
Start with a scaled sketch on paper. Note the footprint dimensions, the door placement, roof style (flat, sloped for drainage, or peaked), and where perches, feeders, and water stations will go. This sketch will save you from costly cuts and force you to think about bird flow through the space before materials are bought.
Site selection and placement
Indoor placement
Indoors, place the aviary or flight cage against an interior wall, not an exterior wall that gets cold in winter or direct afternoon sun through glass. Avoid kitchens entirely: cooking fumes, non-stick coatings at high heat, and aerosol cleaners can be fatal to birds. Position the structure so birds can see into the room and observe household activity, which reduces stress, but give them at least one sheltered corner where they can retreat. Aim for a temperature range of roughly 68 to 85 degrees F (20 to 29 degrees C) and relative humidity of 40 to 60 percent. Cross-ventilation is important, but direct drafts from AC vents or open windows hitting the cage directly are harmful.
Outdoor placement
Outdoor aviaries need at least one-third of the structure permanently covered and shaded so birds can escape direct sun and rain. For step-by-step plans and materials lists on how to build an outdoor bird cage, see our dedicated guide. Orient the structure so the prevailing wind does not blow directly through the main mesh panels. A south-facing aspect (in the northern hemisphere) gives morning and afternoon sun access while allowing shade management. Avoid low-lying areas that pool water, and keep the base elevated or sealed to stop rodents from digging underneath. Noise matters too: placing an outdoor aviary adjacent to a busy road, air conditioning unit, or power tools workshop adds stress that compounds over time.
Noise, neighbors and wildlife
Think about predator pressure at your specific site. Raccoons, cats, hawks, and even neighborhood dogs can reach wire mesh and cause panic injuries even without breaking in. Bury hardware cloth at least 12 inches underground around the base of outdoor aviaries, or use a poured concrete footing. Use a mesh size no larger than 1/2 inch on all exterior faces to exclude rodents and to prevent birds from pushing their heads through.
Safe materials: what to buy and what to avoid
Material choice is where most well-intentioned builds go wrong. Zinc and lead are among the most common causes of heavy-metal toxicosis in pet birds. Galvanized wire and hardware, which are coated in zinc, are a known source of poisoning, particularly when birds chew the wire or ingest corroded flakes. Clinical veterinary sources confirm that serum zinc elevation from galvanized cage contact is routinely diagnosed in avian practice, and chelation treatment is required in serious cases. Do not use galvanized wire mesh for any surface that birds can reach and chew. The MSPCA‑Angell article 'Diagnosing and Treating Heavy Metal Toxicosis in Birds, MSPCA‑Angell' documents that galvanized metal is a common source of zinc poisoning in birds Diagnosing and Treating Heavy Metal Toxicosis in Birds — MSPCA‑Angell. The safer choice is 304 or 316 stainless steel, which is non-toxic, corrosion-resistant, and holds up outdoors for decades. Use 316 stainless if you are in a coastal or high-humidity environment for added chloride resistance.
| Material | Safety rating | Best use | Notes |
|---|---|---|---|
| 304 stainless steel mesh | Excellent | All interior mesh, outdoor mesh | Non-toxic, durable, specify wire gauge and opening size on order |
| 316 stainless steel mesh | Excellent | Coastal/high-humidity outdoor builds | Higher corrosion resistance than 304, costs more |
| Powder-coated steel | Good (if certified) | Frame panels, cage body | Confirm coating is bird-safe and lead/zinc free; chips can expose bare metal |
| Galvanized wire (new) | Poor | Structural framing only, out of bird reach | Zinc coating is a toxicity risk if chewed or corroded; avoid near birds |
| Aluminum (anodized) | Good | Frames, door hinges | Lightweight, non-toxic when anodized; avoid raw aluminum that oxidizes |
| Untreated timber (hardwood) | Good | Frame, perches, base | Birds will chew; avoid treated timber with arsenic or copper preservatives |
| PVC-coated chicken wire | Poor | Not recommended | Too thin for predator exclusion; small mesh may trap bird feet |
| Lead paint or fittings | Dangerous | Never | Banned for good reason; check older hardware and second-hand cages |
For mesh specifically, use 1/4 inch to 1/2 inch opening stainless steel hardware cloth for small birds. The 1/4 inch size stops rodent intrusion and prevents birds from pushing their heads through gaps. Specify the wire diameter and gauge when ordering from industrial suppliers, and pull a manufacturer datasheet to confirm stainless grade. Thin 'chicken wire' is not predator-proof and is not appropriate for any permanent aviary build.
Tools and materials list
For a timber-frame flight cage or small indoor aviary
- Measuring tape, carpenter's square, pencil
- Circular saw or miter saw for timber framing
- Drill and driver with assorted bits
- Staple gun (heavy-duty, 1/2 inch staples) for attaching mesh to timber frame
- Wire cutters and tin snips for cutting mesh
- Sandpaper (80 and 120 grit) for smoothing timber edges
- 304 stainless steel welded wire mesh (1/4 or 1/2 inch opening, specify gauge)
- Untreated pine or cedar 2x2 or 2x4 framing lumber
- Stainless steel or zinc-free screws and hinges
- J-clips or C-rings with J-clip pliers for joining mesh panels (optional but clean)
- Door latch rated for your bird species (parrots open simple spring latches)
- Non-toxic wood sealant for any timber exposed to moisture
Additional tools for outdoor walk-in aviaries
- Post-hole digger or auger for setting corner posts
- Concrete mix for footings
- Level (24 inch or longer)
- Roofing material: corrugated polycarbonate, timber sheeting, or metal roofing panels
- Weatherproof exterior screws and post anchors
- Gravel or pavers for base drainage layer
Step-by-step build walkthrough
Step 1: Cut and prepare your frame
Cut your timber framing to your planned dimensions. For detailed plans and step-by-step measurements, see how to build bird cage. Sand all cut edges smooth because splintered timber injures feet and gives birds a starting point to shred the frame faster than you expect. For an indoor flight cage, a rectangular box frame with internal cross-members at door level and a separate top panel is the most straightforward approach. Pre-drill all screw holes to prevent wood splitting. If you are building outdoors, set corner posts in concrete footings at least 18 inches deep and let them cure fully before attaching any framing. Photo tip: photograph each stage before adding the next layer, especially before mesh goes on, so you can reference the internal structure later.
Step 2: Attach mesh panels
Cut your stainless mesh panels about 1 inch larger than each frame opening on all sides so you have material to fold and staple over the timber edge. Fold the outer half-inch of mesh back on itself with pliers before stapling to eliminate sharp wire ends that can cut bird feet or your hands. Staple every 2 to 3 inches along the timber frame, and add a trim strip of thin timber batten over the stapled edge for a clean, snag-free finish. For outdoor builds, use J-clips to join mesh panels at corners rather than leaving raw overlapping edges. Double-check every seam: run a gloved hand over all mesh surfaces and feel for protruding wire ends or loose staples before birds go anywhere near the structure.
Step 3: Build and hang the door
A walk-in outdoor aviary must have a double-door vestibule, sometimes called a sally port or airlock. This is an outer door into a small enclosed entry space, then a second inner door into the main aviary. This design is standard practice in professional aviaries and prevents birds from escaping when you enter with food, equipment, or during cleaning. For step-by-step plans and measurements specific to breeding setups, see how to build bird breeding cages. The BVAAWF/FRAME/RSPCA/UFAW joint report 'Laboratory birds: refinements in husbandry and procedures' recommends providing a double‑door vestibule (sally‑port) on flight aviaries to prevent accidental escapes blank" rel="noopener noreferrer">Laboratory birds: refinements in husbandry and procedures (BVAAWF/FRAME/RSPCA/UFAW joint report). Build the vestibule as a separate framed box, roughly 36 by 36 inches minimum, attached to the main structure. For smaller indoor flight cages, a single door with a reliable two-step latch (parrots are clever enough to work simple spring latches) is sufficient. Use stainless or powder-coated hinges and confirm they are rated for outdoor use if applicable.
Step 4: Roof and weatherproofing
Indoor flight cages can use a mesh top panel. Outdoor aviaries need a solid roof over at least one-third of the footprint to provide shelter from rain, direct sun, and bird-of-prey harassment from above. A sloped corrugated polycarbonate panel is lightweight, transmits some daylight, and sheds rain cleanly. Overlap roof panels by at least 4 inches and seal the ridge joint with compatible roofing tape. On any timber exposed to weather, apply a bird-safe non-toxic exterior sealant or use naturally rot-resistant species like cedar. Check that all roof fasteners are flush and that no sharp screws or nails protrude downward into the bird space.
Step 5: Add perches, substrate and enrichment
Perch variety matters more than perch quantity. Provide at least three to four different diameters and textures. Natural branches from bird-safe trees (apple, willow, birch, eucalyptus) are excellent because uneven surfaces exercise foot muscles and reduce the risk of pressure-sore pododermatitis. Avoid perches directly over food and water stations to reduce contamination. For substrate on the aviary floor, clean river sand or food-grade grit over a removable tray is easy to clean. Avoid gravel that is too coarse (foot injury risk) or wood chips that stay damp and harbor mold. Enrichment items like foraging puzzles, swings, and shreddable toys can be rotated weekly and add behavioral complexity without compromising structure safety.
Step 6: Safety check before birds enter
- Run a gloved hand over every mesh surface checking for sharp wire ends or protruding staples.
- Test every latch and hinge by opening and closing the door multiple times; confirm it latches securely without force.
- Check that no gap anywhere in the structure exceeds the mesh opening size (no 'corner gaps' where framing members meet mesh unevenly).
- Confirm all timber is sanded smooth and that no treated or chemically finished wood is accessible to birds.
- Verify that no galvanized, zinc-coated, or painted hardware is within chewing reach.
- Rinse the entire interior with clean water and allow to dry fully before introducing birds.
Species-appropriate requirements overview
The single biggest welfare upgrade you can give a small pet bird is more horizontal flight space. Authoritative welfare guidance from groups like the RSPCA explicitly recommends that social small species such as budgerigars and cockatiels should have aviary or flight access rather than being permanently confined in small cages. The core principle is that the bird must be able to fully stretch both wings simultaneously without touching any surface. Beyond that minimum, the goal is enough length for meaningful straight-line flight. Expert joint-working groups on laboratory bird husbandry propose a sensible minimum footprint for small species (under roughly 500 g) of around 2 meters by 4 meters with 2 meters of height, specifically because this allows some straight flight. You do not necessarily need to build to that scale for a small pet flock, but the principle of maximizing horizontal length should drive every design decision. Prioritize length over height every time.
Social needs vary by species. Budgies and cockatiels are flock animals and do poorly in isolation; canaries are more territorial and often housed in individual cages or very large flights where visual separation is possible. Breeding setups require additional privacy zones: nest boxes, visual barriers between pairs, and separate feeding stations to reduce competition. Think about behavior before you finalize your layout.
Cockatiels: dimensions and design notes
Cockatiels are active, curious birds that use vertical space for climbing as well as horizontal space for flight. A single pet cockatiel housed part-time in a cage while getting supervised out-of-cage flight time needs a cage that is at minimum 24 inches wide, 24 inches deep, and 30 inches tall, but this is a genuine minimum, not a target. For a dedicated indoor flight cage or small aviary where the bird spends most of its time, aim for 48 inches or more in length, 24 inches deep, and 36 inches tall. For step‑by‑step plans, material lists, and cockatiel‑specific measurements, see a dedicated guide on how to build a bird cage for cockatiels (internal resource ID 2312538a-351d-450c-bdf4-77edf0f932c3). For a pair or small group, scale up proportionally: add roughly 18 to 24 inches of length per additional bird.
| Setup type | Minimum length | Minimum depth | Minimum height | Bar/mesh spacing |
|---|---|---|---|---|
| Single bird part-time cage | 24 in (61 cm) | 24 in (61 cm) | 30 in (76 cm) | 5/8 in (1.6 cm) |
| Single bird primary housing | 48 in (122 cm) | 24 in (61 cm) | 36 in (91 cm) | 5/8 in (1.6 cm) |
| Pair or small flock flight cage | 60–72 in (152–183 cm) | 24–30 in (61–76 cm) | 36–48 in (91–122 cm) | 5/8 in (1.6 cm) |
| Walk-in aviary (flock) | 120 in / 10 ft+ (305 cm+) | 48 in / 4 ft (122 cm) | 72–84 in (183–213 cm) | 1/2 in mesh (1.3 cm) |
Bar or mesh spacing should be no wider than 5/8 inch (about 1.6 cm) for cockatiels. Wider gaps allow head entrapment, which causes panic injuries and, in worst cases, strangulation. Perch diameter should fall in the 1/2 inch to 1 inch range (approximately 1.3 to 2.5 cm), with at least two different diameters provided. Cockatiels are enthusiastic chewers, so any timber framing they can reach will be worked on; use harder woods or protect framing edges with stainless trim. For a walk-in cockatiel aviary, include multiple perch levels at different heights, a sheltered nesting alcove if you are breeding, and at least one visual barrier panel (a partially opaque section of wall) so subordinate birds can escape line of sight from dominant birds.
Parakeets and budgies: dimensions and design notes
Budgerigars are among the most aerobatic small birds commonly kept as pets, and they suffer most visibly from undersized housing. A single budgie kept as a pet with regular out-of-cage flight can be housed in a cage as small as 18 inches long, but this is not a welfare-positive target. For a bird that will spend most of its time in the enclosure, avian care guidance consistently recommends a flight-cage length of at least 36 inches (about 90 cm), and many sources push for 60 to 73 inches (approximately 150 to 186 cm) or more to allow genuine straight-line flight. For a flock of four to six budgies, a purpose-built flight cage or small walk-in aviary in the range of 72 to 90 inches long is a practical and humane goal.
| Setup type | Minimum length | Minimum depth | Minimum height | Bar/mesh spacing |
|---|---|---|---|---|
| Single bird minimum cage | 18 in (46 cm) | 18 in (46 cm) | 24 in (61 cm) | 1/2 in (1.3 cm) |
| Single/pair primary housing | 36–48 in (90–122 cm) | 18–24 in (46–61 cm) | 24–30 in (61–76 cm) | 1/2 in (1.3 cm) |
| Small flock flight cage (4–6 birds) | 60–72 in (152–183 cm) | 24 in (61 cm) | 30–36 in (76–91 cm) | 1/2 in (1.3 cm) |
| Walk-in aviary (6+ birds) | 96 in / 8 ft+ (244 cm+) | 48 in (122 cm) | 72 in (183 cm) | 1/2 in mesh (1.3 cm) |
Bar spacing for budgies should not exceed 1/2 inch (1.3 cm). Their small heads can pass through wider gaps and their feet can become entrapped in larger mesh. Perch diameters in the range of 1/2 inch to 3/4 inch (about 1.3 to 1.9 cm) suit budgies best. Vary textures with natural branches and rope perches. Budgies are social and should ideally be kept in pairs or groups; a flock flight cage is a more natural setup than a single-bird cage. If you are building a breeder setup, include individual nest-box compartments with dividers and plan for separate feed access per pair to reduce aggression. The design principles for a budgie flight cage are closely related to building a general bird flight cage, and many of the same framing and mesh techniques apply directly.
Canaries: cage vs. aviary considerations and per-bird space guidelines
Canaries sit in an interesting middle ground because they are territorial and do not thrive in crowded conditions the way flock-oriented budgies do, yet they still need significant horizontal space for flight and exercise. The key distinction for canary housing is between a single-bird show or pet cage, a flight cage for one or two birds to exercise, and a colony aviary for multiple birds. Each has different design requirements.
Per-bird space guidelines for canaries
For a single canary used primarily for singing and companionship, a minimum cage of 24 inches long by 16 inches deep by 18 inches tall is a workable starting point, but again, this is a floor not a goal. A flight cage for one or two canaries should be at least 36 inches long to allow meaningful wing movement. For a detailed step-by-step plan, materials list, and diagrams, see how to build a canary bird cage. The RSPCA principle applies here too: the bird must be able to fully extend both wings without touching the sides. For a colony aviary housing four or more canaries, plan for at least 18 to 24 inches of flight length per bird, which quickly pushes you toward a purpose-built flight cage or walk-in structure. Male canaries will fight during breeding season, so colony housing outside of breeding season is more practical unless you have large enough space for territorial spacing.
| Setup type | Minimum length | Minimum depth | Minimum height | Bar/mesh spacing |
|---|---|---|---|---|
| Single pet canary cage | 24 in (61 cm) | 16 in (41 cm) | 18 in (46 cm) | 1/2 in (1.3 cm) |
| Flight cage (1–2 birds) | 36–48 in (90–122 cm) | 18 in (46 cm) | 24 in (61 cm) | 1/2 in (1.3 cm) |
| Colony flight cage (4–6 birds) | 72 in (183 cm) | 24 in (61 cm) | 30–36 in (76–91 cm) | 1/2 in (1.3 cm) |
| Walk-in aviary (6+ birds) | 96 in / 8 ft+ (244 cm+) | 48 in (122 cm) | 72 in (183 cm) | 1/2 in mesh (1.3 cm) |
Perch sizing for canaries is slightly smaller than for parrots: aim for 3/8 inch to 7/8 inch diameter (approximately 1 to 2.2 cm). Natural branches in this size range, plus one or two commercial rope perches for variety, cover the range well. Canaries do not typically chew framing the way parrots do, so timber frames hold up better in canary aviaries. That said, all the same material safety rules apply: no galvanized wire within reach, no treated timber, and stainless mesh on all bird-accessible surfaces. For breeding canaries, provide individual nest cup holders at consistent heights and ensure each pair has clear visual separation from neighboring pairs; hanging a partial divider panel between territories within a larger colony aviary reduces fighting significantly.
Cleaning, pest control and disease prevention
A well-built aviary is much easier to clean if you design for it from the start. Pull-out waste trays under the floor, removable perch holders, and smooth surfaces without ledges where droppings accumulate all reduce cleaning time dramatically. The correct sequence for any aviary clean is mechanical removal of all organic material first, then disinfection, then thorough rinsing before birds return. This order matters: disinfectants are far less effective against viruses and bacteria when applied over organic debris. The US EPA maintains a registered product list (List M) for products effective against avian influenza; during any suspected disease event, use an EPA-listed product, follow the label contact time exactly, and rinse all surfaces before birds are reintroduced. Birds should never be exposed to strong disinfectant fumes or residues.
For pest control, the best approach is structural exclusion. A 1/4 inch mesh base panel under the aviary floor, combined with buried perimeter mesh extending at least 12 inches underground on outdoor builds, stops rodents from entering. Rodents carry disease, steal food, and stress birds with nighttime disturbance. Inside, remove uneaten food nightly, store seed in sealed metal containers, and check the floor substrate for signs of digging or droppings weekly. Red mite is a common pest in canary and finch aviaries in particular; inspect perch ends and dark corners regularly, and treat with a veterinarian-recommended product, not household pesticides.
Weatherproofing for seasonal changes
Outdoor aviaries need active seasonal management, not just construction weatherproofing. In winter, cover exposed mesh panels with clear polycarbonate sheeting or heavy-duty greenhouse film on the windward and north-facing sides, leaving at least one mesh panel partially open for air exchange to prevent respiratory disease from moisture buildup. In summer, add shade cloth over the roof panel if solar gain raises the internal temperature above 85 degrees F (29 degrees C). Canaries, parakeets, and cockatiels are all temperate or semi-arid species that can tolerate mild cool weather but are sensitive to sudden temperature swings, drafts, and sustained damp conditions. If your region experiences hard frosts, consider whether a heated indoor space is more appropriate than an outdoor aviary for small species through winter.
Humane trap cage use: legal and rescue context only
Trap cages exist as a topic because escaped pet birds sometimes need to be recaptured, and wildlife rescue operations use humane traps to collect injured wild birds for veterinary care. This guide covers trap cage design only in those two contexts. Using a trap to capture wild birds for permanent keeping is illegal in most jurisdictions without a specific permit, and attempting to keep protected native species without authorization violates federal law in the US under the Migratory Bird Treaty Act. If you are building or using a trap cage for any purpose, verify the legality in your jurisdiction first. For escaped pet bird recovery, a simple spring-door trap baited with familiar food inside a familiar-looking cage, placed in the bird's last known area, is the most commonly used method. If you need step-by-step construction details for a humane capture device, see our practical guide on how to build a bird trap cage. Always monitor the trap continuously so a recaptured bird is not left unattended in a small enclosure, and release any unintended captures immediately.
Enrichment and decorative ideas that keep welfare first
A structurally safe and correctly sized aviary is the foundation, but enrichment is what makes it a genuinely good environment. The principle here is simple: add interest without adding risk. Rotate foraging toys every week or two rather than leaving the same items until birds stop engaging with them. Use food-safe, non-toxic dyes if you want colorful enrichment items. Live bird-safe potted plants (spider plants, wheatgrass, safe herbs like basil) add visual complexity and give birds something to interact with. Hang different perch types at varied heights and angles to encourage movement throughout the space rather than habitual use of two or three spots. For outdoor aviaries, plant low-toxicity shrubs or grasses adjacent to the mesh to give birds natural visual stimulation through the wire. Avoid anything with loose fibers that can tangle toes, painted items with unknown paint composition, or mirrors that cause chronic stress in territorial species like canaries.
Troubleshooting common problems
| Problem | Likely cause | Fix |
|---|---|---|
| Bird escaping through mesh | Mesh opening too large or corner gap in framing | Replace with 1/2 in or smaller mesh; add timber batten over all seams and corners |
| Rust appearing on wire | Galvanized or low-grade steel used | Replace with 304/316 stainless mesh; this is not cosmetic, it is a zinc toxicity risk |
| Rodent intrusion | No buried perimeter mesh or floor exclusion | Add 1/4 in mesh skirt buried 12 in deep and/or a solid or mesh floor panel |
| Birds repeatedly avoiding one area | Draft, temperature extreme, or predator harassment from outside | Check for drafts, add shade, install a visual barrier on the affected side |
| Droppings on food/water constantly | Perches positioned directly above stations | Relocate perches so no perch is directly overhead of any food or water container |
| Persistent foot sores (pododermatitis) | Only one perch diameter and texture available | Add at least 3 different diameter perches with varied textures; remove plastic dowel perches |
| Condensation and damp inside aviary | Insufficient ventilation | Ensure at least one fully open mesh panel for air exchange; add a roof overhang to reduce rain entry |
| Birds not using added enrichment | Enrichment placed in high-traffic area or is unfamiliar | Introduce new items near familiar perches first; move gradually to new locations over several days |
Building an aviary is an iterative project. The first version you build will teach you more about your specific birds and site than any guide can. Take photos at every stage, keep notes on what you change and why, and do not treat the initial build as permanent. The best aviary is one you can modify, clean easily, and expand as your flock or skills grow.
FAQ
What are species-appropriate minimum dimensions and layout principles for cockatiels, parakeets (budgerigars) and canaries in cages, flight cages and aviaries?
Use safety-first space and flight principles: - Indoor cages (temporary/short-term): choose the largest cage you can fit; prioritize length over height for small parrots. For single budgerigar/cockatiel aim for a long axis ≥ 90–120 cm (36–48 in); larger is always better. Canaries require less length but need horizontal space for short flights (minimum ~60–90 cm / 24–36 in for single bird). - Flight cages/aviaries (regular flight access): target at least 1.0–2.0 m (3–6 ft) of continuous straight flight length for small parrots; community guidance often recommends flight-cage length 90–186 cm (36–73 in) as a practical range. - Full outdoor aviaries for social/small species (recommended lower bound for serious flight/husbandry): consider footprints near 2 m × 4 m × 2 m high (approx. 6.5 × 13 × 6.5 ft) as a sensible minimum when providing sustained straight flight for groups. - Layout rules: allow birds to fully extend wings without touching sides, include multiple perching levels and clear flight corridors, provide sheltered areas and branch/vegetation perches, and use a sally-port/double door for entry to prevent escapes.
Which mesh and construction materials are safe, durable and predator-resistant for indoor and outdoor aviaries?
Prioritize non-toxic, corrosion-resistant metals and appropriate mesh size/gauge: - Preferred metals: food-grade stainless steel 304 for general use; 316 stainless for coastal/marine environments. - Avoid: bare/ corroding galvanized wire and low-grade zinc alloys in bird-accessible areas (risk of zinc toxicosis if chewed). If galvanized is used only out of reach, ensure coatings are intact and inaccessible. - Mesh size: for small parrots and canaries use 1/4"–1/2" (6–13 mm) openings to prevent head/foot entrapment; choose heavier gauge (16–19 ga or comparable) stainless welded or woven hardware cloth for outdoor predator resistance. - Supply: buy from reputable industrial suppliers, specify stainless grade and wire diameter, and check manufacturer datasheets for tensile/gauge specs.
What tools and materials will I need for a typical DIY indoor cage repair up to building a backyard aviary?
Common tools and materials (photo-ready checklist): - Tools: tape measure, speed square, spirit level, cordless drill/driver, screw/sinker bits, stainless steel self-tapping screws/bolts, nut drivers, pop-rivet gun with stainless rivets (optional), bolt cutters or tin snips (for mesh), wire crimpers/hog ring pliers and stainless hog rings, angle grinder or jigsaw with metal blade (for framing cuts), staple gun for weatherproof fabric, caulk gun, ladder, work gloves, eye protection. - Materials: 304/316 stainless welded wire or woven hardware cloth (choose mesh size), stainless steel angle or tubing for frame, exterior-grade rot-resistant timber (if using wood but not for bird-accessible surfaces), stainless fasteners, marine-grade silicone sealant, polyethylene roofing or corrugated metal roofing (non-toxic paint), UV-rated shade cloth, predator-proof foundation materials. - Accessories: perches of varied diameters/materials (natural branches, manzanita, untreated hardwood; synthetic rope perches for variety), feeders/waterers, perching hardware, sally-port door hardware, rubber matting or removable droppings trays.
Step-by-step: How do I fix a simple indoor cage (replace mesh, add perches, secure doors) safely?
Quick repair walkthrough: 1) Remove bird(s) to a safe temporary cage; cover and quiet area. 2) Measure and photograph existing cage to order replacement parts. 3) Remove damaged mesh or hardware with cutters; wear PPE. 4) Cut replacement stainless mesh to size with allowance for fastening. 5) Attach mesh starting at one corner using stainless hog rings or screws/washers; keep mesh taut and edges finished to avoid sharp points. 6) Replace or add perches with varied diameters (budgie/cockatiel: ~1.3–2.5 cm; canaries: ~1–2.2 cm); ensure secure mounts and avoid adhesives that birds can peck. 7) Check door latches and add secondary catches; install a small internal latch or pin to prevent accidental openings. 8) Clean surfaces and allow any sealants/paints to fully cure and vent before returning birds. 9) Perform a safety inspection (no sharp edges, no loose fasteners, mesh secure).
Step-by-step: How do I build a small backyard flight aviary suitable for budgerigars/cockatiels (DIY frame + mesh)?
Condensed build plan (typical small flight aviary ~2 m long × 1–2 m deep × 2 m high): 1) Plan and permit: confirm local zoning and AWA/USDA obligations if you breed/sell above thresholds; check HOA rules and bird import/export laws. 2) Site prep: level area, consider concrete or compacted gravel footing and predator-proof skirt (bury mesh 30–45 cm). 3) Build frame: construct a rigid frame from stainless or powder-coated steel tubing or rot-resistant timber (note: wood must not be chewed by birds). Use bracing and anchor to ground. 4) Install sally-port: build double-door vestibule with inward-opening inner door and outward outer door; test for escape prevention. 5) Attach mesh: fix 304/316 stainless hardware cloth to frame with stainless hog rings or screws and washers; overlap seams and seal/cover sharp edges. 6) Create shelter: build a roofed sheltered area with solid weatherproof roof and insulated nest/shelter boxes. 7) Add perches, feeding zones and enrichment: arrange multiple perch diameters, vegetation/branches, swing toys, bathing stations and foraging devices. 8) Weatherproofing: add shade cloth, guttering, and predator locks; orient aviary to avoid prevailing cold drafts and midday sun. 9) Final inspection: check for gaps, sharp edges, structural soundness and predator vulnerabilities; run a day/night trial without birds to test security.
How do I design and build a breeder setup while staying within legal/regulatory frameworks?
Regulatory and design guidance: - Legal: determine whether federal/state/local laws apply (in the U.S. the USDA AWA bird standards may require licensing/inspection for certain breeder thresholds; check APHIS bird standards and local ordinances). - Design: separate breeding compartments with safe nesting boxes sized for the species, quarantine/illness isolation enclosures, and secure record-keeping space. Provide per-bird space for pair nesting plus aviary flight access; ensure nest box size and placement suit species. - Biosecurity: include dedicated cleaning stations, footbaths (as appropriate), airflow separation from general housing, and strict quarantine procedures for new birds. - Husbandry: plan routine health checks, egg/nest monitoring, and recordkeeping to meet inspection readiness.