You can build a safe, durable outdoor bird cage in a weekend using pressure-treated or cedar lumber for the frame, stainless steel or powder-coated welded wire mesh for the walls, and stainless steel hardware throughout. The key things that separate a good outdoor build from a dangerous one are material choices (no galvanized wire around chewing birds, no toxic paint), sizing that actually fits your bird's wingspan and tail, and structural details that keep predators out and your bird safely in.
How to Build an Outdoor Bird Cage: Step-by-Step DIY

Maya Bennett
14 May 2026
Decide the right outdoor cage design for your bird
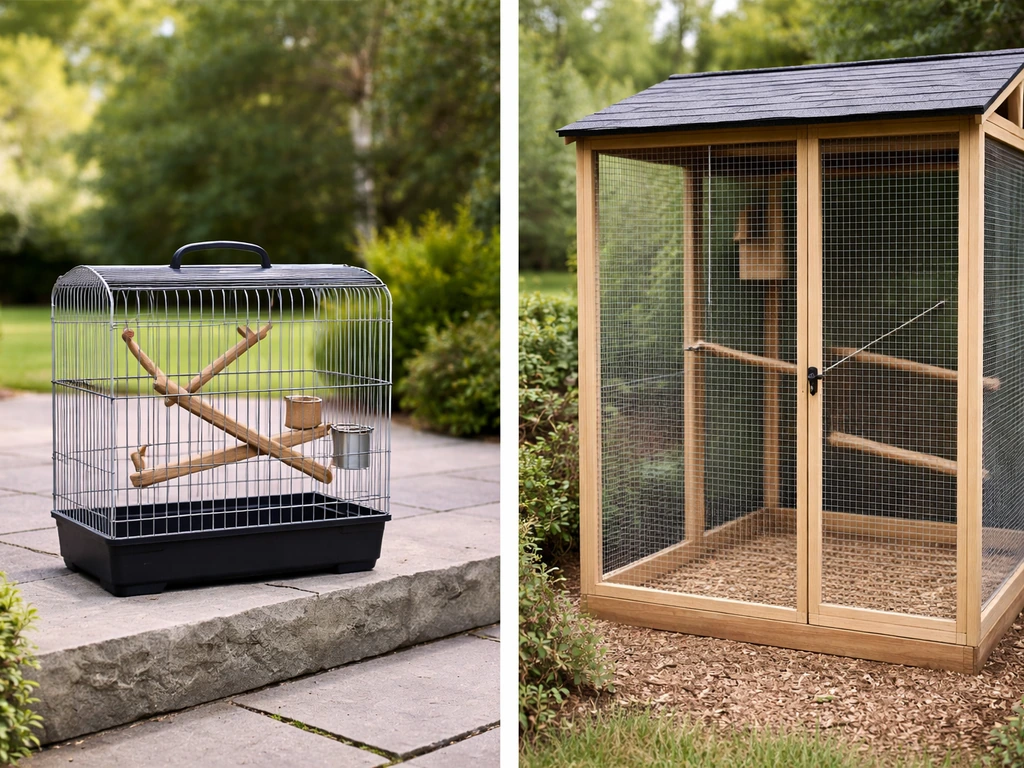
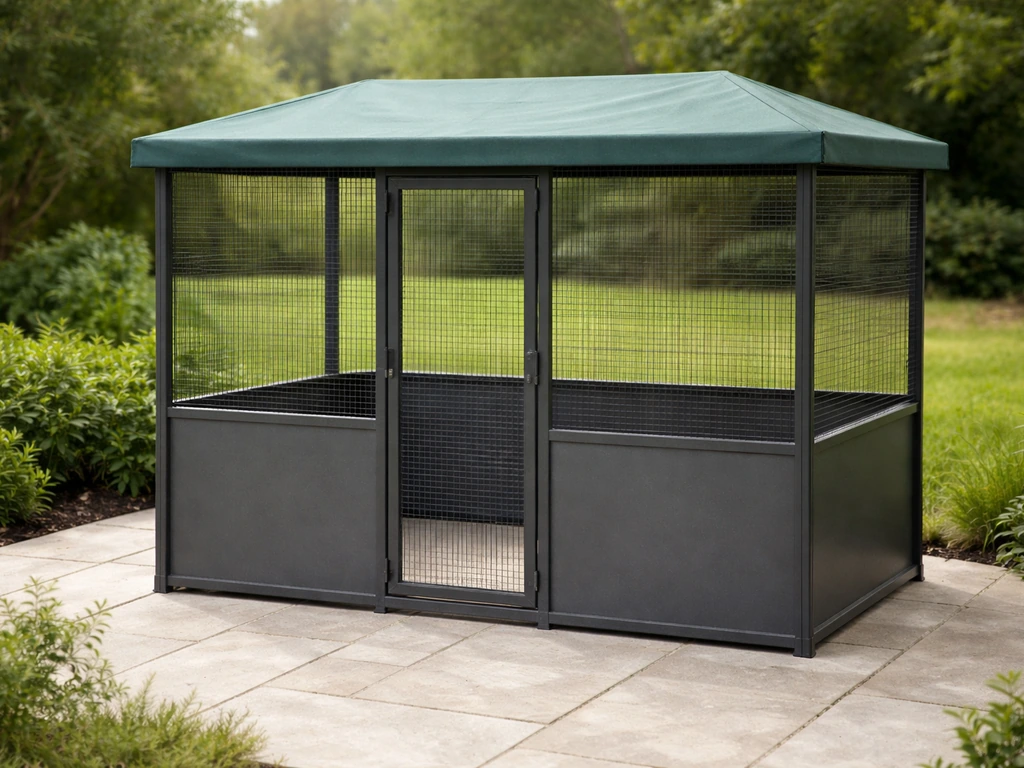
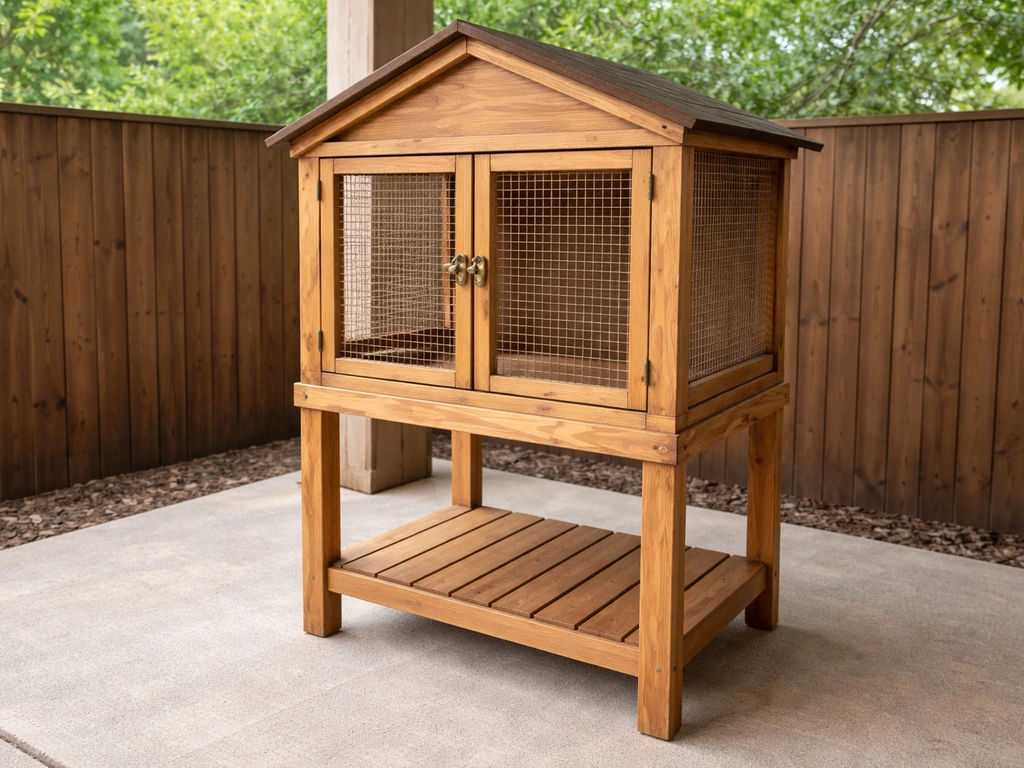
Before you cut a single board, you need to know what kind of structure you're actually building. Outdoor bird cages fall into a few practical categories: a portable cage with a solid frame and mesh sides that you move seasonally, a fixed walk-in aviary attached to an existing structure, and a freestanding flight cage on a permanent concrete or paver base. This section is also a useful guide for how to build an aviary bird cage that fits your space and your birds fixed walk-in aviary. For most pet bird owners with one or two birds, a fixed freestanding flight cage or small walk-in aviary is the most practical option, and the RSPCA describes aviary-style outdoor housing as the best way to meet a pet bird's environmental needs.
Your bird species drives the design more than anything else. Small birds like budgies, finches, and canaries need fine mesh spacing (1/4 to 1/2 inch) and a minimum starting size of around 18 x 18 x 24 inches for a pair, though going bigger is always better. Cockatiels and lovebirds need at least 24 x 24 x 36 inches with 5/8 to 3/4 inch bar spacing. If you're building for larger parrots or a mixed-species setup, check the specific spacing and sizing requirements for your species before committing to a design. Building an outdoor cage for cockatiels or parakeets specifically is worth its own deep dive, and those builds share a lot of the steps here.
Think about access from the start. A walk-in design lets you clean easily and interact with your birds, but even a smaller cage needs a door large enough to reach every corner. If you plan to breed birds, a partitioned internal layout matters too. If you are specifically planning a canary setup, use these same outdoor build principles and dimensions so your canary bird cage is safe and comfortable For breeding setups, a dedicated build approach helps a lot.. If you’re specifically building bird breeding cages, use a partitioned layout so you can keep pairs separated when needed and manage nesting safely If you plan to breed birds. For breeding setups, a dedicated build approach helps a lot.
| Bird Type | Minimum Cage Size | Bar/Mesh Spacing | Recommended Build Style |
|---|---|---|---|
| Budgies (pair) | 18" x 18" x 24" | 1/4" to 1/2" | Flight cage or small aviary |
| Finches (pair) | 8" x 30" x 18" | 1/4" to 1/2" | Flight cage |
| Cockatiels/Lovebirds | 24" x 24" x 36" | 5/8" to 3/4" | Flight cage or walk-in aviary |
| Conures | 24" x 24" x 36" | 5/8" to 3/4" | Walk-in aviary |
| Large parrots | Species-dependent, larger | 3/4" to 1" | Walk-in aviary or full aviary build |
Plan dimensions, location, and weather protection
Sizing is the one thing people consistently underestimate. The rule from Florida's standard caging requirements is worth keeping in mind: birds must be able to perch without their tail feathers touching the floor, have full head clearance in a normal posture, and be able to extend their wings. For every additional bird you add, increase the original floor area by at least 25 percent. A minimum dimension of 60 cm (about 24 inches) in any direction is a sensible floor for any bird, and that's really a bare minimum, not a target.
Location is as important as size. You want partial sun and partial shade throughout the day, ideally in a spot that gets morning sun and afternoon shade in summer. Avoid low-lying areas where water pools, spots directly under trees where wild birds perch overhead and drop droppings, and anywhere near a garage or garden shed where fumes from paint, pesticides, or fuel can drift over. Think about airflow too: enough breeze to keep things fresh, but not a wind tunnel.
For wind protection, the RSPCA recommends that solid cladding run continuously around at least three walls and cover roughly one-third of the total area of those walls. In practice this means one solid wall and solid panels along the lower third of two adjacent walls, with the fourth side more open for airflow and visibility. The roof should always be solid or covered, both for rain and for predator deterrence.
- Orient the solid wall toward the direction of your prevailing wind (usually north or northwest in the US)
- Leave the south or east-facing side more open for morning light
- Plan for a covered overhang of at least 12 inches beyond the mesh walls on all sides
- Raise the cage floor at least 6 inches off the ground on a frame or concrete base to prevent moisture buildup and deter rodents
- Keep the cage away from outdoor cooking areas, chemical storage, and heavy foot traffic zones
Choose bird-safe outdoor materials and hardware

This is the section that saves birds' lives, so pay attention here. The two biggest material hazards in outdoor cage builds are galvanized wire and toxic coatings. Galvanized wire contains zinc and sometimes lead, both of which cause heavy metal toxicosis in birds. Brighter galvanized finishes actually indicate higher zinc content.
If your bird chews on the cage at all, galvanized wire is a genuine poisoning risk. The safest mesh choices for an outdoor build are welded stainless steel wire mesh or powder-coated welded wire mesh. Stainless steel costs more but lasts essentially forever outdoors and is completely safe. Powder-coated steel is a good middle-ground option as long as the coating is intact and the powder coat is applied over steel (not galvanized) wire.
For the frame, untreated cedar, redwood, or Douglas fir are the classic choices because they're naturally rot-resistant and completely non-toxic to birds. Pressure-treated lumber is fine for the base/foundation that sits on the ground and doesn't contact the cage interior, but avoid it anywhere birds can chew it directly. If you want a metal frame, powder-coated steel tube or aluminum extrusion both work well outdoors.
Every piece of hardware, including hinges, latches, screws, and bolts, should be stainless steel. Standard zinc-plated or galvanized hardware corrodes quickly outdoors and poses the same zinc toxicity risk as galvanized mesh. Use stainless steel screws throughout, and look for marine-grade stainless if you're in a humid climate.
| Material | Best Use | Safety Rating | Notes |
|---|---|---|---|
| Stainless steel welded mesh | Walls and ceiling mesh | Excellent | Most expensive but safest and longest-lasting |
| Powder-coated welded wire | Walls and ceiling mesh | Good | Safe when coating is intact; inspect regularly for chips |
| Galvanized wire | Avoid for bird contact areas | Poor | Zinc/lead toxicity risk, especially for chewing species |
| Cedar/redwood lumber | Frame, perches, panels | Excellent | Naturally rot-resistant, bird-safe, no treatment needed |
| Pressure-treated lumber | Base/foundation only | Acceptable | Keep away from areas birds can chew |
| Aluminum hardware/frame | Frame extrusions, hinges | Good | Lightweight, rust-proof, bird-safe |
| Stainless steel hardware | Screws, latches, hinges | Excellent | Use throughout; avoid zinc-plated alternatives |
If you want to paint or seal any wood surfaces, use a bird-safe, water-based paint or sealant and let it cure completely (at least 72 hours with good ventilation) before birds have access. Avoid oil-based paints, lead-based paints, and any coating that contains zinc compounds.
Build steps: frame, walls and mesh, doors, and secure latches
Here's the build sequence I recommend. If you specifically need a bird trap cage instead of a general outdoor enclosure, focus on secure one-way access and release-safe construction methods. If you want a complete, step-by-step walkthrough of the whole build, see our guide on how to build a bird cage from frame to final latch how to build bird cage. Work in this order and you'll avoid the most common mistakes, like cutting mesh before you have a solid frame to attach it to, or discovering your door opening is too small after everything is assembled.
Tools and materials you'll need
- Measuring tape, speed square, and pencil
- Circular saw or miter saw for lumber
- Drill and assorted bits (including a countersink bit)
- Tin snips or an angle grinder with a cut-off disc for mesh
- Staple gun with heavy-duty 1/2" staples (for tacking mesh before screwing)
- J-clips or hog ring pliers and clips (for joining mesh sections)
- Stainless steel screws (1-1/4" and 2-1/2" lengths)
- Cedar, redwood, or Douglas fir 2x4s for the frame
- Stainless steel or powder-coated welded wire mesh in your chosen gauge and spacing
- Stainless steel hinges (at least two per door), barrel bolt latches, and carabiner-style spring locks
- Roofing material: corrugated polycarbonate panels or galvanized steel roofing (kept away from bird contact)
- Level
Step 1: Build the base frame
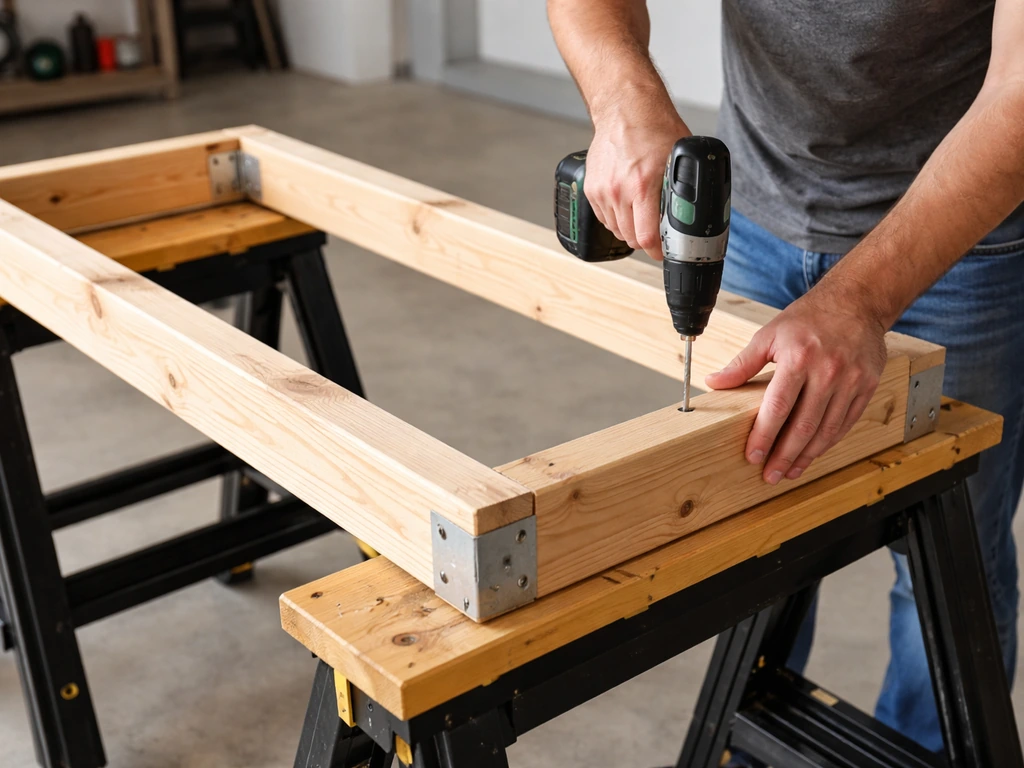
Start with the floor frame. Cut your 2x4s to form a rectangle matching your planned cage footprint. Use corner brackets and 2-1/2 inch stainless screws to join the corners, checking square with your speed square. Add cross-members every 16 to 24 inches for rigidity. If this base will sit directly on the ground or pavers, use pressure-treated lumber here. If it will be elevated, cedar works fine. Drill 1/2 inch drainage holes in any solid floor panel so water doesn't pool.
Step 2: Build and raise the vertical frame
Cut your corner posts and any intermediate vertical members. For a cage up to 6 feet tall, 4x4 corner posts give good stability. Attach them to the base frame using post base hardware and stainless screws. Use your level constantly at this stage. A frame that's even slightly out of plumb will give you headaches when you hang doors and attach mesh. Add horizontal rails at the top and at intermediate heights (mid-height rails help support the mesh and are good door header/footer points).
Step 3: Attach solid wall panels
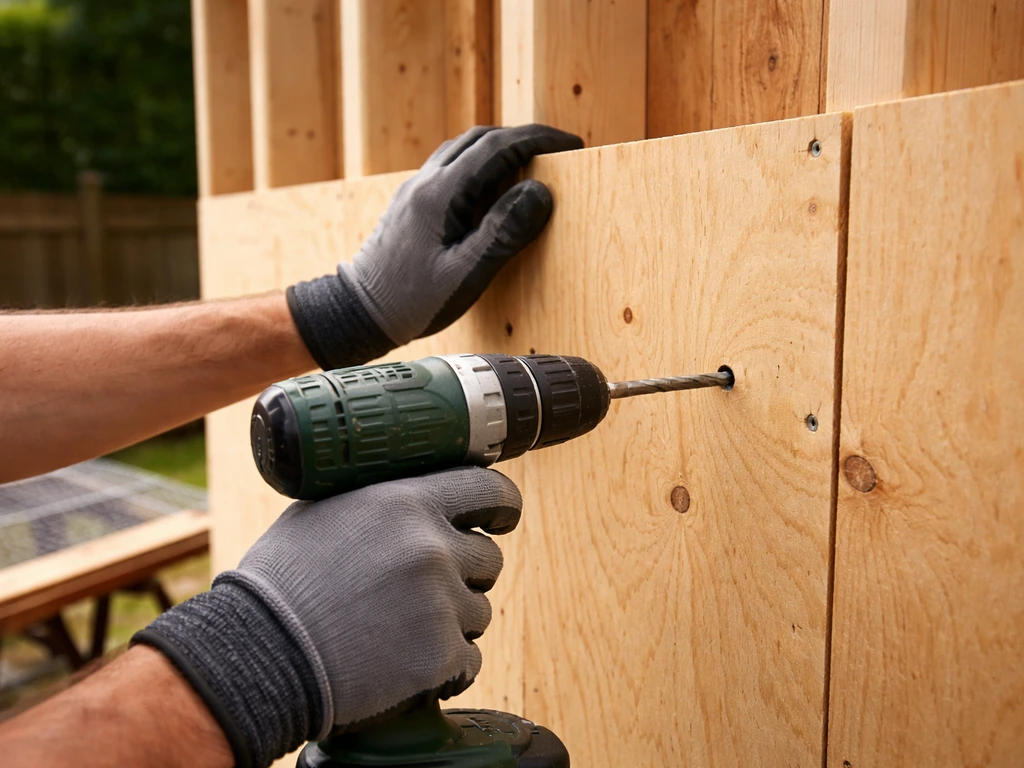
On your designated solid walls (remember: at least one full side and the lower third of two adjacent walls), attach exterior-grade plywood or cedar planking. Screw panels directly to your frame members. This is also the time to add any solid roof framing and attach your roofing material. Make sure the roof has at least a 1-in-12 pitch so rain runs off rather than pooling.
Step 4: Cut and attach mesh panels
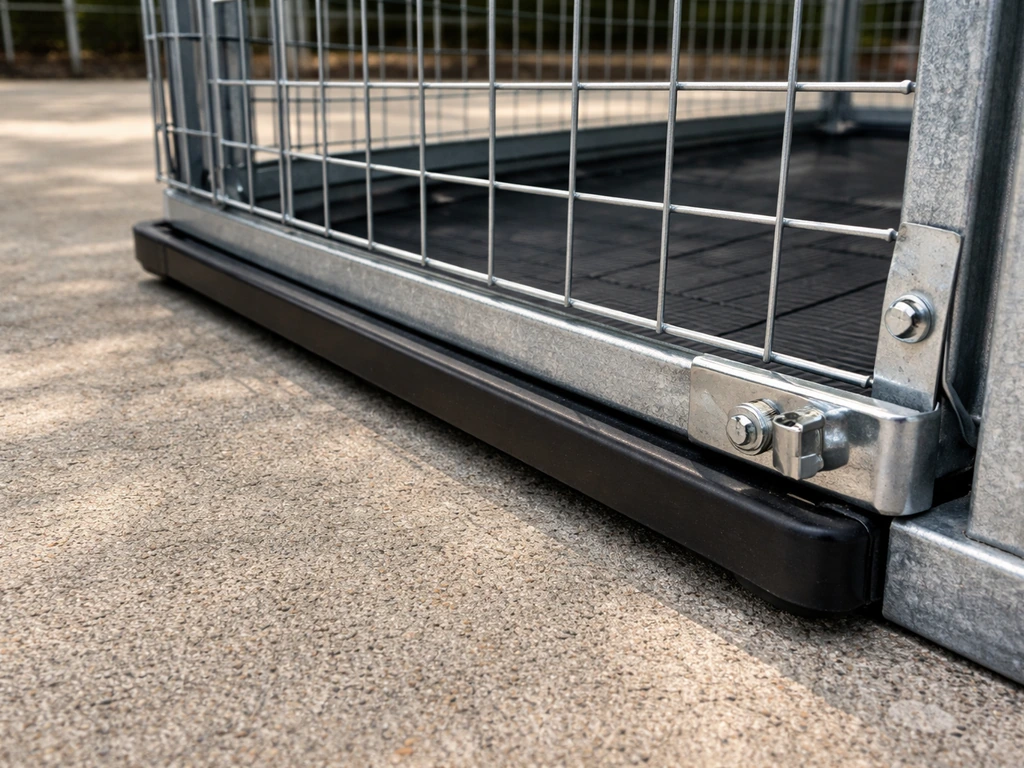
Measure each open panel and cut mesh to size using tin snips or an angle grinder. Wear gloves because cut wire edges are sharp. Tack the mesh temporarily with staples around the perimeter, then go back and secure it with wire staples or screws and fender washers every 6 inches. The perimeter attachment is critical: a predator (raccoon, cat) will work at any loose edge.
If you want to make a bird flight cage that stays secure long term, focus just as hard on predator-proofing as you do on the frame and mesh predator (raccoon, cat) will work at any loose edge. Fold any cut wire ends inward or cover them with J-clip trim or wood molding so your bird can't press its feet or face against a sharp edge.
Step 5: Build and hang doors
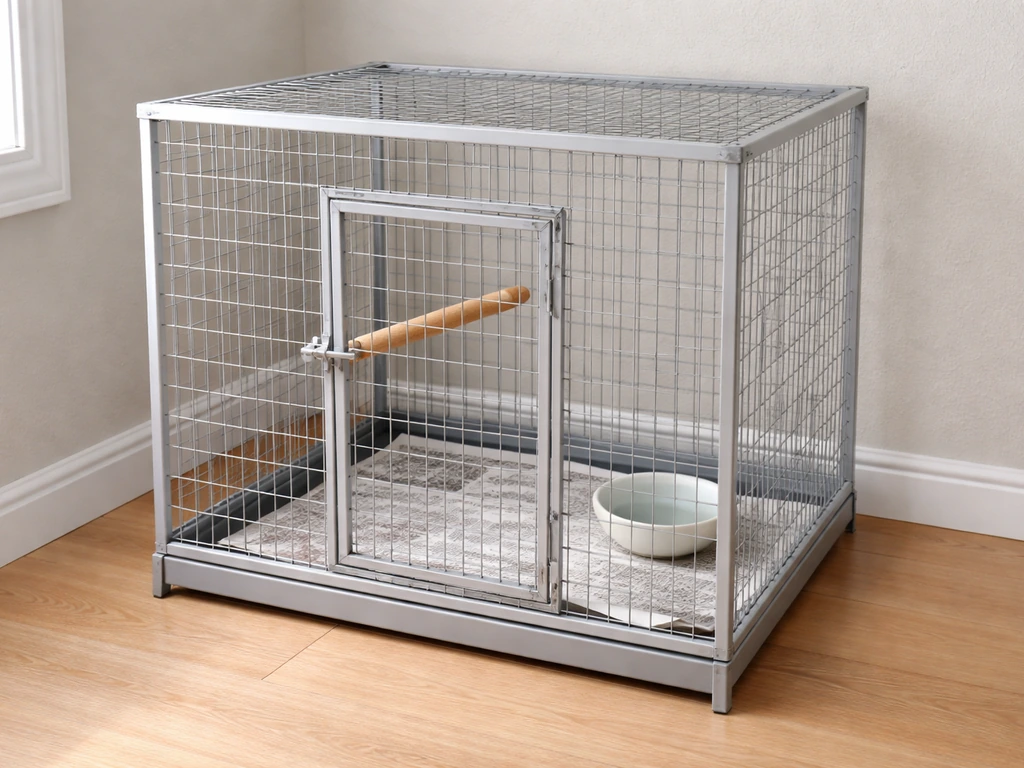
Build each door as its own small frame with mesh attached, sized to fit snugly in the opening with about 1/4 inch clearance on all sides. Hang it with at least two stainless steel hinges. Test the swing and confirm it closes flush. Make the main access door large enough to reach every corner of the cage comfortably, and at least large enough to get a nesting box in and out without tilting it sideways.
Step 6: Install latches
This is not a place to cut corners. Use at minimum a barrel bolt latch plus a secondary carabiner or spring snap on every door. Larger parrots and even clever cockatiels can work a single barrel bolt open. For walk-in doors, a padlock hasp adds another layer. Every latch should be operable with one hand while you're carrying something with the other. Test each one a dozen times before you put birds in.
Perches, accessories, and enrichment without safety compromises
Perch setup in an outdoor cage matters more than people think. The diameter of each perch should roughly match the size of your bird's foot: your bird's toes should wrap about two-thirds of the way around without fully closing or splaying flat. Variability is the goal, so use multiple perch diameters rather than all identical dowels. Natural wood branches from non-toxic trees (apple, willow, eucalyptus, and manzanita are all popular) make the best perches because their irregular surfaces exercise foot muscles and reduce pressure sores.
Avoid sandpaper perch covers. They seem like a practical nail-trimming solution but veterinary sources consistently advise against them because they abrade the bottoms of birds' feet and cause painful sores. Rope perches and wooden perches are the safe alternatives.
Place perches at different heights so your bird can choose a temperature zone (higher is warmer), and make sure no perch is positioned directly over food or water dishes so droppings don't contaminate them. In an outdoor cage, leave the highest perch clear of the solid roof area so your bird gets airflow when it wants it.
- Natural wood branches: the first choice for perches, safe and stimulating
- Rope perches: good for variety, check regularly for fraying and replace before threads become a tangle/ingestion hazard
- Foraging toys hung from the mesh or roof frame (stainless steel hooks only)
- Cuttlebone or mineral block mounted to the frame for beak maintenance
- Nest boxes or roosting shelves positioned in the sheltered solid-wall corner
- Food and water stations at a mid-height level, easy to reach and easy to clean
- A shallow bird bath inside or adjacent to the cage (change water daily)
Keep enrichment items made from bird-safe materials only. Avoid items with zinc hardware (many cheap toys have galvanized quick links), bells with lead-solder joints, or anything with small parts a bird can swallow. Rotate toys regularly to maintain interest, but never add so many that your bird can't fly or move freely between perches.
Covers, shelter, and seasonal care setup
The solid roof and partial solid walls you built already handle most of the weather protection, but you'll want additional covers for specific seasons and conditions. A breathable waterproof cage cover for the open mesh sides is worth making or buying for rain, cold nights, and winter. Canvas tarps work, but purpose-cut covers with grommets and ties are neater and easier to secure. Avoid plastic sheeting directly against the mesh because it blocks airflow completely and can create a dangerous heat buildup on warm days.
In summer, your priority is preventing overheating. Add shade cloth (50 to 70 percent density) over the exposed sides if your morning-sun wall gets strong afternoon sun. Misters or a small fan positioned to create a gentle breeze (not blowing directly into the cage) help on very hot days. Keep fresh water available at all times and check it multiple times daily in heat.
In winter, most temperate pet bird species should not be left outdoors below 50 to 55 degrees Fahrenheit (10 to 13 degrees Celsius) without supplemental heat, and tropical species like parrots need temperatures consistently above 65 degrees Fahrenheit (18 degrees Celsius). A ceramic heat emitter (no light, just heat) on a thermostat inside the sheltered section is the safest heating option. Keep it away from any flammable material and check the wiring regularly for rodent damage.
- Fit wind-blocking covers on the exposed mesh sides before temperatures drop in autumn
- Use a thermostatically controlled ceramic heat emitter for cold nights rather than heat lamps (which can cause eye and skin problems)
- In spring, inspect the entire structure for winter damage: loose mesh, swollen wood panels, corroded hardware
- During storm season, bring portable cages indoors; for permanent structures check all latches and roof attachments before a predicted storm
- Keep a spare cover on hand so you can replace a damaged one quickly
Outdoor troubleshooting: pests, escape prevention, and cleaning and maintenance
Keeping predators and pests out
Predator pressure is the biggest difference between an indoor cage and an outdoor one. Raccoons, rats, cats, and even hawks will test your structure. The mesh you chose is your first line of defense: welded wire is far stronger than chicken wire (which raccoons can pull apart with their hands). Bury a wire skirt at least 12 inches into the ground around any cage that sits on soil, bending it outward at 90 degrees to stop digging predators. Check the ground perimeter monthly for new dig attempts.
Rodents are drawn to spilled seed and droppings. Use a tray or catch pan under the cage to collect debris and empty it every day or two. Store all bird food in rodent-proof metal containers away from the cage. If you see rodent droppings near the cage, address it immediately: rats can chew through wood framing and will stress your birds even if they can't get inside.
Wild birds perching on or near the cage are a disease transmission risk, particularly for respiratory illnesses. The roof overhang helps, and removing any horizontal surfaces wild birds can land on near the cage reduces the problem. Avoid placing feeders for wild birds within 20 feet of the outdoor cage.
Escape prevention checks
- Walk the full perimeter of the cage before putting birds in and check every mesh join for gaps wider than half the bird's head
- Test every latch with deliberate force in multiple directions, not just a gentle push
- Check that no perch, toy, or branch is positioned so that a bird could use it as a launching point to reach and push a door open
- Inspect all mesh attachments along the frame after any storm or after a predator attempt
- If you add or modify anything inside the cage, recheck the full latch and mesh integrity before returning birds
Cleaning and disinfection routine
Outdoor cages accumulate dirt, droppings, and debris faster than indoor ones. A daily spot clean of the floor and food/water stations takes five minutes and prevents the buildup that makes weekly cleaning a major project. Remove and replace any wet or soiled substrate daily. For water dishes, scrub and refill every day without exception.
For weekly deep cleaning, move your birds to a temporary indoor cage, then scrub all surfaces with warm water and a bird-safe detergent. Rinse thoroughly. Then disinfect using a diluted bleach solution: a 10 percent bleach solution (roughly 1 part household bleach to 9 parts water) applied to clean surfaces, left for 10 minutes, then rinsed completely and allowed to dry fully before birds go back in. Bleach only works on clean surfaces, so the scrub step comes first. Birds are very sensitive to fumes, so they must be well away from the area while you're disinfecting, and everything must be dry and aired out before they return.
Monthly, inspect every piece of hardware for corrosion, every wood surface for rot or splintering, and every mesh panel for loose staples or widening gaps. Tighten or replace any hardware showing rust. A quick monthly check catches problems before they become escape attempts or health hazards. Run your hand along every mesh edge to feel for sharp points that have worked loose. Fix them immediately. A well-maintained outdoor cage can last 10 to 15 years with this kind of attention.
FAQ
Can I use galvanized wire anywhere on my outdoor bird cage if my birds cannot reach it?
Avoid it entirely. Even if birds cannot chew, galvanized wire can still corrode over time and release zinc particles, and you can unintentionally expose it at cut edges or where wiring loosens. If you must replace a section, swap that whole panel to welded stainless or powder-coated welded mesh.
What should I do about rust on stainless hardware or mesh over time?
Light surface staining can happen if the metal has contact with other materials, but true rust indicates contamination or the wrong metal. If you see spreading rust, replace the affected fasteners or mesh section, then prevent recurrence by ensuring hardware stays fully stainless and you rinse off any salty residue (especially near coastlines).
How do I choose the right mesh spacing for my bird when I am building for multiple species?
Use the smallest species requirement as the baseline and treat it as the safety limit. If you plan to house different sizes together, you also need to adjust perches and feeding access so the larger birds do not bully smaller ones into spots with different clearance. Otherwise, use partitioning so each species has its own compliant mesh zones.
Is chicken wire ever acceptable for outdoor bird cage walls if I reinforce it?
No. Chicken wire is not predator-proof, raccoons can pull it apart quickly, and it can create sharp or loose edges if it deforms. Use welded wire mesh with stainless or powder-coated welded construction throughout the enclosure, including any “temporary” panels.
How deep should the wire skirt be, and does it matter if my cage is on pavers?
If the cage sits on soil, bury a skirt at least 12 inches and bend it outward at 90 degrees. If you are on solid pavers or a concrete pad with no soil perimeter, a skirt is less effective because there is nowhere for digging to start, but you should still block gaps at the perimeter with the same mesh and ensure there are no crawl spaces under the base.
What is the best way to prevent birds from getting feet or faces stuck at the bottom of the cage?
Keep the lower perimeter attachment tight, then fold cut wire ends inward and cover them with J-clip trim or molding. Also ensure the floor frame does not create a narrow gap where toes can wedge, and avoid leaving any protruding screw tips inside the enclosure.
Can I raise the cage slightly off the ground instead of putting it directly on pavers or soil?
Yes, but make sure the underside is predator-blocked. If you elevate the cage, consider adding a continuous mesh barrier around the entire base perimeter and keep the area under it clean and accessible for monthly inspection, since rodents can exploit dark gaps.
How do I handle drainage if my outdoor cage has a solid floor or sits in a wet climate?
Drill drainage holes in any solid floor panels and use a sloped design or slight grading so water runs out rather than pooling. Also plan to use removable trays or easily reachable cleaning access, because wet floors accelerate odor and can increase foot issues.
Can I build an outdoor cage without a fully solid roof if I use mesh all around?
A solid or covered roof is strongly recommended. Without it, rain exposure increases chilling and contamination risks, and predators gain an additional entry route or leverage points. If you want airflow, keep upper sides more open, but keep the roof fully protective.
What winter heating setup is safest, and how can I avoid overheating?
Use a ceramic heat emitter on a thermostat inside the sheltered section, keep it elevated and guarded so birds cannot contact it, and verify wiring is protected from chewing and moisture. For overheating prevention, check temperatures with a thermometer at perch height in both the sheltered and open areas, then adjust the thermostat accordingly.
Is a tarp cover safe in cold weather if I secure it tightly?
It can be, but avoid plastic sheeting directly against the mesh because it blocks airflow and can create heat buildup. If you use a tarp or canvas cover, leave a controlled ventilation path so moisture can escape, and remove or loosen covers during calm warm spells to prevent condensation.
How can I make sure my door size is correct before I build the full frame?
Build around your largest “carry object,” usually a nesting box or your bird’s travel container. Add extra access clearance for your hand, not just for the container, and dry-fit the door into the opening while the frame is square, then confirm you can reach the back corners without contorting.
What is the safest way to position perches so droppings do not contaminate food and water?
Place food and water on a different vertical zone than the top perches. Ideally, keep the highest perch clear of the solid roof area, then ensure there is no direct line where droppings can fall straight into dishes below. If needed, add drip shields or relocate dish placements to break the drop path.
How often should I rotate toys and how can I avoid accidentally introducing toxic materials?
Rotate on a schedule that matches your birds’ interest, but inspect every item before and after rotation for damaged coatings, loose hardware, and swallowed fragments. When replacing toys, avoid any zinc quick links, check for lead-soldered joints in bells, and choose materials that can be scrubbed clean without leaving residue.
What should I do if I suspect zinc exposure from galvanized parts already installed?
Remove the galvanized component immediately and switch to stainless or powder-coated welded mesh. Then monitor your birds closely for signs of illness and contact an avian vet promptly, since the correct response depends on species and exposure severity. Do not “wait it out” if chewing has occurred.
How do I clean and disinfect without harming my birds with bleach fumes?
Scrub first, rinse thoroughly, then disinfect and keep birds completely away until every surface is fully dry and aired out. Use only a properly diluted bleach mix, do not mix with other cleaners, and clean in a ventilated area so vapors do not linger near the cage.
What monthly inspection details are easy to miss on outdoor cages?
Run your hand along every mesh edge for sharp points, check hinge pins and latch springs for stiffness, and look for widening gaps around the door frames where predators can probe. Also inspect wood joints for splintering, because a small fracture can turn into a loose entry point.
Next Articles
How to Build a Bird Cage from Wood: Plans and Steps
Step by step wood bird cage plans: safe sizing, bar spacing, doors, stand, weatherproofing, and trouble fixes.
How to Make a Temporary Bird Cage Step by Step
Step-by-step DIY guide to build a safe temporary bird cage now, with sizing, bar spacing, materials, and safety checks.
How to Make a Glass Bird Cage: Step-by-Step DIY Guide
Step-by-step DIY for a safe glass bird enclosure: materials, escape-proof design, ventilation, assembly, and maintenance