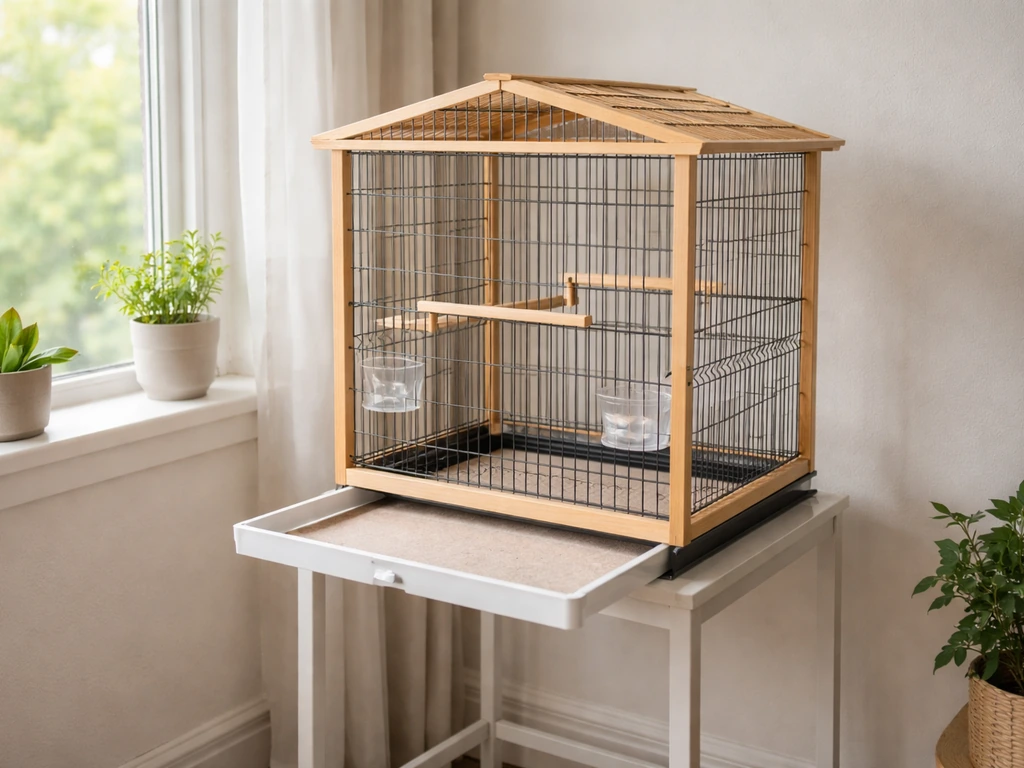
You can build a safe, comfortable DIY cage for a cockatiel using stainless steel mesh or powder-coated welded wire, a hardwood or PVC frame, and basic hand tools. The minimum finished interior should be 24 inches wide by 24 inches deep by 30 inches tall, with bar spacing no wider than 1/2 inch so your bird can't squeeze its head through. Get those two numbers right from the start and the rest of the build is straightforward.
How to Build a Bird Cage for Cockatiels: Step-by-Step Guide

Maya Bennett
6 Jun 2026
Choosing the right cage size and layout for cockatiels
Cockatiels are medium-sized parrots with a wingspan that can reach 12 to 14 inches when they stretch. That means the floor dimensions of 24 x 24 inches is a practical minimum, not a generous allowance. Go wider whenever you can: a cage that is 36 inches wide gives a bird room to move laterally without turning every few wing flaps into a wall collision. Height matters less than width and depth because cockatiels naturally move side to side more than up and down, but 30 inches of interior height is still the floor you should plan around.
Bar spacing is the single most important safety measurement in the whole build. Every credible avian source I've seen lands in the same narrow range: 1/2 inch (12.7 mm) to 5/8 inch (15.9 mm). Stick to 1/2 inch if you can. At that spacing a cockatiel physically cannot push its head through the bars, which eliminates the biggest entrapment risk. Anything wider than 3/4 inch is genuinely dangerous for a bird this size. Glas Bird Club also recommends cage bar spacing be as large as possible, but blank" rel="noopener noreferrer">no greater than 5/8 inch.
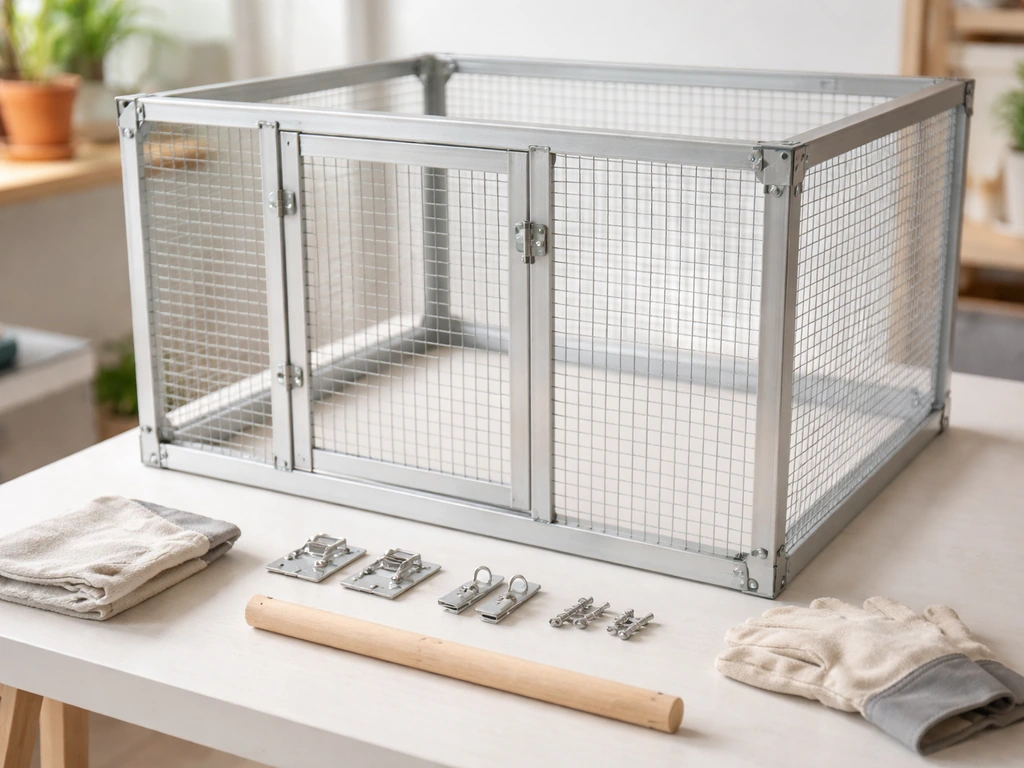
Layout planning means deciding where the doors go before you cut a single piece of wire or wood. You want at least one large front door (minimum 8 x 10 inches) so you can reach in comfortably to clean, restock food, and handle the bird. A smaller side door for a hanging food dish is a nice bonus. Plan a removable drop tray at the bottom: a slide-out sheet of galvanized steel or plastic-coated plywood sitting below a wire grate makes daily cleanup a two-minute job. Keeping ventilation in mind, at least three sides of the cage should be open wire rather than solid panel. A solid back panel is acceptable and actually helps the bird feel more secure, but solid sides trap moisture and limit airflow.
Safe materials and cage design basics
The wire is the most critical material choice, and this is where a lot of DIY cages go wrong. Galvanized wire is the most common and affordable option, but it carries a real zinc toxicity risk. The MCAA safety manual notes zinc as a hazardous heavy metal in galvanized metals and addresses welding and hot-work as a context for dangerous zinc fumes zinc toxicity risk. The zinc coating on galvanized wire can flake, chip, or be chewed directly by a curious cockatiel, and zinc poisoning in birds is serious and fast-moving. If you use galvanized wire, buy '2x4 welded wire' or hardware cloth labeled as 'after-weld galvanized' (also called hot-dipped after welding), scrub it thoroughly with a diluted apple cider vinegar solution, rinse it completely, and let it dry before assembly. Never weld or cut galvanized wire indoors without excellent ventilation: cutting releases zinc dust and heating it produces zinc oxide fumes, which can cause metal fume fever in humans and are lethal to birds.
A better option is 304-grade stainless steel welded mesh. It costs more upfront but contains no zinc coating, does not rust, and is non-toxic if chewed. For a DIY build this is the material I recommend if your budget allows it. The third option is powder-coated welded wire panels, which are fine as long as the powder coat is fully intact and confirmed non-toxic (look for bird-safe or pet-safe labels). Chipped or worn powder coat exposes the base metal underneath, so inspect these panels carefully and replace any that show damage.
| Wire Type | Zinc Risk | Rust Risk | Cost | Best For |
|---|---|---|---|---|
| Hot-dipped galvanized (after-weld) | Moderate (prep required) | Low | Low | Budget builds with proper prep |
| 304 Stainless steel mesh | None | Very low | High | Best long-term option |
| Powder-coated welded panels | Low (if intact) | Low | Medium | Aesthetic builds, inspect regularly |
For the frame, use untreated hardwood (poplar, maple, or oak are good choices), aluminum angle stock, or PVC pipe. Avoid softwoods like pine or cedar: pine is low in durability and cedar releases aromatic compounds that can irritate a bird's respiratory system. Do not use pressure-treated lumber anywhere in or around the cage. If you go with wood joints, use stainless steel screws and avoid zinc-plated fasteners at any point the bird can contact. J-clips or hog rings for attaching mesh panels should be stainless steel or plated with a bird-safe finish. Standard zinc-plated J-clips are a known hazard if the bird chews on them.
Tools and parts checklist for a DIY build
You do not need a workshop full of specialized equipment. Most of this build can be done with basic hand tools and a drill. Here is everything you need to gather before you start cutting.
- Welded wire mesh (1/2 inch spacing, 16 or 18 gauge): enough for four sides plus a top, calculated from your finished dimensions plus 2 inches overlap on each edge
- Frame lumber or aluminum angle stock: cut list based on your cage dimensions
- Stainless steel J-clips or hog rings and the matching pliers (J-clip pliers make this much faster)
- Stainless steel wood screws (1.5 inch and 2 inch) and a drill/driver
- Wire cutters or aviation snips for cutting mesh panels
- Metal file or fine sandpaper to deburr all cut wire edges
- Slide-out drop tray: galvanized sheet metal, plastic HDPE sheet, or a fitted replacement tray cut to size
- Wire grate for above the drop tray (optional but highly recommended for keeping the bird out of its own droppings)
- Heavy-duty door hinges and bird-safe cage locks or carabiner-style latches (at least two per door — cockatiels are clever enough to work a single latch)
- Measuring tape, carpenter's square, and a marking pencil
- Safety glasses and heavy gloves for wire handling
- Apple cider vinegar and a scrub brush (for galvanized wire prep if applicable)
Step-by-step build and assembly process
Step 1: Cut and prep your wire panels
Cut your mesh panels slightly oversized, then trim to final dimensions after deburring. Every single cut edge must be filed smooth. Run a gloved finger along every cut edge before assembly: if it snags your glove, it will cut your bird. If you are using galvanized wire, this is when you scrub the panels with diluted vinegar (one part vinegar to two parts water), rinse thoroughly, and let them dry completely in fresh air. Do not skip this step.
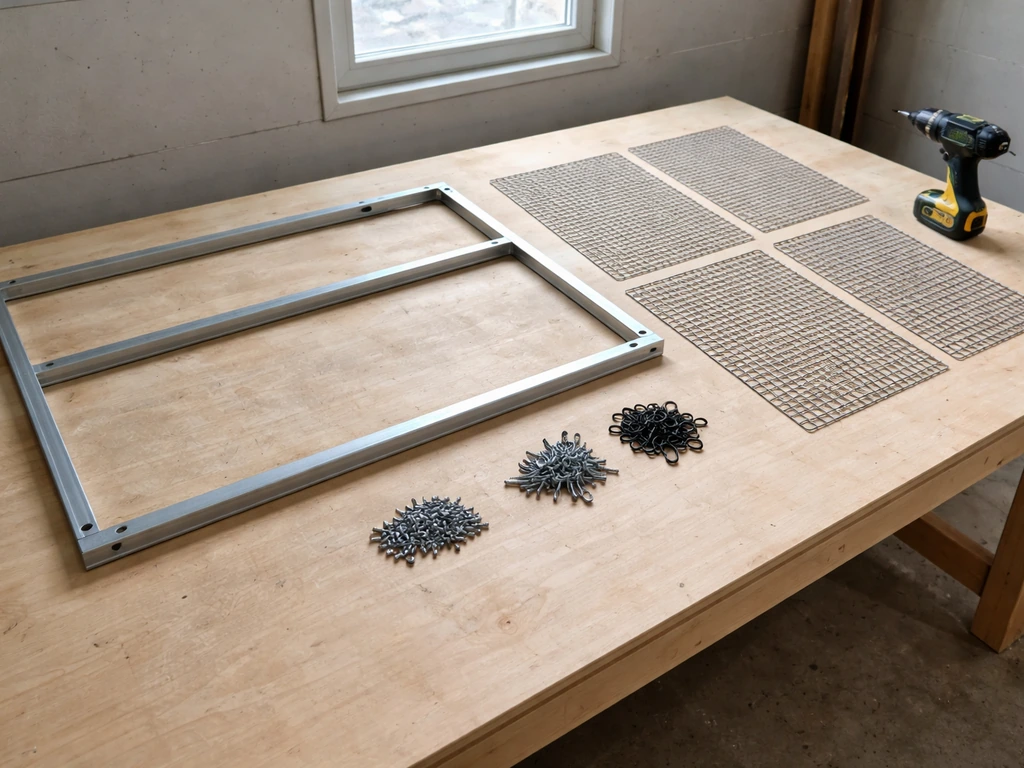
Step 2: Build the frame
Cut your frame pieces to your planned dimensions and assemble the rectangular frame sections (front, back, two sides, top, and bottom) using your drill and stainless steel screws. Square each frame section with a carpenter's square before driving the final screw. A frame that is even slightly out of square will make attaching mesh panels frustrating and leave gaps at corners. Build all six frame sections, then dry-fit them together to check everything lines up before you attach any wire.
Step 3: Attach wire mesh to frame panels
Lay each frame section flat on a workbench. Position the mesh panel over the frame so the wire overlaps the inner edge of the frame by at least 1/2 inch on each side. Secure the mesh to the frame using J-clips or hog rings placed every 3 to 4 inches around the entire perimeter. Pull the mesh taut before crimping each clip: loose mesh sags over time and creates gaps at corners. For wood frames, you can also use a staple gun with 1/2-inch crown staples as a temporary hold while you apply J-clips, but do not use staples as the sole fastener (cockatiels will work them loose).
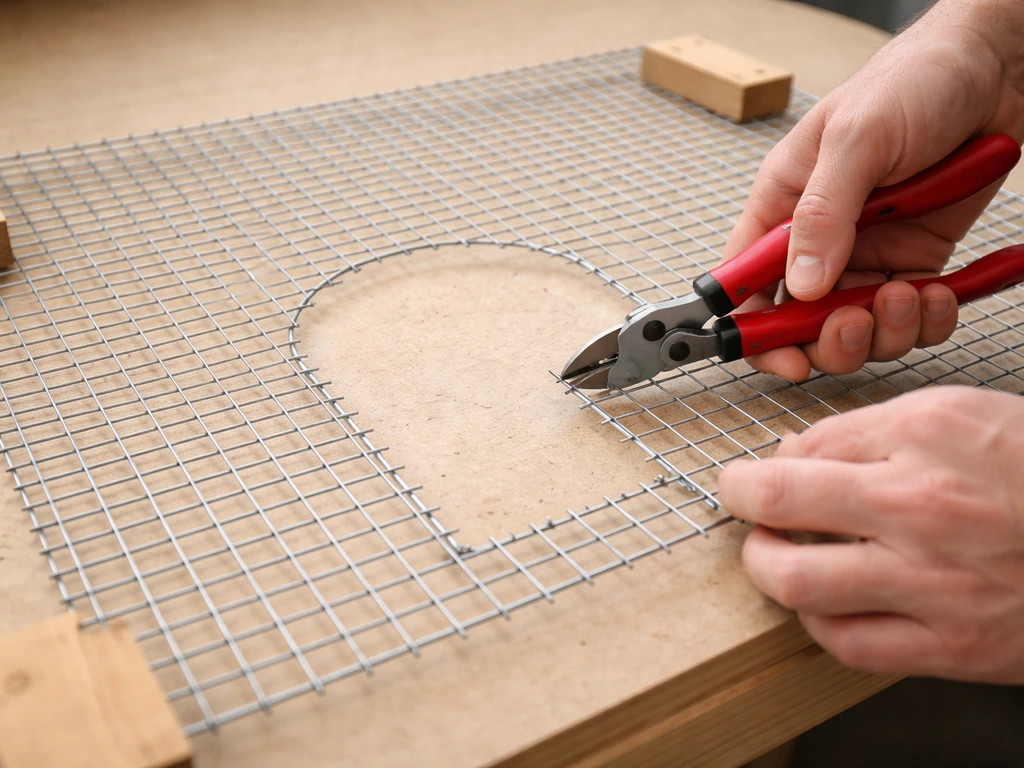
Step 4: Cut and frame door openings
Mark your door openings on the front panel before attaching the mesh to it. Cut the mesh within the door opening using wire cutters, leaving the outer frame perimeter intact. Build a separate door frame from the same lumber or aluminum, attach mesh to it, and hang it with small hinges. Add two latches per door: cockatiels can open a single standard latch with their beak. Parrots in general are persistent and curious, so test every door yourself by pressing and pulling in different directions before the bird goes anywhere near the cage.
Step 5: Assemble the full cage box
Join the six panels together with additional J-clips at every seam, spacing clips every 2 to 3 inches along each edge. Pay special attention to corners: this is where the most stress concentrates over time. Run your finger along every interior seam to check for any exposed wire tips or clip edges that project inward into the bird's space. Any sharp protrusion inside the cage needs to be addressed before the bird goes in: file it, clip it, or cover it with a small strip of electrical tape as a temporary measure while you fix it properly.
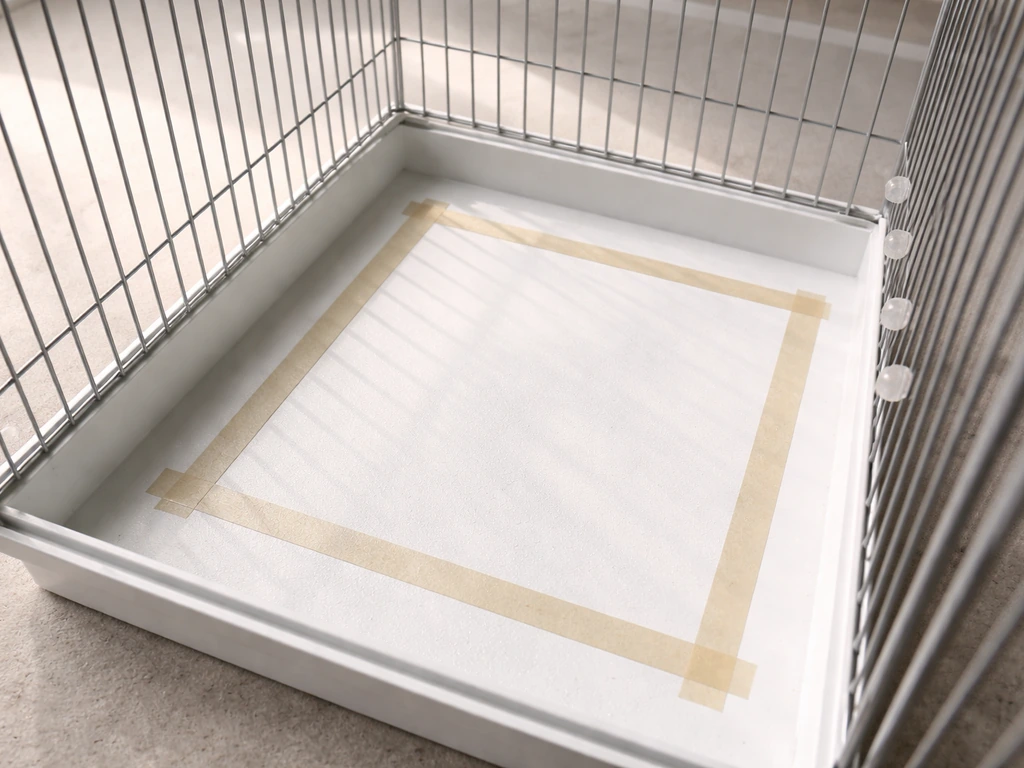
Step 6: Install the drop tray and grate
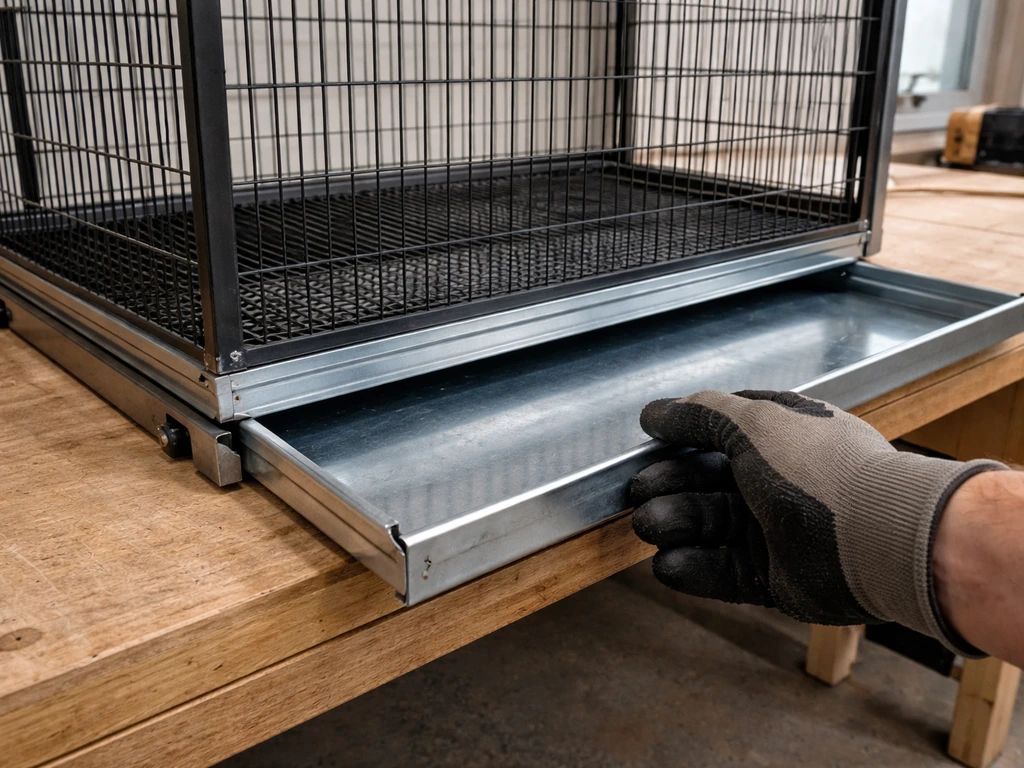
The drop tray slides into a channel at the base of the cage. Build two parallel wooden or aluminum rails about 1/4 inch apart on the inside bottom edges of the cage frame, sized to your tray's thickness. The tray should slide in and out without tools. Above the tray, attach a wire grate at the same 1/2-inch spacing: this keeps the bird standing on clean wire rather than sitting in droppings. The grate should also be removable for weekly cleaning. Line the tray itself with paper (newspaper or unprinted paper towels): it is cheap, easy to swap daily, and lets you see the droppings clearly, which is a useful health indicator.
Step 7: Final safety check before use
- Run a finger along every interior surface looking for sharp wire ends, protruding clip edges, or splinters
- Check every door: does it latch firmly from both sides? Can you open it with one hand while holding a bird with the other?
- Check every corner seam for gaps wider than 1/2 inch
- Check the bar spacing in multiple spots with a ruler: confirm it is consistently at or below 1/2 inch
- Gently pull on the wire mesh at several points: it should feel solid, not flex or pop away from the frame
- Check the drop tray slides smoothly and seats flush with no gaps around the edges large enough for the bird to fall through
Installation: placement, stand setup, and daily workflow
Where you put the cage in your home matters as much as how you built it. Cockatiels are sensitive to drafts, temperature swings, fumes, and noise, so placement is an active welfare decision. Pick a room where the family spends time during the day: cockatiels are social and will get stressed and bored if isolated. Living rooms and home offices work well. Kitchens do not: cooking fumes, including non-stick cookware fumes (PTFE/Teflon), are lethal to birds even in small amounts. Bathrooms and laundry rooms introduce moisture and chemical exposure.
Position the cage against a wall or in a corner so the bird has a solid visual reference point and feels secure. Keep it away from exterior doors and windows that are frequently opened: drafts are a real risk. Never place the cage in direct sunlight. A bird in a cage has no way to escape rising temperatures, and heat stroke can happen very quickly. A window location with bright indirect light is fine, but be aware that glass filters out the UV light that birds need for vitamin D synthesis, so window light is not equivalent to safe outdoor exposure.
Height is important too. The cage should sit at roughly chest to eye level for the humans in the household. A cage on the floor makes the bird feel vulnerable and prey to activity around it. A cage that is too high (at ceiling level) can make the bird dominant and difficult to handle. Chest height is the practical sweet spot. If you are building a stand, aim for the cage floor to sit about 36 to 40 inches off the ground.
A rolling stand with locking casters makes daily workflow much easier. You can wheel the cage to a cleanup spot, wheel it closer to where you are working from home, or move it briefly for seasonal adjustments without heavy lifting. Build or buy a stand that is wider than the cage's footprint by at least 4 inches on each side so the whole assembly is stable and won't tip if the bird moves suddenly.
Perches, toys, feeding/water setup, and enrichment
Perches
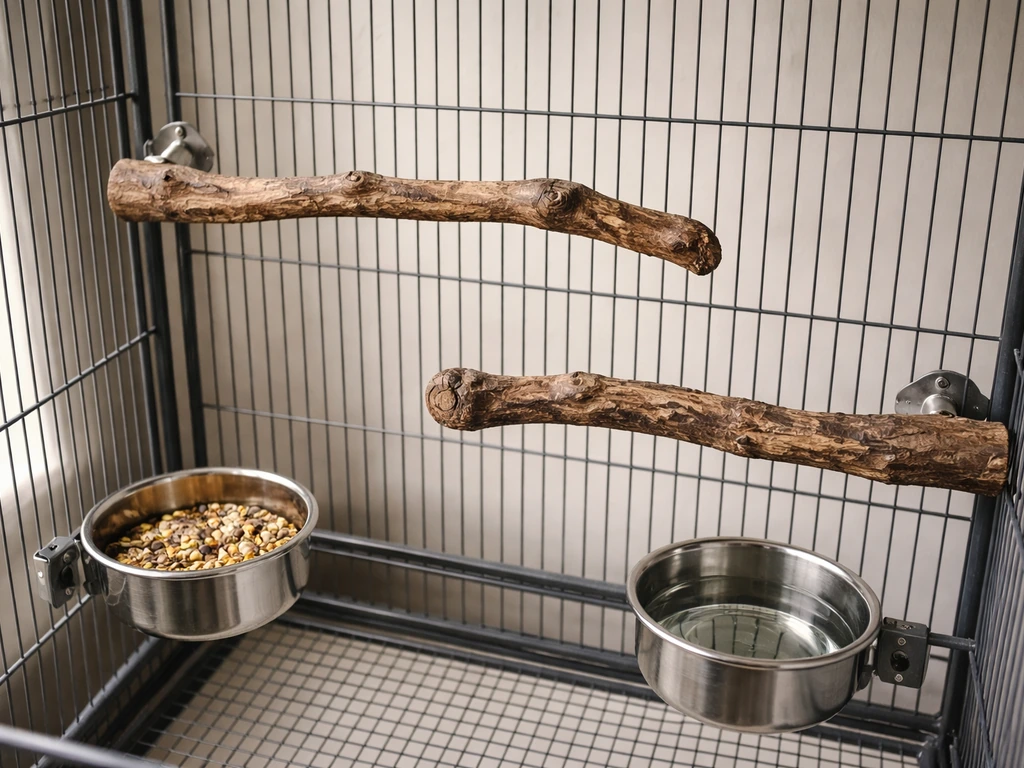
Cockatiels spend almost all their time on their feet, so perch quality matters enormously. Use natural hardwood branches (manzanita, java wood, dragonwood, or safe fruit tree branches from trees that have never been treated or sprayed) in varying diameters. A perch diameter of 5/8 inch to 1 inch is the right range for a cockatiel's foot: it should wrap about three-quarters of the way around the perch. Having multiple perches of different diameters exercises the foot muscles and prevents pressure sores. Install perches at different heights but keep the highest perch at least 6 inches below the cage roof so the bird has headroom including crest clearance.
Avoid placing perches directly above food or water dishes: droppings contaminate food and water quickly. Position at least one perch close to the food station (within a few inches) so the bird can eat comfortably without perching on the dish. Do not use sandpaper-wrapped perches: they abrade the foot pads and cause sores without meaningfully wearing down nails.
Feeding and water stations
Place food and water receptacles above the perches where the bird can reach them without having to climb down to the cage floor. Mounting dishes on the cage bars at a height the bird naturally perches at is ideal. Use at least two food dishes: one for dry seed or pellet mix and one for fresh food. A third water dish or an attached water bottle keeps hydration separate from food mess. Stainless steel dishes are easiest to clean and sanitize, and they do not harbor bacteria the way plastic dishes can after they develop scratches.
Toys and enrichment
Cockatiels are chewers and foragers. Rotating three or four toys at a time prevents boredom without overcrowding the cage. Good options include untreated wooden chews, rope toys (natural cotton or sisal, not synthetic fibers), foraging cups or puzzle feeders, and small foot toys the bird can pick up and manipulate. Avoid toys with small zinc or lead-containing metal parts, very long loose strings (entanglement risk), or tiny gaps that could trap toes or a beak. Bells are popular with cockatiels: look for stainless steel bells specifically, as some cheap bells contain zinc or lead.
Covers, cleaning, safety checks, and troubleshooting
Using a cage cover
A cage cover at night helps cockatiels get the 10 to 12 hours of sleep they need and reduces stress from household activity or outside light sources. Use a breathable fabric like cotton or linen: heavy blackout material traps heat and moisture inside the cage, which is the opposite of what you want. Cover three sides and the top, leaving the front partially open for airflow. Never wrap the cage completely. Check the interior temperature if the room is warm: a covered cage in a hot room can become dangerous quickly.
Cleaning routine
Daily: pull and replace the drop tray liner, wipe down any visibly soiled perches or dish surfaces, and swap out fresh food. This takes about five minutes if the cage is designed for access. Weekly: remove the bird to a safe temporary space, pull the tray and grate, wash them with hot soapy water, rinse well, and apply a bird-safe disinfectant. Rinse again thoroughly after disinfecting: residue is harmful. Wipe down all bar surfaces and the interior frame. Let everything dry before reassembling and returning the bird. Monthly: do a more thorough inspection of all hardware, latches, wire connections, and perch mountings.
Common troubleshooting
- Rust spots on wire: Sand off surface rust immediately and assess whether the wire is still structurally sound. Stainless panels are the long-term fix if galvanized wire keeps rusting in your climate.
- Bird chewing on cage bars: Some bar chewing is normal exploratory behavior, but heavy chewing on galvanized wire is a zinc exposure risk. Swap affected panels for stainless or powder-coated alternatives.
- Mites or pests in the cage: Disassemble, clean, and treat all surfaces with a veterinarian-approved avian mite spray. Natural wood perches can harbor mites: replace them, or bake new wood branches at 200°F (93°C) for 30 minutes before introducing them.
- Bird escaping or getting a toe/claw caught: Recheck every gap and clip joint. A bird that repeatedly gets a toe caught usually means a clip edge is protruding: file it down immediately.
- Food mess everywhere: Add a seed catcher skirt around the bottom perimeter of the cage. This is a simple fabric or acrylic ring that catches flung seed and dramatically reduces floor cleanup.
- Cage feels too small after a few weeks: This is common with a minimum-size build. If you notice increased screaming, feather plucking, or aggression, the bird may need more space. Size up the cage or ensure daily supervised out-of-cage time in a bird-proofed room.
Quick daily welfare check
Each morning when you uncover the cage and replace the tray liner, do a fast five-second scan: is the bird alert and active? Are the droppings normal in color and consistency (a white urate cap with a dark green-gray fecal portion)? Are all perches, dishes, and latches in position? This daily check catches problems early. A lethargic bird, watery droppings, or a cage that has been tampered with overnight all warrant closer inspection before you start the day.
If you are interested in scaling up this kind of project, the same bar-spacing and material principles apply but with different footprint requirements for other species. If you are interested in scaling up this kind of project, the same bar-spacing and material principles apply, and you can apply them directly when you follow how to build a canary bird cage. If you want to build bird breeding cages, focus next on nesting-space design, divider choices, and security features for pairs or colonies. Parakeets have slightly different sizing needs compared to cockatiels, and a full flight cage or outdoor aviary build follows many of the same construction steps but introduces weatherproofing and pest-exclusion considerations that are worth planning for separately. If you also want the full end-to-end workflow from start to finish, see how to build bird cage for the complete build sequence. If you want an outdoor aviary instead, you will need to add weatherproofing, secure fencing, and pest exclusion on top of the same cage-building steps outdoor aviary build. If you are aiming for a flight cage, the same safety measurements and material choices apply, but you will need to scale the dimensions and plan for extra horizontal flying space how to build a bird flight cage. Parakeet cage builds follow the same core approach, so you can adapt these bar-spacing, safe-wire, and door-access steps to your parakeets. If you specifically want a bird trap cage, start by planning the cage dimensions and bar spacing for safe capture and to prevent escapes.
FAQ
Can I build a cockatiel cage using hardware cloth instead of welded wire or stainless mesh?
In most DIY builds, it is not the best primary material because hardware cloth can have inconsistent mesh quality and rough cut edges, and it is often made from zinc-coated steel. If you use it at all, only choose a clearly bird-safe, after-weld galvanized or stainless option, and verify bar spacing stays within 1/2 inch (12.7 mm) or less everywhere, including around doors, corners, and any repairs.
What should I do if my cage has sharp edges or protruding wire tips even after the first assembly check?
Do a second inspection after the cage is fully assembled and stressed, meaning after you gently press down on the mesh near seams and doors. Any clip edge that shifts or any wire tip that catches a gloved finger should be filed and then secured again (for example, replace a mis-crimped clip). Temporary tape inside the cage should be replaced with a proper fix because parrots can peel it off.
How do I size the cage if I plan to add a second bird later?
Cockatiels do best with more floor area than minimum single-bird dimensions. If you might expand, build wider rather than just taller, and plan for multiple feeding points so one bird cannot block the other at the food. Also consider adding extra perches at different heights and ensure door access remains large enough to clean and manage two birds safely.
Is it safe to use a heat lamp, space heater, or nearby fireplace with a DIY cockatiel cage?
You should not position direct heat sources close enough to dry out or overheat the cage airspace. Drafts are dangerous, but so is localized heat, especially if a night cover is used. If you need extra warmth, use a room-level heating approach and confirm the cage interior stays in a safe temperature range, with the cover removed if temperatures rise.
Can I place the cage on a wooden floor or next to baseboards and walls?
It is better to keep the cage away from moisture-prone areas and minimize chewing access to the stand and wall edges. A rolling stand helps, but still avoid direct contact with damp baseboards, and keep the cage at least a small gap from surfaces where cleaning chemicals might splash. Also make sure the tray rails do not scrape the stand during slide-out cleaning.
What liner should I use in the drop tray, and can I reuse it?
Use paper that is easy to swap daily, unprinted paper towels or plain paper, and do not reuse liners because droppings, moisture, and bacteria accumulate quickly. If your cage design allows it, line the tray fully so droppings do not miss the paper and hit the grate area. Avoid scented liners, clay-based litter, or anything dusty or chemically treated.
How often should I replace perches, and how do I know when a perch becomes unsafe?
Replace perches when they develop cracks, splinters, loose bark that the bird can pull off, or uneven surfaces that start abrading foot pads. Even natural wood can wear down, changing diameter over time, so measure occasionally to keep the perch diameter within the cockatiel range and to prevent sores from a perch that has become too small or too smooth.
My cockatiel is chewing the cage. What construction changes help without buying new parts?
First, confirm the wire type has no hazardous coating (avoid zinc-coated materials, and confirm stainless or confirmed bird-safe powder coat). Next, check door frames and any exposed fasteners, those areas get chewed first. Add protection by ensuring all interior seams have secure clips, and replace any warped or loose panels that create gaps or leverage points.
Can I hang food bowls from the bars inside the cage?
Yes, as long as the attachment method cannot snag the bird, and the bowl location does not allow the bird to sleep directly in droppings. Use stainless hardware and confirm the bowl cannot be pulled loose by beak pressure. Also keep at least one perch close to the food station so the bird can eat without hopping down to the tray level.
What is the safest way to test door latches after installation?
Test with your own hands using the same motion a cockatiel would apply (press, pull, and lift slightly), and do it from multiple angles. If you can open the latch with one gentle motion, assume the bird can as well. Use two latches per door, and make sure the door frame overlaps the cage opening so there is no wide gap if a latch is bumped.
How should I handle cleaning and disinfecting so it does not leave fumes behind?
Use a bird-safe disinfectant and rinse thoroughly, even if the label says no-rinse. After disinfecting the tray and grate, let everything dry fully in fresh air before the bird returns. Also avoid aerosol sprays anywhere near the cage, and never combine cleaners because mixed residues can create irritating or toxic fumes.
Next Articles
How to Build a Canary Bird Cage: Step-by-Step DIY Guide
Step-by-step DIY canary cage build: safe materials, wire specs, measurements, setup, placement, and maintenance checklis
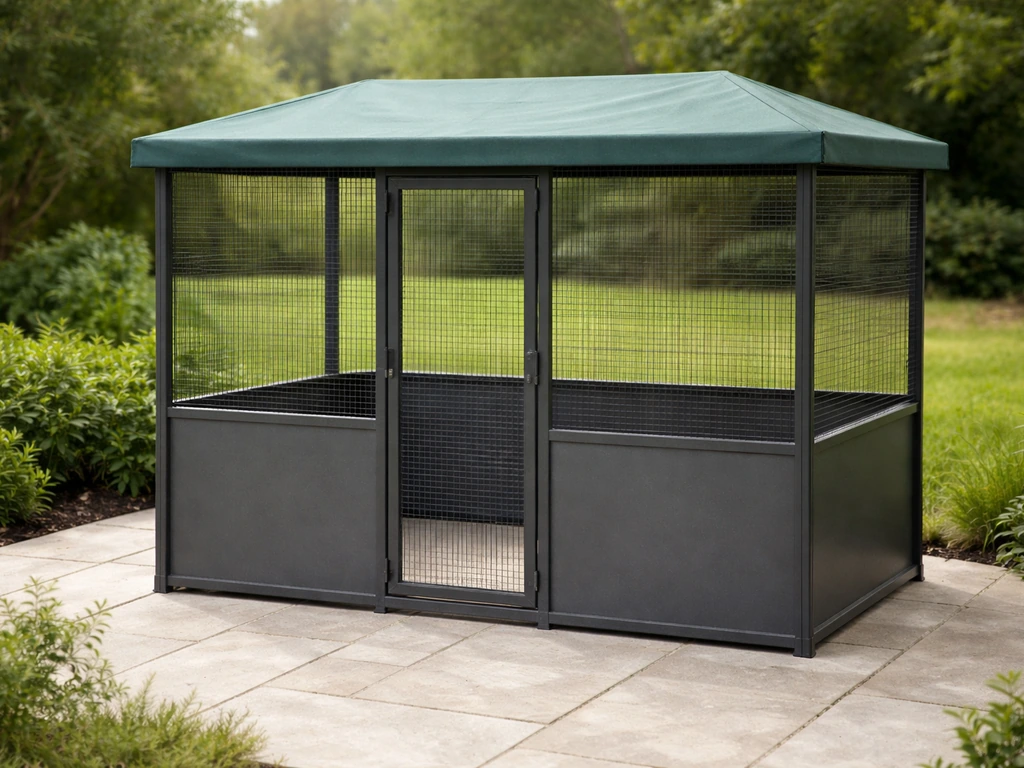
How to Build an Outdoor Bird Cage: Step-by-Step DIY
Step-by-step DIY guide to build a weatherproof outdoor bird cage with safe materials, assembly steps, placement, and car
How to Build a Bird Cage from Wood: Plans and Steps
Step by step wood bird cage plans: safe sizing, bar spacing, doors, stand, weatherproofing, and trouble fixes.