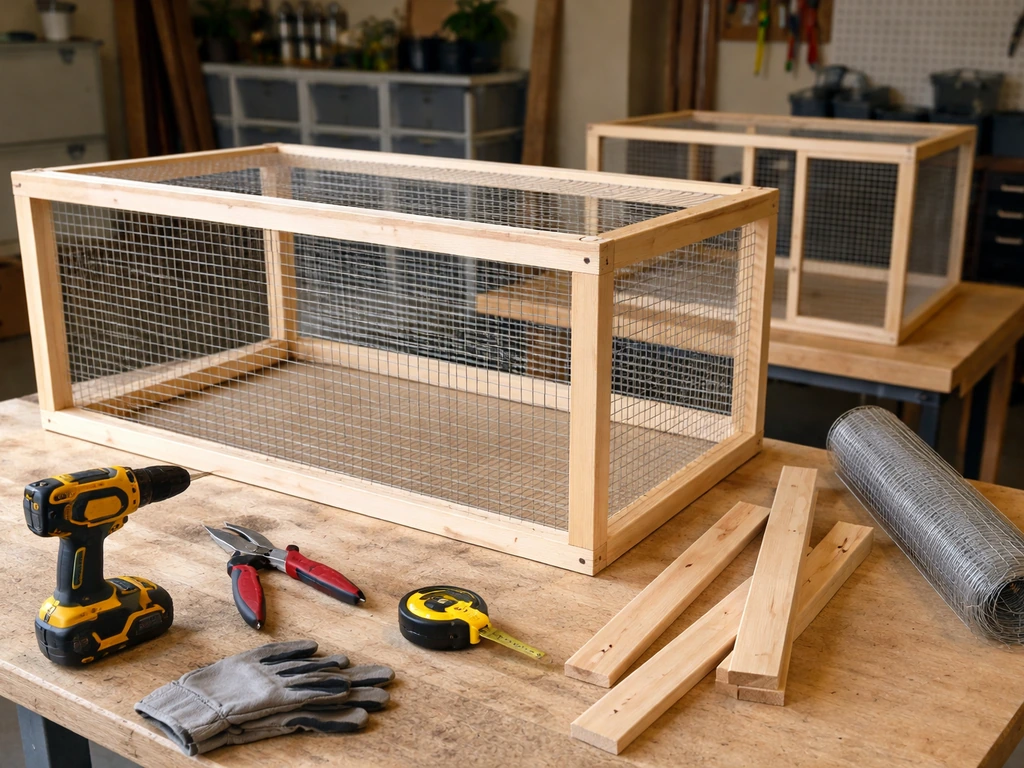
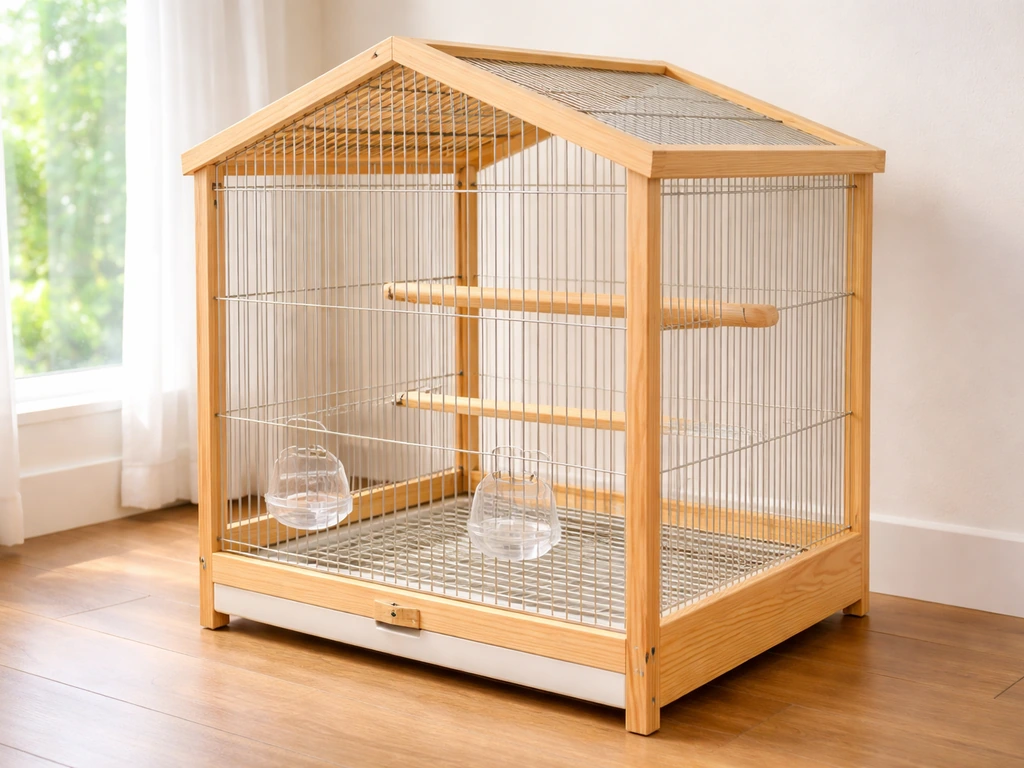
You can build a solid DIY bird breeding cage in a weekend using welded wire mesh, a basic wood frame, and a handful of hardware-store parts. If you want a complete walkthrough of the cage build, see our step-by-step guide on how to build a bird cage for breeding DIY bird breeding cage. The key is sizing it correctly for your species, choosing bird-safe materials, and designing in features that make cleaning and nest access easy before you cut a single piece of wire.
How to Build Bird Breeding Cages: DIY Step-by-Step Guide

Maya Bennett
24 Jun 2026
Plan the setup before you build anything
Breeding cages have different requirements than everyday pet cages. The pair needs more floor space, a dedicated nesting zone, and easy access for you to check eggs and chicks without stressing the birds. Get these decisions locked in before you buy materials.
Minimum sizes by species
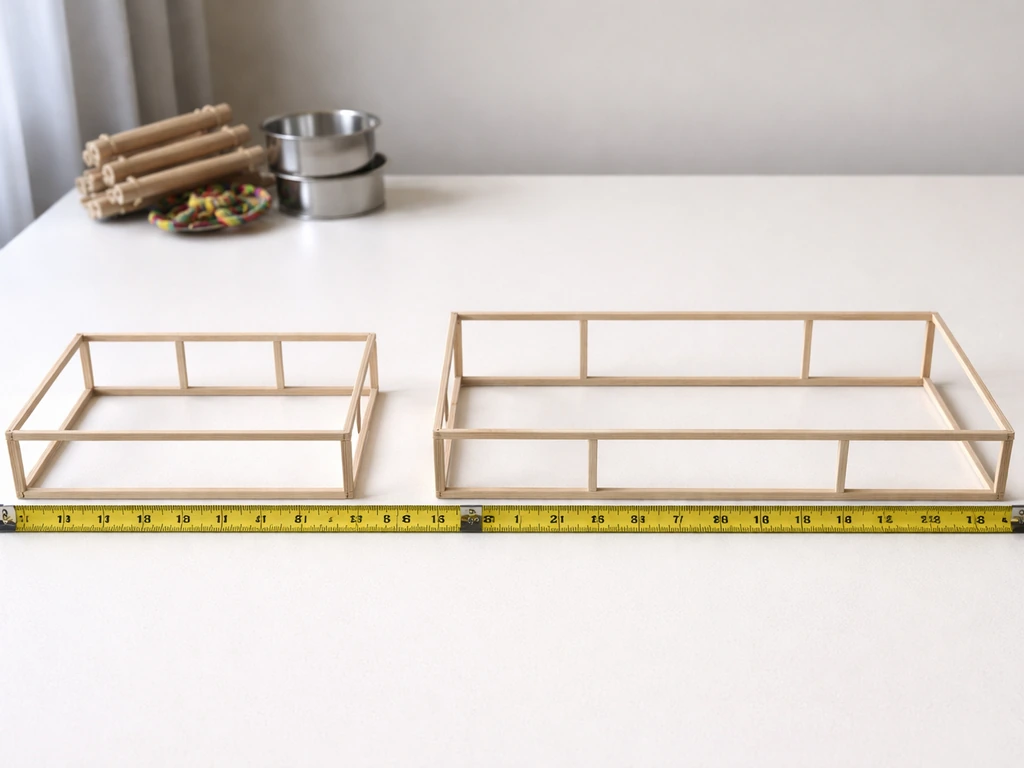
For budgies (parakeets), the baseline single-bird cage is 18 x 18 x 18 inches, but that is too cramped for a breeding pair. A breeding cage should be at least 24 inches long x 16 inches deep x 16 inches tall for one pair, which gives room to fly short distances and fit a nest box on the outside or inside of one wall. Cockatiels need considerably more room: aim for 20 x 20 x 50 inches for a breeding pair. Canaries can work in a cage around 24 x 16 x 16 inches, similar to budgies, but they benefit from extra length since they prefer flight over climbing. If you are building for finches or other small softbills, that same budgie-sized footprint works, though a longer cage (36 inches+) gives better exercise room. For larger parrots, scale up proportionally and lean toward an aviary-style build.
Layout decisions to make now
- Decide whether the nest box mounts inside the cage or hangs on the outside wall through an access hole. Outside mounting keeps cage floor space cleaner and lets you check the nest without opening the main door.
- Plan for at least two perch heights: a high perch near the nest box entrance and a lower perch for feeding. Keep perches away from food and water bowls to reduce droppings in the bowls.
- Include a sliding drop-tray under the floor grate so you can clean daily without disturbing the birds.
- Put the main access door on the long side, centered, so you can reach every corner.
- Add a small secondary door near the nest box for egg checks and chick removal.
Materials and safe design choices
The wrong materials can injure or poison breeding birds, so this section is worth taking seriously. Stress during breeding is already high, and toxic fumes or sharp edges make things worse.
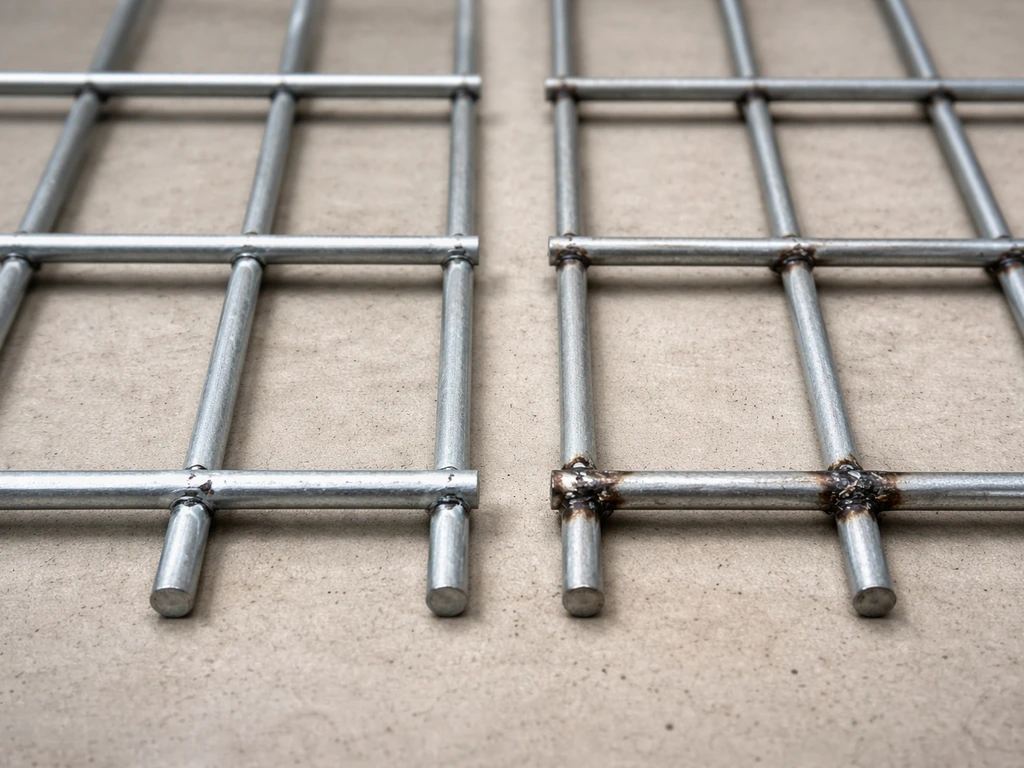
Wire mesh
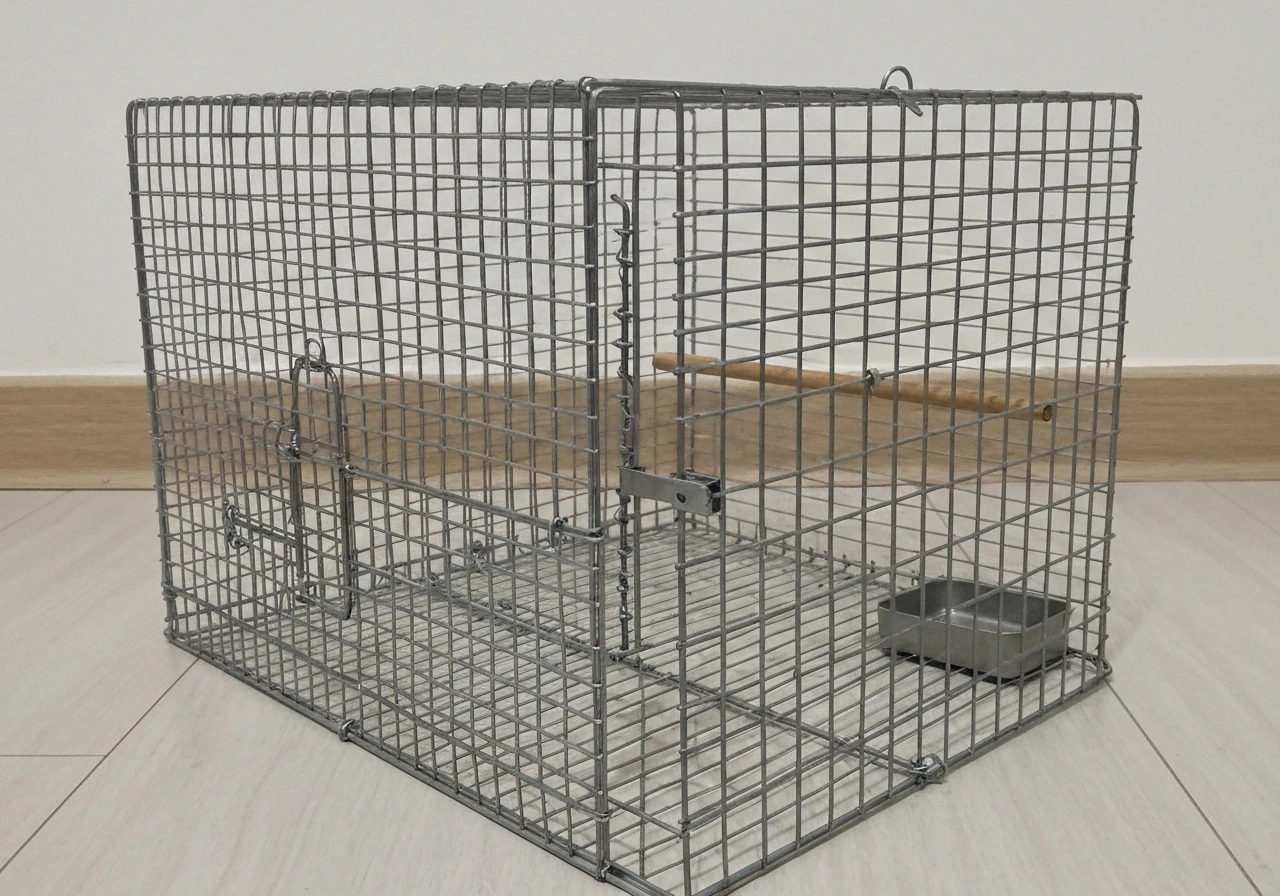
Use galvanized-after-welding (GAW) welded wire mesh, not galvanized-before-welding. The before-welding type has zinc residue at the weld points that can cause zinc toxicity. Bar spacing should not exceed 1/2 inch for small birds like budgies, finches, and canaries, so they cannot poke their heads through and get stuck. For cockatiels, 1/2 inch to 1 inch spacing works, but stay at 1/2 inch if you have chicks in the cage. Avoid hardware cloth with sharp wire ends that are not folded over, and never use chicken wire for the main enclosure, it is too easy to deform and the openings are too large.
Wood framing
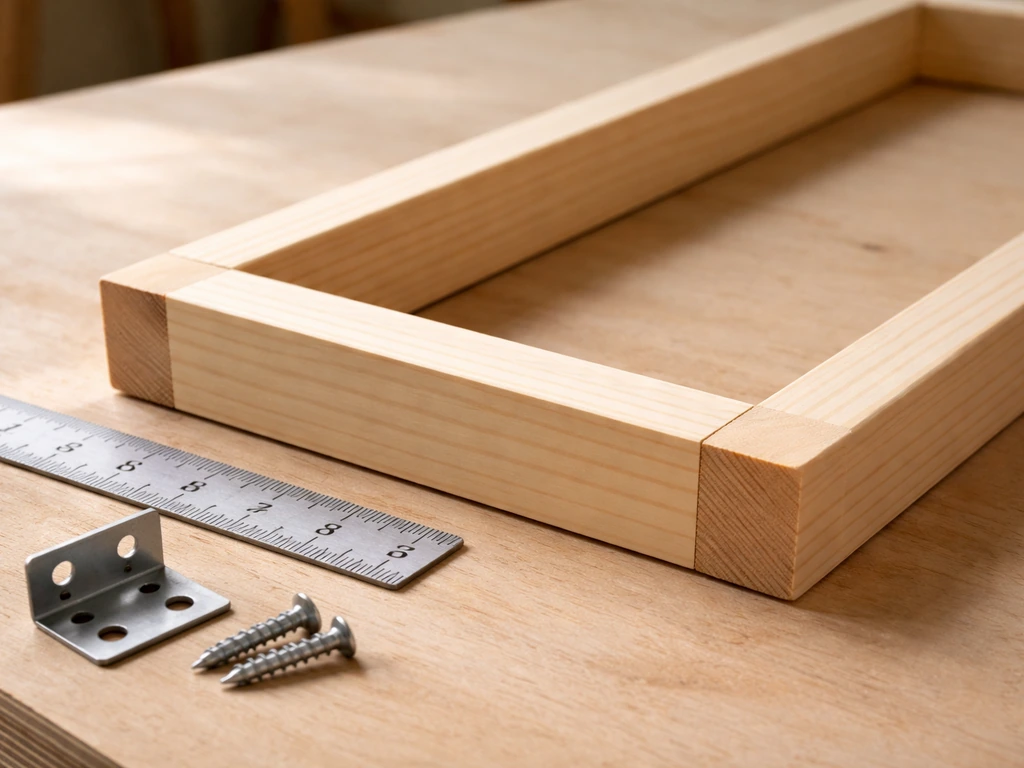
Pine, fir, and poplar are all fine for the frame. Avoid cedar and redwood because the aromatic oils can irritate bird respiratory systems. Use 1x2 or 2x2 lumber for the frame depending on the cage size. For small cages (budgie-sized), 1x2 pine is plenty. For cockatiel-sized or larger, go with 2x2 for the corner posts. Seal or paint any exposed wood with a bird-safe, water-based paint or polyurethane and let it cure fully for at least 72 hours before birds go in.
Coatings and hardware
If you want to powder-coat the wire or frame, use a coating confirmed non-toxic once cured. Avoid any paint containing lead or zinc. For latches, use stainless steel or solid brass snap bolts and J-clips. Avoid cheap zinc-plated hardware that will rust in a humid breeding room. Use stainless steel staples or J-clips to attach wire to the frame, not standard steel staples that rust within months.
Nest box materials
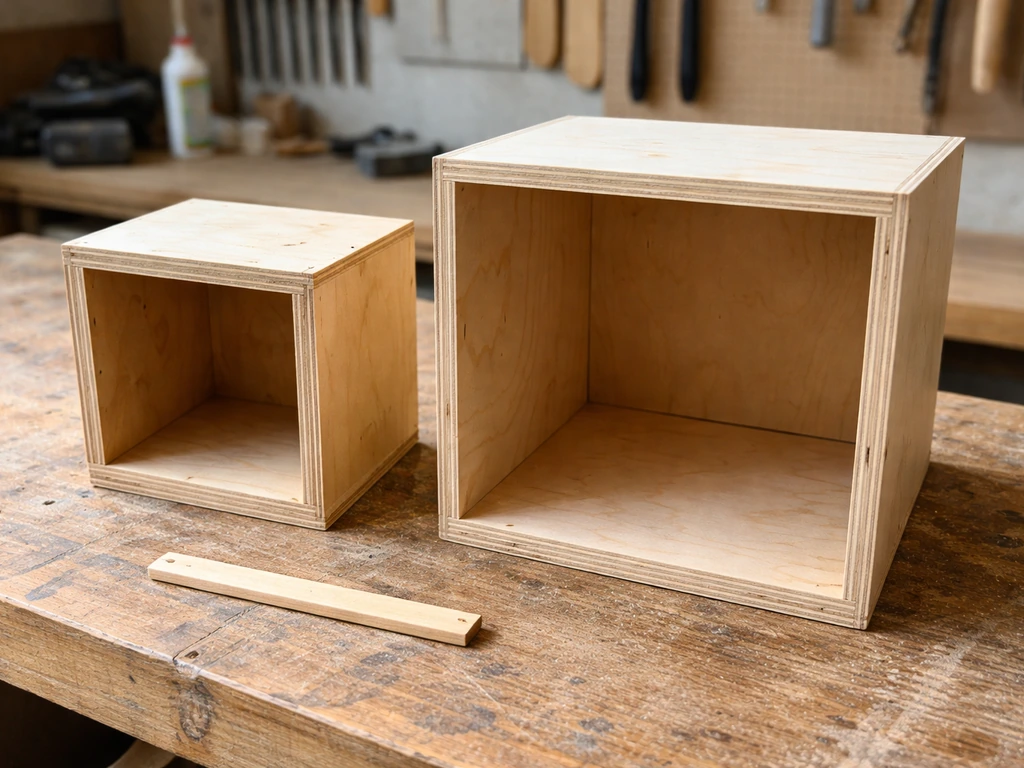
Plywood is the standard choice for nest boxes. Use untreated 1/2-inch plywood for small birds and 3/4-inch for cockatiels and larger. A cockatiel nest box should measure roughly 10 to 12 inches on each side, around 12 inches tall, with a 2-inch entrance hole. Budgie nest boxes are typically 6 x 6 x 8 to 10 inches with a 1.75-inch hole. Do not line the box with synthetic materials. Untreated pine shavings or chemical-free cork substrate work well as bedding.
Tools, parts list, and where to source everything
Tools you will need
- Tape measure and pencil
- Miter saw or circular saw for cutting wood
- Wire snips or aviation snips for cutting mesh
- Staple gun with stainless steel staples (or J-clip pliers and J-clips)
- Drill and bits for pilot holes and nest-box access holes
- Screwdriver and 1.5-inch wood screws
- Sandpaper (80 and 120 grit) for smoothing cut wood edges
- Safety glasses and gloves for handling cut wire
Parts checklist
- 1x2 or 2x2 pine lumber for the frame (quantity based on your dimensions)
- Welded wire mesh, 1/2-inch spacing, galvanized-after-welding (buy a roll and cut to size)
- 1/2-inch or 3/4-inch untreated plywood for nest box and floor panels
- Wire mesh or plastic-coated wire for the drop-tray floor grate
- Metal or plastic slide-out tray (a baking tray or sheet-metal pan cut to size works well)
- Stainless steel or brass hinges (2 per door)
- Snap bolts or cage-clip latches for doors and nest box
- J-clips or stainless staples for wire attachment
- Untreated pine shavings for nest box bedding
- Bird-safe paint or polyurethane for wood sealing (optional but recommended)
DIY vs. premade components
You do not have to build every part from scratch. Premade nest boxes for budgies and cockatiels are widely available from bird supply shops and cost $8 to $25 each. It is often faster and cheaper to buy the nest box and build the cage frame yourself than the other way around. Wire panel kits sold for modular pet enclosures can be used for the walls if the spacing is correct, saving you the work of stapling mesh. Slide-out trays are often sold as replacement parts for commercial cages and can be cut to fit your dimensions. The frame and door construction are where the DIY effort is best spent, since those need to match your exact species and space requirements.
How to build it: step-by-step
This walkthrough uses a budgie breeding cage (24 x 16 x 16 inches) as the example. If you want an even larger, outdoor-style enclosure, follow these guidelines for how to build aviary bird cage as well. Scale dimensions up for cockatiels or other species using the sizes above.
Step 1: Cut and assemble the frame
Cut your 1x2 lumber to create a rectangular box frame: four pieces at 24 inches for the long horizontals, four pieces at 16 inches for the short horizontals, and four pieces at 16 inches for the verticals. Sand all cut ends. Assemble into a box shape using wood screws, drilling pilot holes first to avoid splitting. Use two screws at each corner joint. Check that all corners are square using a speed square before the glue or screws set. This is the most important accuracy check in the whole build. Once the frame is square and assembled, you can start shaping the rest of the build toward a complete bird flight cage setup.
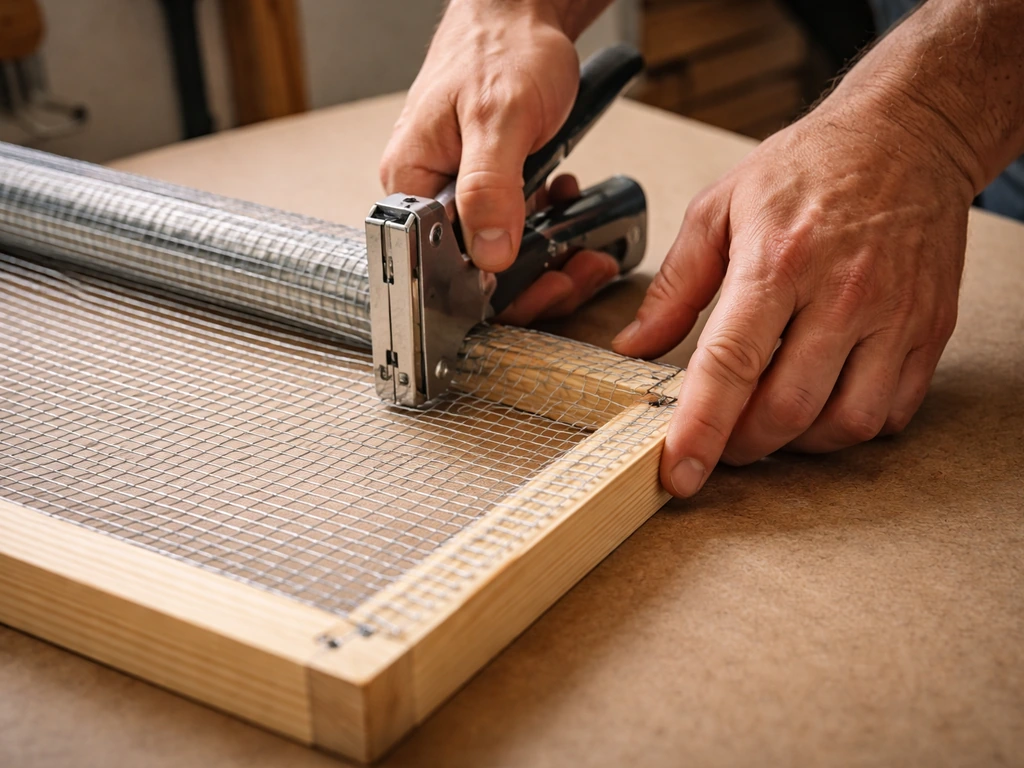
Step 2: Attach the wire mesh panels
Cut wire mesh panels to fit each face of the frame, leaving the bottom open for now. Lay each panel on the frame and secure it with stainless staples every 2 to 3 inches around the perimeter, or use J-clips at each overlap point if you prefer. Pull the wire taut before fastening so it does not sag. Fold any sharp cut wire ends inward against the wood before stapling so no wire tip is exposed inside the cage. Run your gloved hand across the interior surface to check for any sharp points and bend them down if you find any.
Step 3: Build and install the floor grate and drop tray
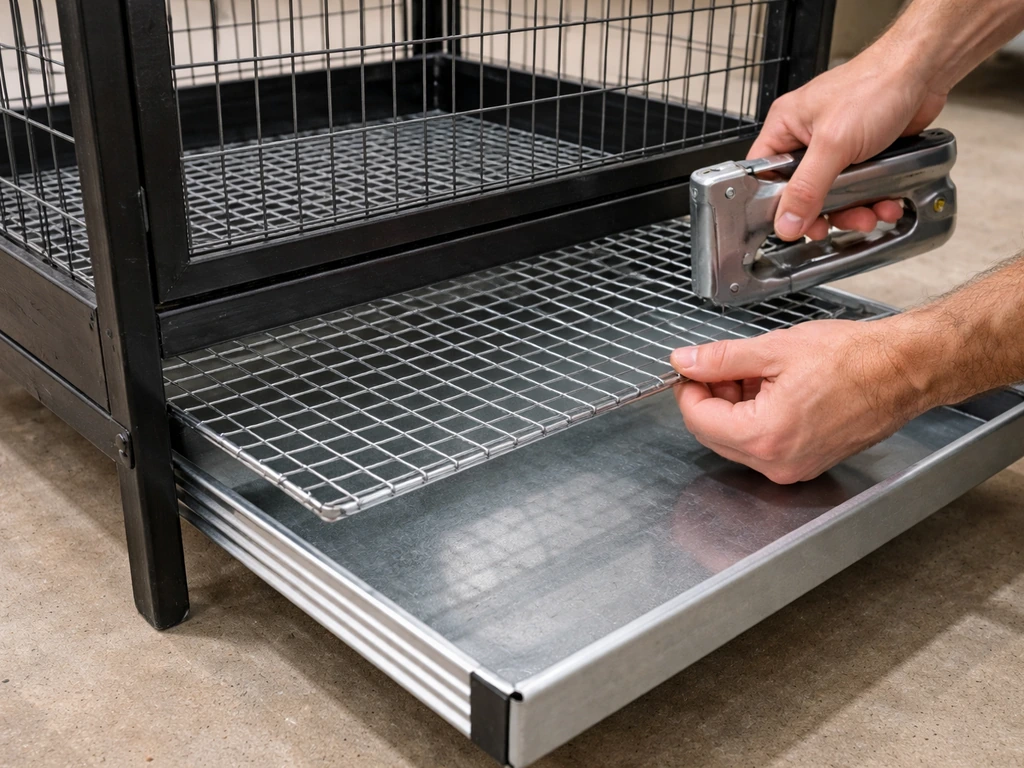
Cut a wire mesh panel for the floor at the same 1/2-inch spacing. Staple it to the bottom frame edges. Directly beneath this, the slide-out tray should fit snugly but move freely. If you are using a sheet-metal pan, measure the interior floor dimensions and bend or cut the pan so it slides in from one end. Line the tray with newspaper or cage liner paper for easy swapping. Test the slide action before installing everything permanently.
Step 4: Build and hang the doors
The main access door should be roughly 8 x 8 inches for a budgie-sized cage, centered on one long wall. Build a small frame from 1x2 scraps, attach wire mesh to it the same way you did the walls, and hang it with two stainless hinges. Install a snap bolt latch at the opposite edge from the hinges. A second smaller door, about 4 x 4 inches, should go on the wall near where the nest box will mount. This is your egg-check door. Fit it with a separate snap bolt so you can open it independently of the main door.
Step 5: Mount the nest box
For outside mounting, cut a hole in one wire panel wall slightly larger than the nest box entrance hole (1.75 inches for budgies, 2 inches for cockatiels). The nest box attaches flush to the outside of the cage wall, with the entrance hole aligning through the cut wire opening. Secure it with small bolts or hooks so you can remove it for cleaning between breeding rounds. For cockatiels, the box (roughly 10 x 10 to 12 x 12 inches, about 12 inches tall) should be positioned high on the wall since cockatiels prefer elevated nesting sites. Fill it with 1 to 2 inches of untreated pine shavings.
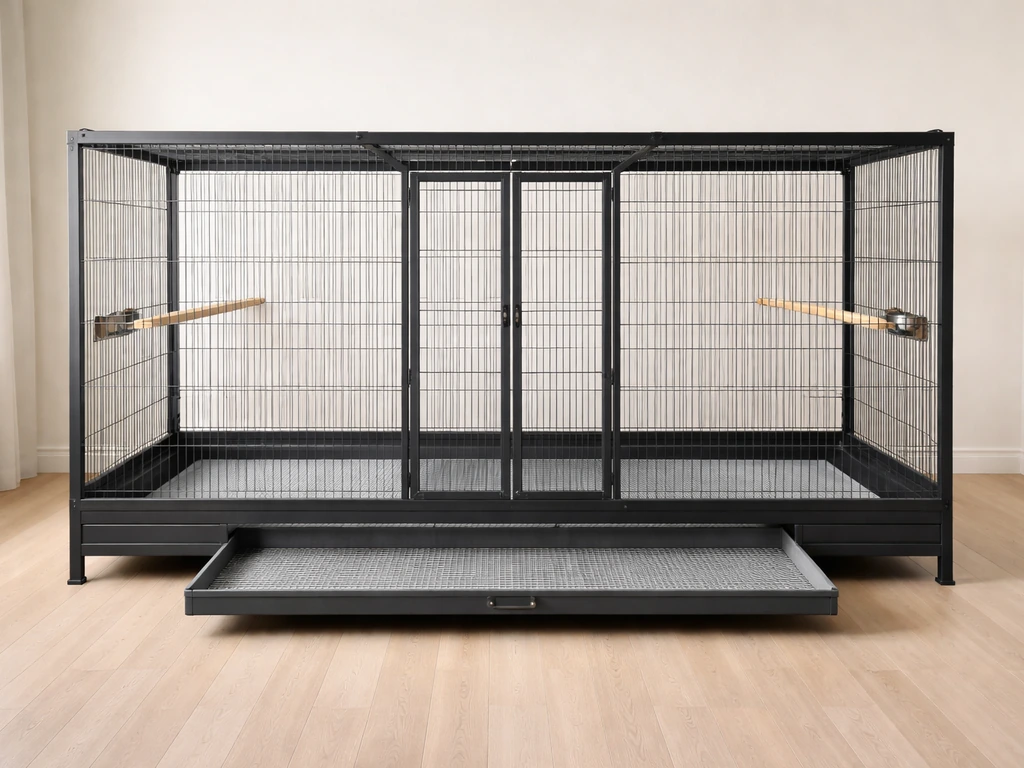
Step 6: Install perches and ventilation features
Attach one perch near the nest box entrance (birds use it as a landing platform). Add a second perch at the opposite end of the cage at a lower height for feeding. Use natural wood dowels or actual branches (apple, pear, or willow work well) at varying diameters to promote foot health. Ventilation in a small cage mostly happens through the wire mesh walls, but make sure at least two opposite faces are fully open wire and are not covered or blocked by furniture placement. Good airflow is critical during breeding, but it should not mean a direct draft blowing on the birds.
Safety and welfare checks before birds go in
Run through these checks once the build is complete and before introducing any birds. Skipping this step is the most common DIY mistake I see.
- Run a gloved hand over every interior surface to find sharp wire ends. Bend them all flat against the wood.
- Wiggle all latches hard. A breeding pair (especially a cockatiel hen) can figure out a poorly secured latch within hours. Replace any latch that moves more than a few millimeters with a proper snap bolt.
- Check that bar spacing is consistently 1/2 inch and that no panel has a gap where the frame meets the wire that a bird could push through.
- Test the drop tray slide a dozen times with paper in it. It should move without snagging.
- Open and close both doors and verify no wire edges are exposed at the door frame edges.
- Smell the cage interior. If you used paint or polyurethane, make sure the cure is complete. If you can still smell the coating, wait another 24 to 48 hours.
- Check the floor grate for any sharp points where the tray slides under it.
- Make sure the nest box can be fully removed from outside the cage without tools, for fast cleaning between clutches.
Escape prevention and predator defense
For indoor cages, escape prevention is mostly about latches and gap checks. For cages placed in a room with other pets, or if you are building a breeding setup in a garage or shed, add a second latch on the main door so two separate actions are needed to open it. Cats and even curious dogs can trip a single snap bolt. If rodents are a risk in your space, place the cage on a stand at least 18 inches off the floor, inspect around any wall gaps, and use tight 1/2-inch mesh rather than 1-inch. Rats can cause catastrophic harm to breeding birds overnight.
Covers, placement, and seasonal protection
Where to place the cage
Place the breeding cage against a solid wall on one or two sides. This gives the birds a sense of security during a vulnerable time and reduces stress. Avoid placing the cage in front of a window that gets direct afternoon sun, which can superheat a small enclosure quickly. A spot with bright indirect light is ideal. Keep the cage away from air conditioning vents, exterior doors that open frequently, and the kitchen, where fumes from non-stick cookware (PTFE/Teflon) are fatal to birds.
Using cage covers
A breathable cotton or fleece cover helps regulate sleep cycles and reduces nighttime disturbance, which matters for breeding success. If you are planning an outdoor setup, choose a weather-appropriate cage cover that protects the birds without trapping heat or blocking airflow. Cover three sides in the evening and leave the front partially open for airflow. Do not use a cover made from synthetic fabrics with loose threads that could catch on wire. Never cover the cage completely during waking hours: it traps heat and cuts off ventilation.
Seasonal considerations
| Season/Condition | Risk | What to do |
|---|---|---|
| Summer heat | Overheating, dehydration | Keep out of direct sun, ensure cross-ventilation, check water twice daily |
| Winter cold | Drafts, temperature drops overnight | Move cage away from exterior walls, use a partial cover, maintain room temp above 65°F (18°C) |
| High humidity | Mold in nest box, respiratory issues | Check nest box bedding every 3 to 4 days, replace if damp, increase room ventilation |
| Low humidity / heating season | Dry air irritating respiratory tract | Use a room humidifier near but not directed at the cage, target 40 to 60% relative humidity |
| Direct drafts (AC or fans) | Chilling eggs and chicks | Block airflow with a partial cover or repositioning, never point a fan at the cage |
Maintenance routines and troubleshooting
Daily and weekly cleaning
Pull the drop tray daily and replace the liner. Wipe food and water bowls each morning. Once a week, remove the perches and wipe them down with a damp cloth. The nest box bedding should be spot-checked every three to four days: remove soiled or wet shavings and add fresh ones without disturbing the eggs. Between breeding rounds, remove the nest box entirely, scrub it with a diluted white vinegar solution, rinse thoroughly, and dry completely in the sun before reuse. Do not use bleach inside the nest box: the residual fumes are harsh in an enclosed space.
Dealing with rust
Rust is the most common long-term problem with DIY wire cages. If you used galvanized-after-welding mesh and stainless hardware, you will rarely see it in the first year or two. But if rust does appear, address it immediately: light surface rust on the wire can be scrubbed off with a stiff brush and treated with a bird-safe rust converter. Any panel with flaking rust or rust pits should be replaced entirely, since birds will chew on wire and ingest rust particles. Prevent it by keeping the cage in a well-ventilated indoor space and drying it thoroughly after each wet cleaning.
Mess control
Breeding pairs produce more mess than a solo bird, especially once chicks hatch. A seed guard (a fabric or plastic skirt that attaches around the lower half of the cage) catches most of the kicked-out seed and shavings. Place a mat under the cage that is easy to shake out. Move water bowls away from perch locations to reduce fecal contamination, and switch to a water bottle sipper if you find the water bowl is getting dirty too quickly.
Pest problems
Red mites are the biggest pest concern in breeding setups because they hide in cage joints and nest boxes during the day and feed on birds overnight. If you see birds scratching excessively or looking pale and lethargic, check at night with a flashlight. Treat with a bird-safe mite spray on the cage structure and nest box (not directly on birds), wash all fabric covers, and disassemble the nest box for a thorough cleaning. Replacing nest box bedding weekly during the breeding season is the best preventive measure. For mice and other rodents near an outdoor or shed setup, snap traps placed well away from the cage are safer than rodenticide, which can harm birds indirectly.
Common build problems and fixes
| Problem | Likely cause | Fix |
|---|---|---|
| Wire panels sagging inward | Mesh not pulled tight enough before stapling | Re-staple with mesh pulled taut, add a center support bar on large panels |
| Birds escaping through door gap | Door frame warped or hinges misaligned | Add a second latch, adjust hinges, or add a strip of mesh over the gap |
| Nest box abandoned by pair | Too much disturbance, or box positioned too low | Limit egg checks to once daily, raise box height, add a privacy board on one side |
| Condensation inside nest box | High humidity plus poor ventilation | Drill two small ventilation holes in the upper corners of the nest box back panel |
| Food bowls always contaminated | Bowls placed under a perch | Move bowls to positions not directly below any perch |
| Rust appearing on wire within months | Non-GAW mesh used, or metal hardware left wet | Replace panel with GAW mesh, dry cage thoroughly after cleaning |
Building a breeding cage is not dramatically different from building a standard bird cage, but the details around nest box access, cleanability, and environmental control matter a lot more when birds are actively breeding. If you are specifically building for parakeets, use the parakeet sizing and nesting access details to keep the cage safe and easy to maintain during breeding build a bird cage. If you have already built a general cage for your species, this project will feel familiar. The main additions are the nest box setup, the secondary egg-check door, and a tighter cleaning routine. Get those right and you will have a setup that supports healthy breeding for years.
FAQ
How do I make the nest box removal easy without leaving unsafe gaps?
If your species uses a nest box, build the box opening and the wire cutout so you can remove the box without tearing bedding. A good rule is to make the wire cut opening only slightly larger than the entrance hole (you can target about 1/8 inch extra clearance) so the box sits flush and chicks do not press through gaps.
What’s the best way to check for sharp points or pinch hazards after assembly?
Do a “tactile” safety test before the first bird goes in, run a gloved hand over every interior seam, and also check the underside of the tray rails and corners where rust can start. Many injuries come from small protrusions you cannot see until you feel them.
Can I coat the wire after building, or does coating change the safety checks?
If you want to powder-coat or paint the wire, do it only after all fabrication steps are finished and the cage is dry and fully cured. Then recheck bar edges and staple or J-clip points, because coatings can build up unevenly at welds and make sharp ridges.
How tight should a slide-out tray fit, and what do I do if it binds?
For slide-out trays, aim for smooth movement with a small gap you can clean. If it binds, do not force it, instead sand or file the tray contact points, and confirm the tray can fully clear the cage bottom for daily liner replacement.
Is it safe to move a breeding cage location or add a cover after birds start nesting?
Yes, but you must keep it species-appropriate and maintain the same bar spacing and access. If you relocate the cage, re-check ventilation at the new spot, especially airflow behind the nest box, and confirm the cover cannot flop into the wire.
How should I cover the cage at night without reducing ventilation?
A dim routine helps, many breeders cover only three sides and leave the front partially open to reduce night disturbance while still allowing airflow. Avoid total cage blackout, and choose a breathable fabric that does not shed threads onto the wire or nest area.
What’s the best way to prevent direct drafts in a small indoor room?
Prevent drafts by orienting the cage so wind from vents does not blow directly across the nest box entrance. If you cannot control HVAC airflow, rotate the cage so the open wire faces are toward the room rather than toward the vent or a frequently opened door.
What bedding should I use in the nest box, and how fast should I replace it if it gets wet?
Use untreated wood and bedding that will not produce strong odors when damp. As a practical schedule, spot-check the nest bedding every 3 to 4 days like you plan, and if it smells strongly sour or looks wet, remove immediately and replace without digging into eggs more than necessary.
How do I minimize stress when checking eggs through a small egg-check door?
If eggs are on the nest box floor, your egg-check door should allow quick access with minimal handling time. Keep the egg-check door independent from the main door so you can open only what you need, then close it promptly to avoid chilling or stressing the pair.
What are common DIY mistakes that compromise safety even if the cage looks sturdy?
Avoid “shortcuts” like using loose hardware cloth or deformable mesh for the main walls. If you need to patch after a mistake, replace the entire affected panel section so the bar spacing stays consistent across the whole cage, not just in one corner.
How can I reduce mess and contamination once chicks hatch?
Seed guards and liners help, but also reposition bowls so droppings are less likely to land in food. If your water bowl still gets contaminated quickly, switch to a sipper, because it reduces wet mess around the perches.
What should I do if I see early rust spots, and when is replacement better than treatment?
For rust, do not treat and keep using panels with pits or flaking, replace them. Also dry the cage completely after any wet cleaning, and keep it in a ventilated area because rust often starts where humidity gets trapped under the tray or behind the frame.
How do I protect breeding birds from rodents in a garage or shed setup?
Yes, but use a stand height and mesh spacing appropriate for rodents in your specific building. A stand at least 18 inches off the floor helps, and rodents can slip through small gaps, so inspect edges around doors, tray openings, and wall junctions after you install the final setup.
What is the most practical way to handle red mites if they appear during breeding?
If you see red mites or suspect them, focus treatment on cage structure and nest box surfaces, not directly on the birds. In addition, wash and dry all removable fabric covers thoroughly, disassemble the nest box for cleaning, and refresh bedding weekly during the breeding season.
Next Articles
How to Build a Bird Flight Cage: Step-by-Step DIY
Step-by-step DIY guide to build a safe bird flight cage with proper size, materials, bar spacing, door, and maintenance.
How to Build a Bird Cage for Parakeets: DIY Guide
Step by step DIY guide to build a safe parakeet cage, choose size materials, assemble, set perches, and add safe enrichm
How to Build a Bird Trap Cage Safely and Humanely
Step-by-step humane build for a bird trap cage, with legal, safety checks, setup tips, and troubleshooting for welfare-f