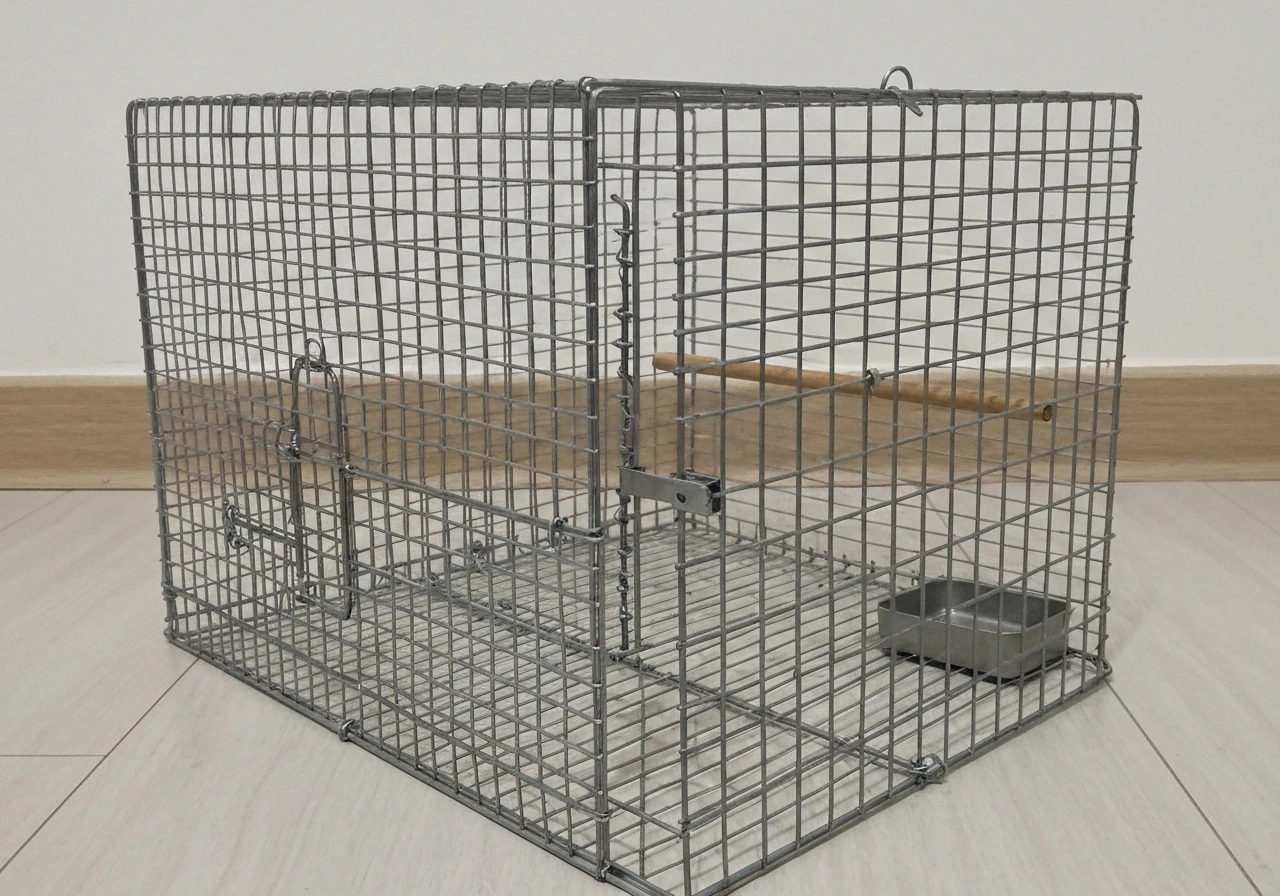
A bird trap cage is a temporary holding enclosure with a trigger-activated or self-closing door that lets a bird enter but not leave on its own. The most common legitimate uses are safely containing an injured bird until you can reach a wildlife rehabilitator, temporarily moving a pet bird that escaped into a hard-to-reach spot, or managing a nuisance bird situation under a proper permit. Building one correctly means using safe materials, correct bar spacing, solid ventilation, and a door mechanism that closes without crushing or injuring the bird.
How to Build a Bird Trap Cage Safely and Humanely

Maya Bennett
7 Jun 2026
Before you build: understand what this is (and isn't) legal for
This is worth saying clearly upfront: in the United States, capturing most wild birds without a federal permit is illegal. Migratory birds (which covers the vast majority of common wild species, from sparrows to robins to hawks) are protected under the Migratory Bird Treaty Act. The U.S. Fish and Wildlife Service routes managed capture or relocation of depredating or nuisance migratory birds through a specific permit process (MBPM-4), and even then, the trapping methods are regulated under 50 CFR § 20.21. Trapping migratory birds without authorization is a federal offense, full stop.
So who should actually build a bird trap cage? There are three practical, legal use cases this guide covers: (1) a pet bird owner who needs to safely re-catch an escaped pet parrot, cockatiel, or parakeet inside or near the home; (2) someone who has found an injured wild bird and needs a temporary, safe container to transport it to a licensed wildlife rehabilitator, which is allowed as immediate emergency aid; and (3) a licensed wildlife professional or permitted operator who already has authorization and needs construction guidance. If you are dealing with a wild bird conflict in your yard or building, the humane and legal first move is to contact your state wildlife agency or a licensed nuisance wildlife control professional, not to set a trap yourself.
Skip glue traps entirely. Audubon, Cornell's wildlife veterinary team, and bird rehab centers across the country have documented how glue traps cause severe injuries to birds: broken feathers, torn skin, dislocated joints. They also catch protected birds unintentionally. There is no safe DIY use case for a glue trap on a bird, ever.
If your goal is to get a wild bird out of your attic or garage without trapping it, Maine IFW and the Wisconsin Humane Society both point to a one-way door as the safest approach: the bird exits on its own, cannot re-enter, and nobody gets hurt. That is always worth trying before building anything.
Materials list and tool setup
For a standard DIY bird trap cage sized for small to medium birds (finch through cockatiel-sized), here is what you need before you start cutting anything: If you want step-by-step instructions, the next sections walk through choosing materials, assembling the frame, and installing a humane door and entry trigger how to build bird breeding cages.
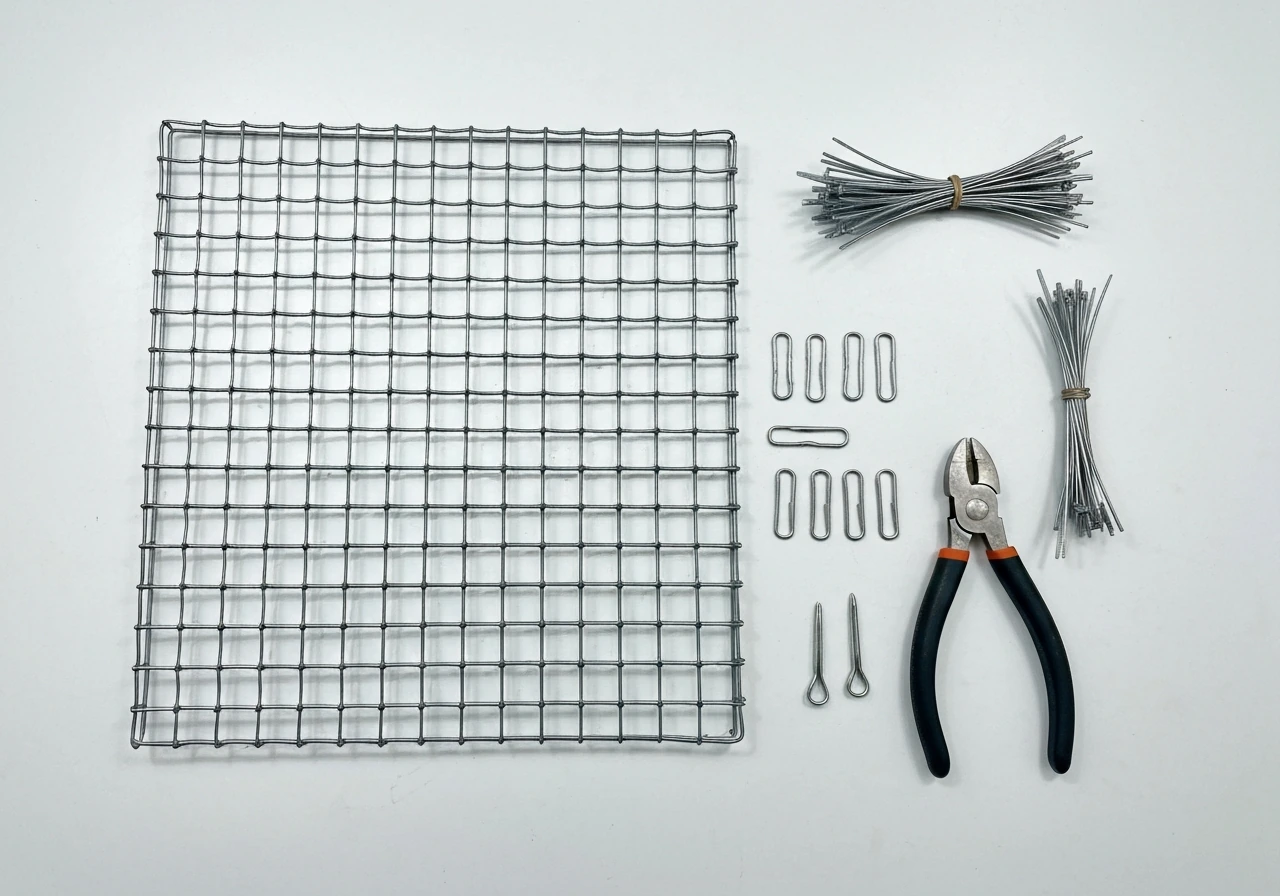
Materials
- Welded wire mesh (galvanized or stainless steel): 19-gauge or heavier for small birds, 16-gauge for medium birds. Bar spacing: 1/2 inch for small birds (finches, budgies), 3/4 inch for cockatiels, no wider than 1 inch for medium parrots. Avoid cheap hardware cloth with sharp cut edges.
- Steel or aluminum square tubing for the frame: 3/4-inch or 1-inch diameter, depending on cage size. Aluminum is lighter and rust-resistant; steel is stronger for larger builds.
- Stainless steel hinge: 2-inch butt hinge, at least two per door panel.
- Spring latch or drop-bar latch: choose a design that closes under its own weight or spring tension, not one requiring manual locking (for a triggered entry door).
- Monofilament fishing line or lightweight steel cable (15-30 lb test) for a simple drop-door trigger string, if using a trigger mechanism.
- Non-toxic wood dowel or PVC pipe (3/4 inch diameter) as a prop stick for a prop-and-string trigger setup.
- Wire cutters and needle-nose pliers.
- Cable ties or J-clips (J-clips give a stronger, professional finish; a J-clip plier tool helps a lot).
- Non-toxic sealant or powder-coat paint if using bare steel (zinc fumes from galvanized mesh can be dangerous for birds, so wash new galvanized mesh with a 50/50 white vinegar and water solution and rinse before use).
- A small food dish and water container that can attach inside the cage.
- Ventilated cover material: breathable cotton or mesh fabric to drape over three sides if needed for calming a stressed bird.
Tools
- Wire cutters (heavy-duty aviation snips for thicker gauge mesh)
- J-clip plier or standard needle-nose pliers
- Tape measure and permanent marker
- Drill with metal bits if using tubing for the frame
- Pop rivet gun (optional, for metal frame corners)
- File or sandpaper to smooth any cut wire edges
File every single cut wire edge before assembly. A single exposed sharp tip inside the cage can slice a bird's foot or wing in seconds, especially if the bird panics.
Step-by-step build plan
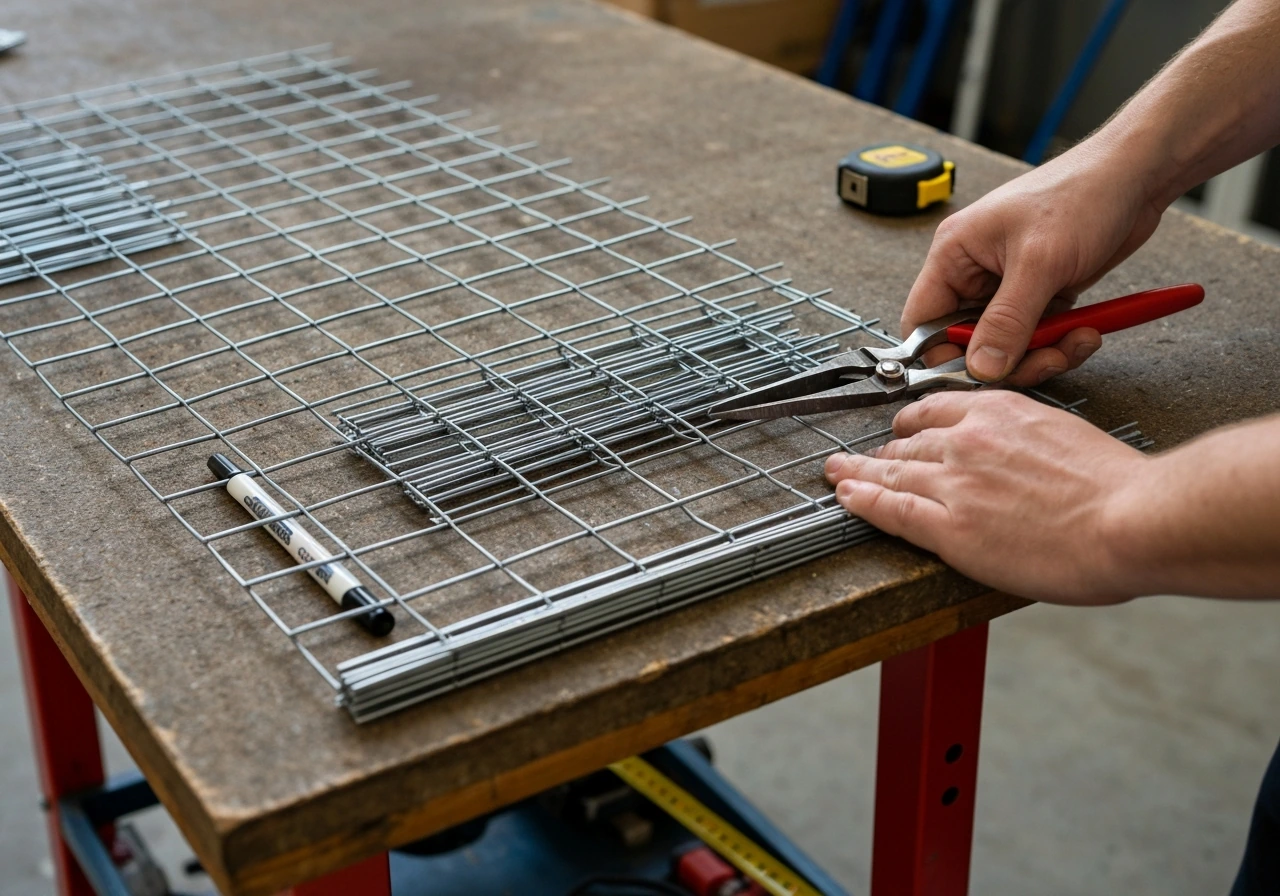
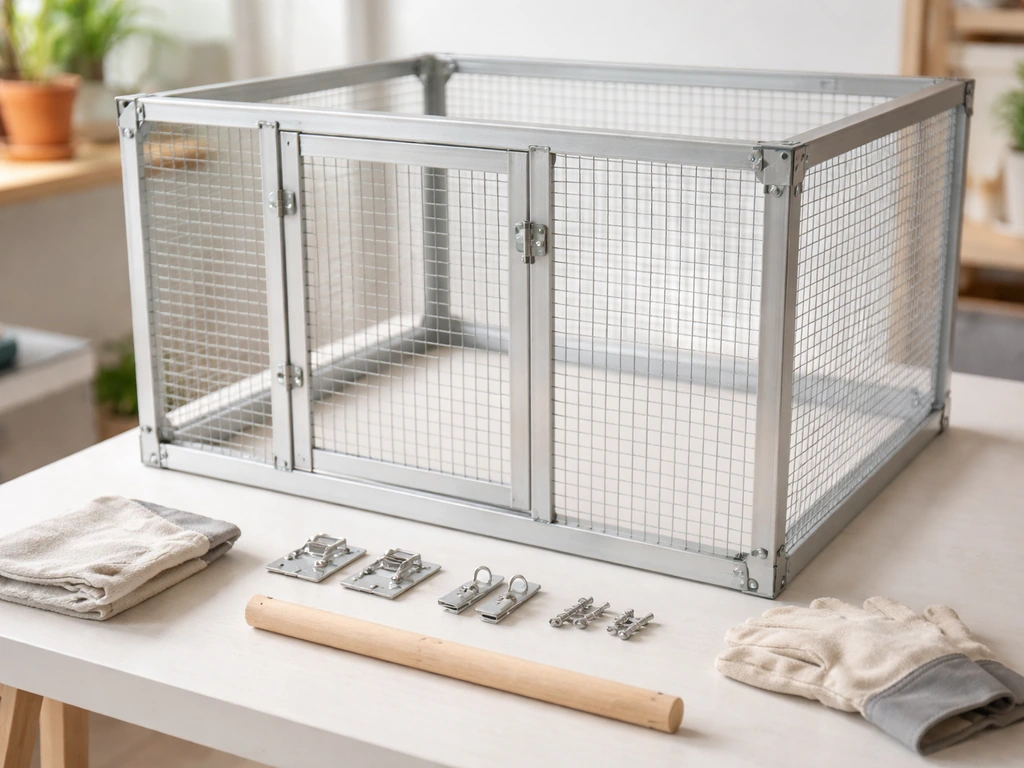
Step 1: Cut your frame panels
For a trap cage sized to catch or temporarily hold a bird up to cockatiel size, a good working interior dimension is 18 inches long, 12 inches wide, and 12 inches tall. Cut six panels from your welded wire mesh: two 18x12 panels (top and bottom), two 12x12 panels (sides), one 18x12 panel (back), and leave the front open for your door.
If you want a complete, practical walkthrough, follow these steps to build an outdoor bird cage safely and legally cut six panels from your welded wire mesh. If you want step-by-step help, use this approach to build bird breeding cages with safe spacing and smooth edges Cut six panels from your welded wire mesh. Smooth every cut edge with a file immediately after cutting. This step is not optional.
Step 2: Assemble the cage body
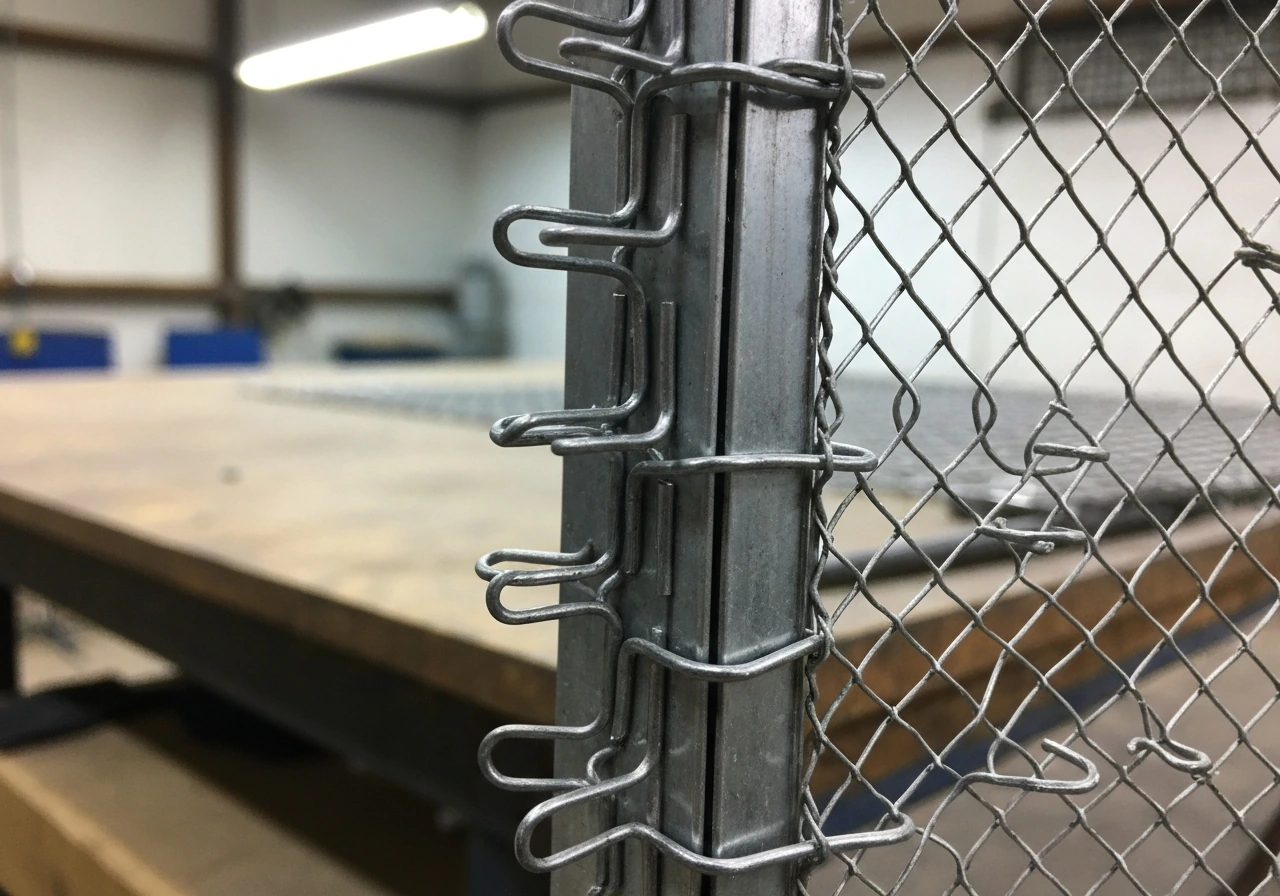
Join the panels using J-clips at every intersection, spacing clips every 3 to 4 inches along each seam. If you are using a metal tube frame, drill attachment holes in the tubing and wire or rivet the mesh to it. Work around the perimeter systematically: attach the bottom to the back first, then add the two side panels, then the top. The result should be a rigid open-fronted box. Squeeze every J-clip tight with pliers so there are no loose ends pointing inward.
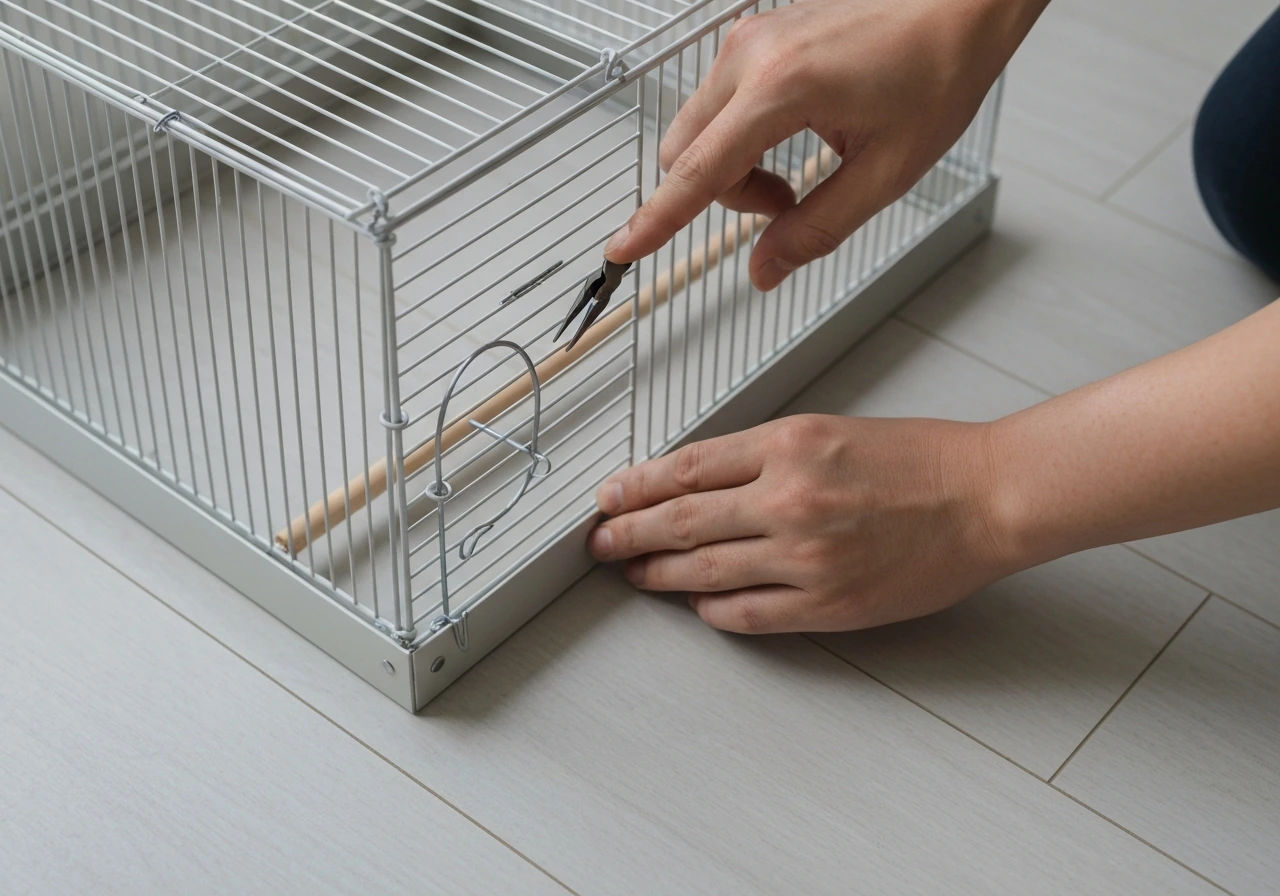
Step 3: Build and hang the door
Cut a door panel from mesh that is about 1/4 inch smaller than the front opening on each side, so it swings freely without catching. Attach it to the top of the front opening using two stainless steel hinges, so the door swings upward and drops down under gravity. This is called a guillotine-style drop door and it is the most common design for humane trap cages because it closes under its own weight without requiring a spring strong enough to injure the bird. Make sure the door drops cleanly from the full-open (up) position to fully closed with no gaps on the sides. A door gap wider than your bar spacing is an escape route.
Step 4: Set up the trigger or entry mechanism
The simplest and most humane trigger is a prop-and-string setup. Cut a prop stick (wood dowel or PVC, about 8 to 10 inches long) that will hold the door open at a 90-degree angle when stood vertically on the cage floor. Tie a length of monofilament or lightweight string from the top of the prop to a perch or bait platform inside the cage. When the bird lands on the bait platform or disturbs the string, the prop falls, and the door drops. This design avoids any mechanism with strong spring tension that could slam the door onto the bird's body or feet.
If you are building this for re-catching a pet bird rather than as a triggered trap, you can skip the trigger entirely and use the drop door as a manually closed door: prop it open, let the bird enter on its own to reach food, then release the prop by pulling a string from a distance. This remote-release approach is lower-stress for the bird and gives you more control.
Step 5: Secure the hardware and do a full inspection
Go around the entire assembled cage and check every clip, hinge, and seam. Look for: any wire end pointing inward, any gap in the mesh where a bird's head or foot could get stuck, any door edge that is not smooth, and any loose J-clip that a bird could work open. Shake the cage firmly. Nothing should rattle, flex, or shift. The door should drop freely, close completely, and have no gap where a foot could be caught at the bottom edge. If the door bottom is bare cut wire, fold a thin strip of smooth tape or file the edge flat.
Bird-safety requirements to check before use
This section matters more than the build steps. A cage that injures the bird it is supposed to protect is worse than no cage at all. The USFWS humane capture guidelines, wildlife rehabilitation standards from NWRA and Texas Parks and Wildlife, and welfare codes all converge on the same core requirements. For the humane capture, handling, and disposition of migratory birds, the USGS ties these requirements to the USFWS guidance on humane methods, welfare considerations, and regulated handling practices welfare codes all converge on the same core requirements..
| Safety requirement | Standard | How to check it |
|---|---|---|
| Bar/mesh spacing | Max 1/2 inch for small birds (finch, budgie), 3/4 inch for cockatiels, 1 inch max for medium parrots | Run your finger across every panel; test with a coin of the appropriate size |
| Ventilation | At least 30% of wall surface open to airflow; no solid panels on more than two sides at once | Hold the cage near a lit candle or incense stick — smoke should move through freely |
| Sharp edges | Zero tolerance — every cut wire end must be filed or folded inward | Run a cloth around the interior; it should not snag |
| Door closure force | Door should close under gravity only, with no spring force strong enough to pinch | Drop the door on your own finger gently — you should feel pressure but not pain or bruising |
| Gap at door bottom | No gap wider than 3/8 inch between door bottom and cage floor when closed | Measure with a ruler after door drops |
| Stability | Cage must not tip when a bird flaps inside | Place on a flat surface and press firmly on one corner; it should not rock |
| Interior hazards | No protruding wire ends, no toxic materials, no small parts that detach | Visual and tactile inspection of every surface |
If you plan to hold a bird for more than a few hours (for example, while waiting for a rehab center to open), you need to add a perch inside, fresh water in a small secured dish, and a partial cover over the cage to reduce stress. Cobequid Wildlife Rehabilitation Centre and Toronto Wildlife Centre both recommend keeping captured wild birds in a dark, quiet, ventilated space to minimize panic-related injuries. Do not use a heat lamp unless you are an experienced rehabilitator; overheating a stressed bird is a real risk.
Placement, baiting, and timing
Where to place the cage
For re-catching a pet bird indoors, place the trap cage in the room where the bird is spending most of its time, ideally near where it has been perching. Set it on the floor or on a flat table, not on a swinging surface. Keep other pets out of the room entirely. For an injured wild bird outdoors, place the cage in shade, away from foot traffic, and at ground level if the bird cannot fly. Avoid direct sun, which can overheat a bird inside a mesh enclosure within minutes, especially in summer.
Baiting
Use the bird's own preferred food as bait. For a pet cockatiel or parakeet, millet spray is almost always effective. For pet parrots, use a favorite treat. Place the main bait toward the back of the cage so the bird has to fully enter to reach it. Drop a few small pieces just outside and inside the entrance to create a trail. If you are using a remote-release approach rather than a trigger, sit quietly at a distance and wait. Birds will almost always enter on their own if they are hungry and you are not looming over the cage.
Timing and monitoring
Never leave a trap cage unattended for long. Washington DFW's trapping guidance makes this point explicitly: you have to be prepared to handle whatever you catch, and the longer a bird is in a trap unattended, the higher the stress and injury risk. Check a set trap at least every 30 minutes. In hot weather, check every 15 minutes. If the cage is set and the bird is not entering after an hour, reset the bait and try again at a different time of day. Early morning, when birds are most active and hungry, is usually the most productive window.
After the bird is inside: safe handling and next steps
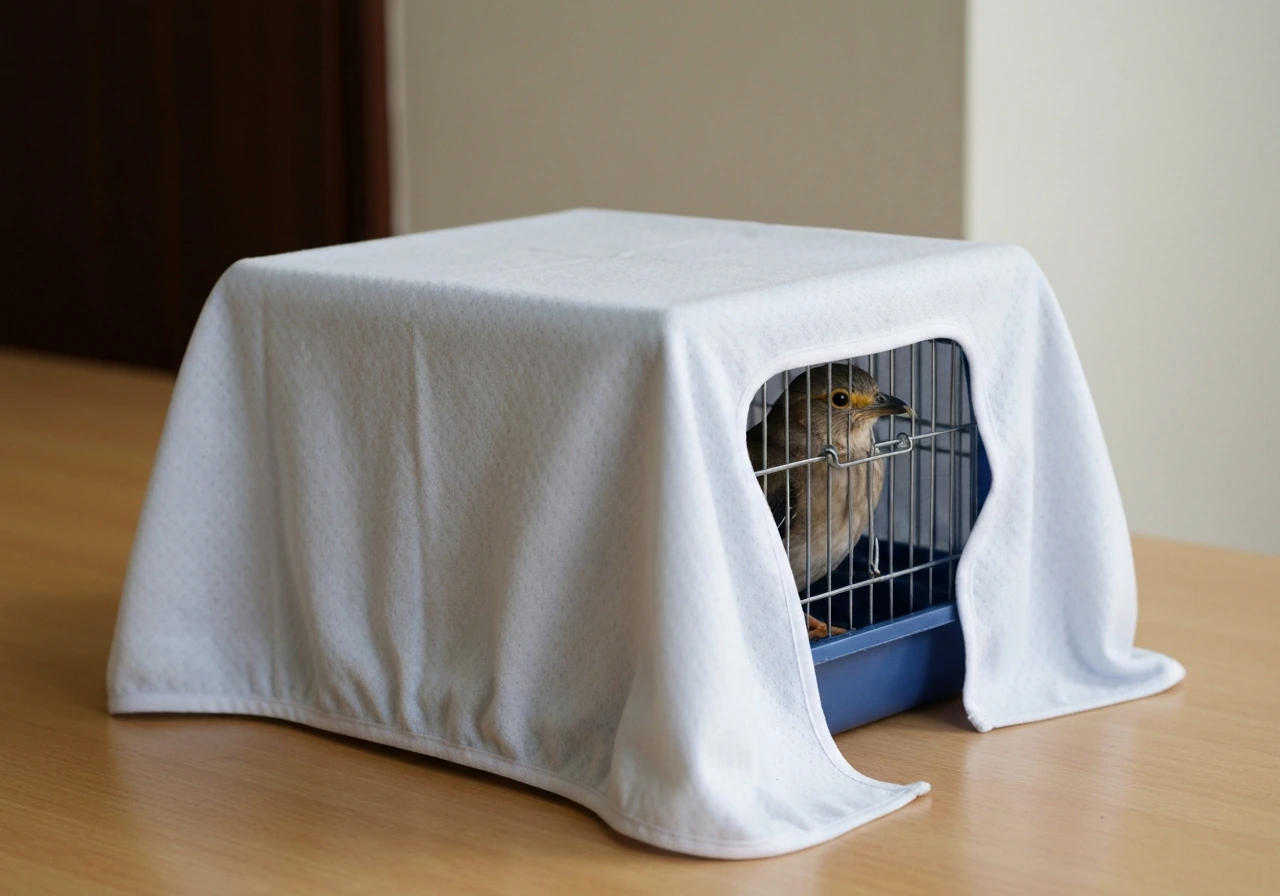
The moment the door drops, cover three sides of the cage immediately with a breathable cloth. This reduces visual stimulation and calms the bird quickly. Speak quietly and move slowly. If the bird is your own pet, give it a few minutes to settle before attempting to open a side access door to retrieve it. If the bird is injured wildlife, do not attempt to handle it yourself beyond what is necessary to transport it safely. Contact a licensed wildlife rehabilitator right away. The USFWS's humane capture framework is clear that minimizing handling time and stress are both central to the bird's welfare during any capture process.
For transporting an injured wild bird, a covered, ventilated box or carrier is safer than keeping the bird in the open wire trap cage, which allows the bird to keep striking the mesh. Transfer it carefully to a secure, dark, ventilated cardboard box (poke several 1/2-inch ventilation holes in the top and sides) and keep it in a quiet, temperature-stable spot until a rehabilitator takes over.
Troubleshooting common problems
- Bird enters but triggers the door too early (before fully inside): move the bait platform further back, and shorten the prop stick so the trip wire is positioned closer to the rear third of the cage floor.
- Door drops but bounces back open: the door is too light. Add a small metal washer taped to the bottom edge of the door panel to increase weight, or add a simple hook-and-eye latch that clicks into place when the door drops.
- Bird approaches but will not enter: reduce your presence near the cage, add a familiar perch just inside the entry, and try covering the top and back of the cage with a dark cloth to make it feel more enclosed and shelter-like.
- Cage tips when bird flaps: add weight to the base by taping flat stones or metal washers to the exterior bottom corners, or place the cage inside a slightly larger open tray.
- Bird appears stressed and is feather-striking the bars: cover all sides immediately, reduce noise, and move the cage to a darker, quieter location. Check for sharp wire ends if you see any blood.
- Pest insects are attracted to bait food left overnight: never leave a baited trap set overnight unattended. Remove bait if you are not actively monitoring, and clean the cage interior with a diluted white vinegar solution after each use.
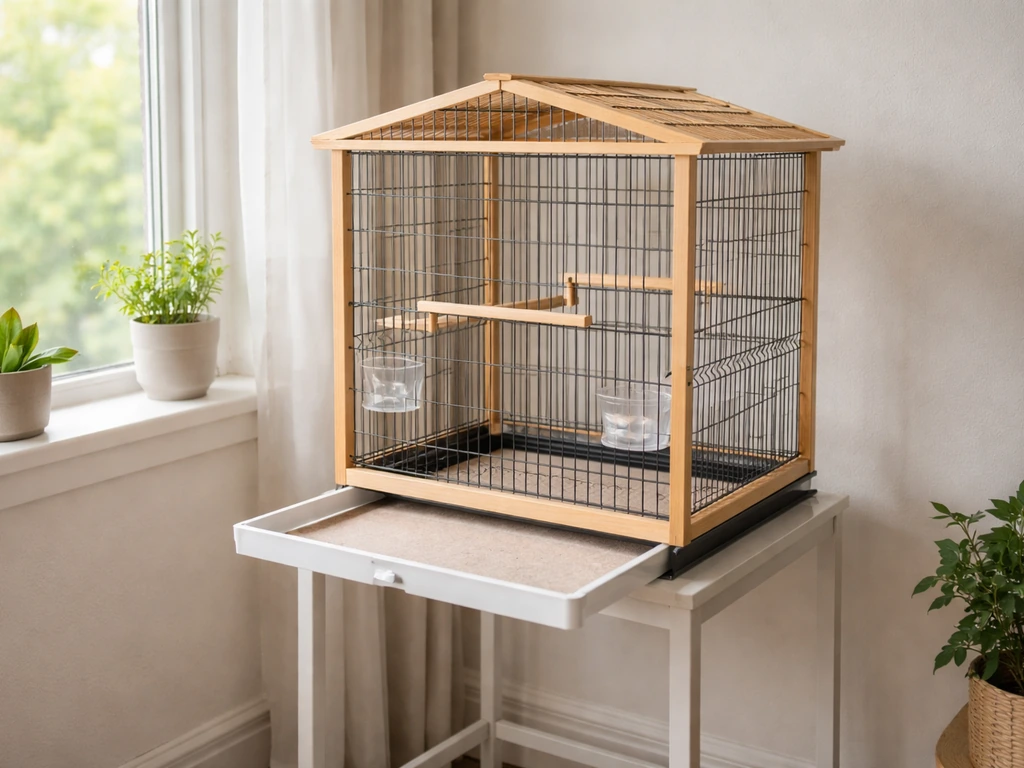
How this differs from other cage builds on this site
A trap cage and a permanent pet bird cage share the same core safety standards (bar spacing, ventilation, no sharp edges, stable construction), but the design priorities are different. A permanent cage for a cockatiel or parakeet is built for long-term comfort, enrichment, and daily access. A trap cage is built for a short, specific task: it needs a reliable self-closing entry mechanism, maximum portability, and fast cleanability.
If you are looking to build a permanent home enclosure for a pet bird, the principles in the general cage build guide, the cockatiel-specific or parakeet-specific build guides, or a flight cage build are more appropriate starting points than this one. The trap cage design described here is intentionally minimal and functional, not a long-term living space. To get the details on constructing one, follow the step-by-step sections above for the frame, door, and trigger setup.
For a long-term enclosure, focus on ventilation, safe bar spacing, and easy maintenance, following a permanent pet bird cage guide instead of a trap setup. If you want a long-term enclosure, review the full process in our guide on how to build an aviary bird cage for safe ventilation and secure construction permanent pet bird cage guide.
Quick pre-use checklist
- Confirm your intended use is legal (pet re-capture, emergency injured bird transport, or permitted professional use).
- All cut wire edges filed smooth — no snag points on a cloth dragged across any interior surface.
- Bar spacing verified at 1/2 inch or smaller for small birds, 3/4 inch or smaller for cockatiels.
- Door drops cleanly under gravity alone, closes with no gap wider than 3/8 inch at the bottom.
- Cage stable on a flat surface — does not tip or rock.
- At least 30% of wall surface is open mesh for ventilation.
- New galvanized mesh cleaned with vinegar-water solution and thoroughly rinsed.
- Bait placed at rear of cage, trail of small pieces leading inward.
- Cover cloth (breathable) ready to drape over cage the moment door closes.
- Wildlife rehabilitator phone number on hand if dealing with a wild bird.
- Monitoring plan set — checking at least every 30 minutes, every 15 in hot weather.
FAQ
Is it ever legal for me to build and use a trap cage for wild birds if I’m just trying to move one that’s causing trouble?
Often not without authorization, especially for migratory birds, even if the bird is “nuisance” to you. The article covers the federal framework, but as a practical next step you should call your state wildlife agency or a permitted nuisance wildlife professional first, then ask specifically whether your situation requires a permit and what capture method is allowed in your area.
Can I use this cage to catch multiple birds at once?
You should not aim for multiple capture in a DIY trap cage. Even if the cage fits one bird, adding more birds increases stress, entanglement risk, and the chance of injuries during door closure. If multiple birds are present, the safer approach is to use an exclusion or one-way door strategy and handle cases individually.
What bar spacing or mesh size should I use so a bird can’t get stuck or escape?
The build focuses on welded wire and safe spacing, but the key decision is matching mesh to the target species so the bird’s head and feet cannot slip through during panic. If you do not know the species, choose a conservative small spacing and still do a “panic fit test” by gently checking that only the intended entry size is possible, then re-check all seams and door gaps.
How do I keep the door from injuring the bird if my hinge or drop timing is off?
Before you set the trap, run repeated dry tests: open fully, release, and confirm the door lands without twisting, binding, or overshooting. If the door hesitates or hits the frame, adjust hinges and alignment or refit the door panel, because a partial closure creates both injury risk and an escape gap.
If I’m using the prop-and-string trigger, how can I prevent the bird from getting tangled before the door drops?
Use minimal slack in the string so it does not form loops the bird can climb into. Also place the string connection high on a perch or bait platform so the bird triggers it naturally rather than pulling on the string from inside the entrance area.
Can I bait the cage longer or leave it out overnight to increase my chances?
No, unattended use is a major risk factor. The article says to check frequently and to reset if a bird has not entered, but practically you should also avoid long overnight placement because temperature swings and extended stress can rapidly increase injury and mortality risk.
What should I do if the bird hits the mesh repeatedly after capture?
Transfer it promptly to a covered, ventilated container if you notice persistent striking behavior. The article notes that open wire trap enclosures invite continued striking, so having a prepped, dark, ventilated box ready at the moment of closure reduces repeated impacts.
How should I cover the cage without causing overheating?
Use a breathable cloth on three sides as described, and avoid materials that block airflow. The fresh next-step is to also monitor ambient temperature, remove the cover if the area is overheating, and keep the cage out of direct sun so airflow plus shade does the cooling work.
Should I put the trap cage on the floor or on a table for wild birds?
For injured or ground-limited birds, ground level is safer as the article suggests. For other wild birds, tables or elevated placement can work, but only if it still stays stable and away from foot traffic, because a toppled cage is a common failure mode.
How do I reduce stress for a pet bird that’s stressed and panicking?
Place the trap cage in the bird’s familiar area as the article recommends, but also reduce visual stimulation by partially dimming the room and keeping people and other pets out. Plan your retrieval route before you set the cage so you can open it calmly and quickly once the bird has settled.
What’s the difference between building a trap cage and building a permanent pet bird cage in terms of design priorities?
A trap cage is optimized for short-term containment, fast cleaning, and a reliable self-closing door, while a permanent cage prioritizes enrichment, long daily access, and routine maintenance. If you need long-term housing, switch to a permanent-cage plan rather than reusing the trap cage, because trap-cage designs typically lack features that support consistent perching and habitat-like comfort.
Next Articles
How to Build a Bird Cage for Cockatiels: Step-by-Step Guide
Step-by-step DIY plan to build and set up a cockatiel cage, with safe materials, sizing, layout, and daily care tips.
How to Build a Canary Bird Cage: Step-by-Step DIY Guide
Step-by-step DIY canary cage build: safe materials, wire specs, measurements, setup, placement, and maintenance checklis
How to Build an Outdoor Bird Cage: Step-by-Step DIY
Step-by-step DIY guide to build a weatherproof outdoor bird cage with safe materials, assembly steps, placement, and car