A bird flight cage needs to be long enough for your bird to actually fly, not just hop between perches. For most small birds like budgies or cockatiels, that means a minimum of 36 to 48 inches in length, with bar spacing no wider than 0.5 inches. For mid-size birds like conures or caiques, you want at least 48 to 60 inches long and 0.75-inch bar spacing. You'll frame it with powder-coated steel or untreated aluminum, use stainless steel mesh for the walls, skip anything galvanized (zinc poisoning is a real and serious risk), and fit a double-door airlock entry so your bird can't bolt out when you reach in. For an outdoor setup, choose outdoor-rated materials and plan for sun, rain, and escape-proof door safety power-coated steel. This guide walks you through every step. If you also need the full walkthrough for dimensions, materials, and build order, see how to build bird cage for a related, step-by-step approach This guide walks you through every step..
How to Build a Bird Flight Cage: Step-by-Step DIY

Choosing the Right Cage Type and Size for Your Bird
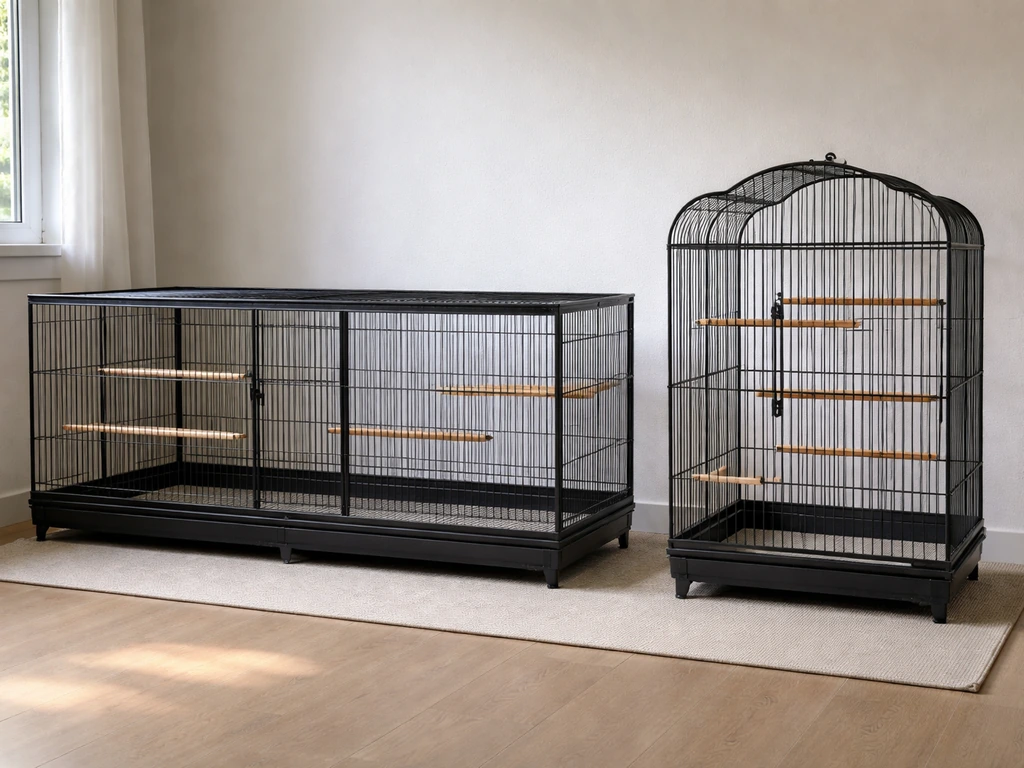
A flight cage is different from a standard cage in one key way: the length is prioritized over the height. Your bird needs room to build up speed and glide between perches, so you're thinking horizontally first. Height matters too, but a tall narrow cage just gives you a fancy ladder, not a flight space. Before you cut a single piece of wood or order wire, nail down your bird's species and how many birds will share the space, because both drive every measurement you'll make.
The Merck Veterinary Manual gives minimum cage dimensions by species group, and these are the floor (not the target). For cockatiels and budgies, the listed minimum is 20 x 20 x 30 inches, but for a true flight cage you want to at least double the length to 48 inches or more. For conures, Poicephalus parrots, and caiques, the minimum jumps to 36 x 24 x 48 inches, and again, a flight cage should push that length toward 60 inches. If you're housing more than one bird, add at least 50 percent more floor space per additional bird.
| Bird Type | Merck Min. Dimensions (L x W x H) | Recommended Flight Cage Length | Bar Spacing |
|---|---|---|---|
| Budgerigar / Parakeet | 20 x 20 x 30 in | 36–48 in | 0.5 in |
| Cockatiel / Lovebird / Parrotlet | 20 x 20 x 30 in | 42–54 in | 0.5 in |
| Conure / Poicephalus / Caique | 36 x 24 x 48 in | 54–72 in | 0.75 in |
| Miniature Macaw | 36 x 24 x 48 in | 60–72 in | 0.75 in |
Bar spacing is a safety-critical number, not an aesthetic one. Too wide and your bird can squeeze its head through and get stuck or injure itself. Too narrow and you've wasted money on wire that's overkill. Stick with the Merck figures: 0.5 inches for small birds, 0.75 inches for mid-size birds. If you're building for canaries or finches, go tighter at 0. For canaries specifically, follow the same safe wiring and spacing rules, then size the cage so your bird has enough room to stretch and fly between perches how to build a canary bird cage. 375 to 0.4 inches. These numbers also come up when building species-specific cages for cockatiels, parakeets, or canaries, so bookmark them regardless of which project you're tackling.
Materials and Safe Construction Specs
Material selection is where most DIY builds go wrong, and the consequences range from ruined wire to a dead bird. Here's what matters most: no zinc, no lead, no PTFE-coated hardware, and no paint that hasn't been confirmed bird-safe. Let me walk through each component.
Frame Material
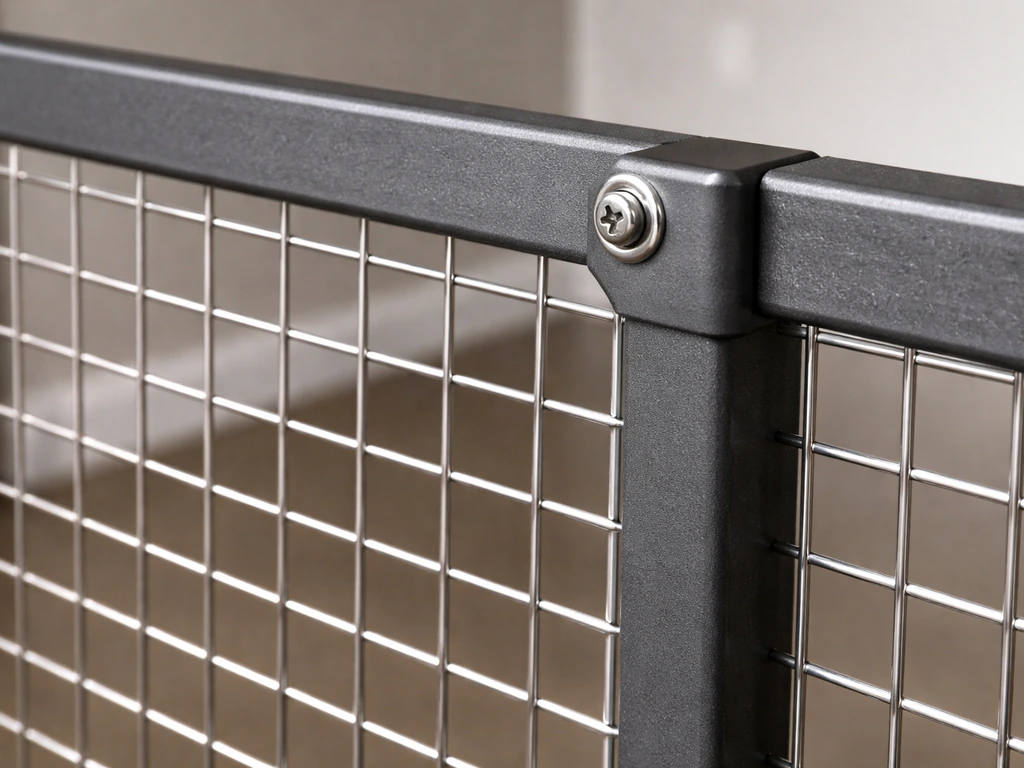
Powder-coated steel is the most practical choice for an indoor flight cage frame. It's sturdy, resists corrosion, and the baked-on finish doesn't off-gas after curing. Make sure the coating is fully cured before your bird goes anywhere near it, usually 48 to 72 hours after any touch-up work. Untreated aluminum angle stock is another solid option: lighter, naturally corrosion-resistant, and easy to cut with a hacksaw or miter saw. Avoid raw steel without a finish because it rusts, and avoid PVC for structural members because it flexes too much for a large flight cage.
Wire and Mesh
Stainless steel welded wire mesh is the gold standard. It doesn't rust, it doesn't leach zinc, and it holds up to birds chewing on it. The downside is cost: 16-gauge stainless mesh runs significantly more than galvanized alternatives. If budget is a real constraint, PVC-coated wire (where the coating is thick, fully intact, and confirmed non-toxic) is a second option, but inspect it for chips or thin spots before installing. What you absolutely cannot use is standard galvanized wire or hardware cloth. Galvanized metal is coated with zinc, and the Merck Veterinary Manual directly identifies galvanized wire and hardware as a major source of zinc poisoning in birds. Birds chew on cage walls. They will ingest zinc. Don't use galvanized wire.
Hardware: Nuts, Bolts, Clips, and Latches
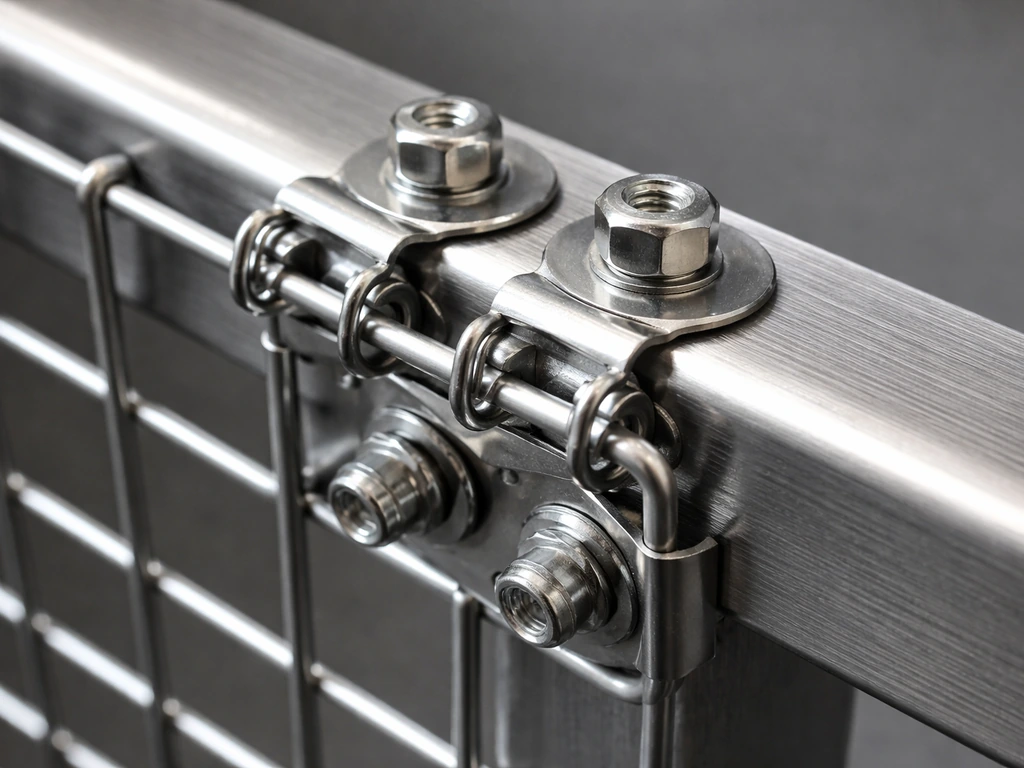
Use stainless steel hardware throughout: bolts, nuts, washers, and cage clips. Zinc die-cast carabiners, galvanized screws, and mystery-metal clips are all off the table. Lead is also a documented toxicity risk for birds, so if you're repurposing old hardware, test it or replace it. Latches should be stainless steel or powder-coated steel and should require two steps to open so a clever bird (especially conures and cockatiels) can't figure out the mechanism and let itself out.
Finishes and Coatings
If you're painting any wood components like perch mounts or access panels, use a water-based, zero-VOC paint and let it off-gas completely for at least 72 hours in a ventilated space before bringing it near your bird. Never use spray paints with PTFE-based components or any nonstick coating near a bird's environment. PTFE (found in Teflon, Silverstone, Tefzel, and similar nonstick finishes) releases acidic fumes when overheated and those fumes are rapidly lethal to birds. Cornell's College of Veterinary Medicine reports it causes severe respiratory compromise and sudden death. VCA recommends removing birds to fresh air immediately if PTFE fume exposure is suspected. Keep PTFE completely out of the picture, not just for the cage, but for tools you're using nearby.
Step-by-Step Build Process
Step 1: Plan and Measure
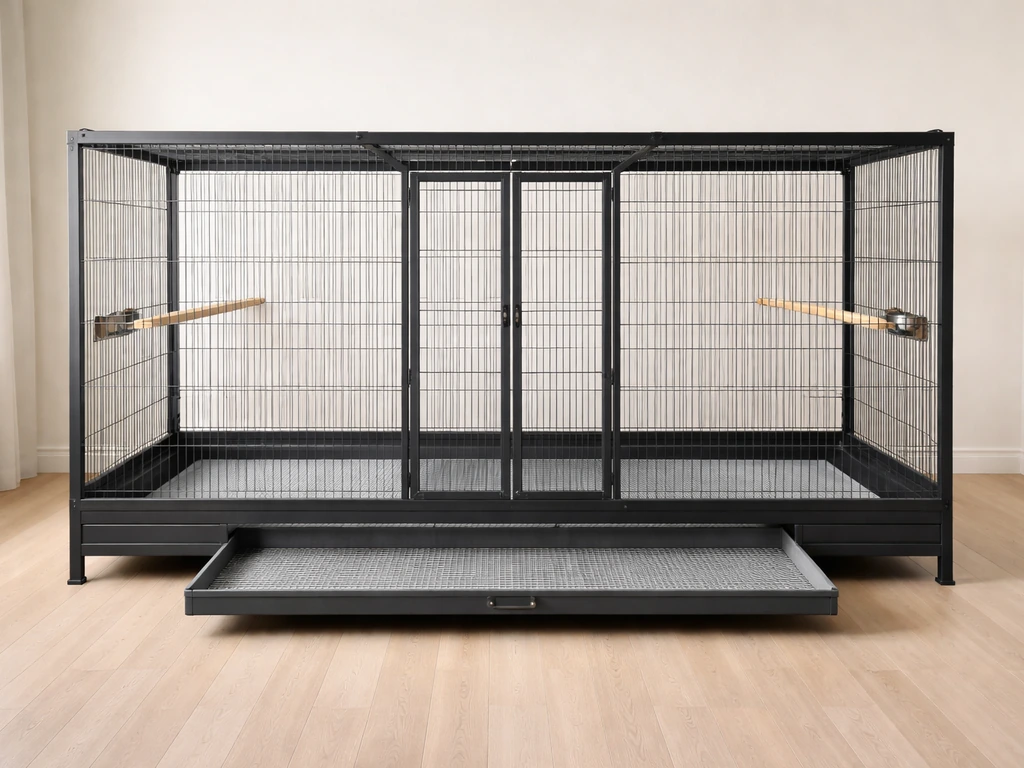
Sketch your cage with exact dimensions before buying materials. Build notes like these can also help you plan a proper bird trap cage layout safely and securely how to build a bird trap cage. A standard indoor flight cage build for a small bird might run 48 x 24 x 36 inches (L x W x H). For a mid-size bird, plan for 60 x 24 x 48 inches. Draw all six faces including the floor panel, and mark where your door, perch anchors, and any access panels will go. Measure your room and confirm the finished cage will fit through doorways during transport to its permanent spot.
Step 2: Build the Frame
Cut your frame material to length using a miter saw (for steel angle) or hacksaw (for aluminum). You'll build two rectangular end frames first, then connect them with horizontal rails along the top, bottom, and at least two mid-height cross-braces for rigidity. For a 48-inch cage, use four horizontal rails: two along the top and two along the bottom. If you're also refining the door safety side of your build, see how to build bird breeding cages for more guidance on secure access and escape prevention double-door airlock entry. Drill pilot holes at every joint and fasten with stainless steel bolts and lock nuts. Do not rely on screws alone for structural joints on a cage this size.
Step 3: Install the Wire Panels
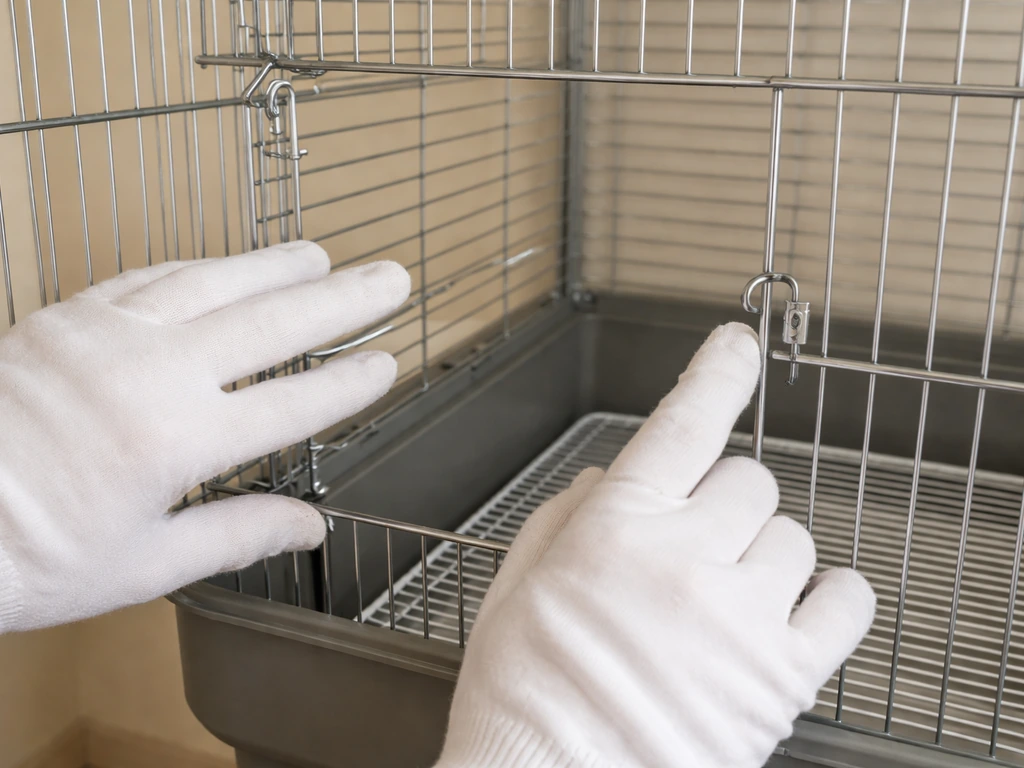
Cut your stainless steel wire mesh panels slightly larger than each face opening, then fold the edges back 0.5 inches using pliers to eliminate exposed sharp ends. Attach each panel to the frame using stainless steel J-clips (applied with a J-clip plier tool) spaced every 3 to 4 inches along all edges. Pull the mesh taut before clipping to prevent sag. Run your finger along every clipped edge wearing a glove and press down any raised clip points. Sharp wire edges are one of the most common injury causes in bird cages. Install the top panel, two long side panels, and the two end panels, leaving the floor and door openings for the next steps.
Step 4: Build and Install the Floor
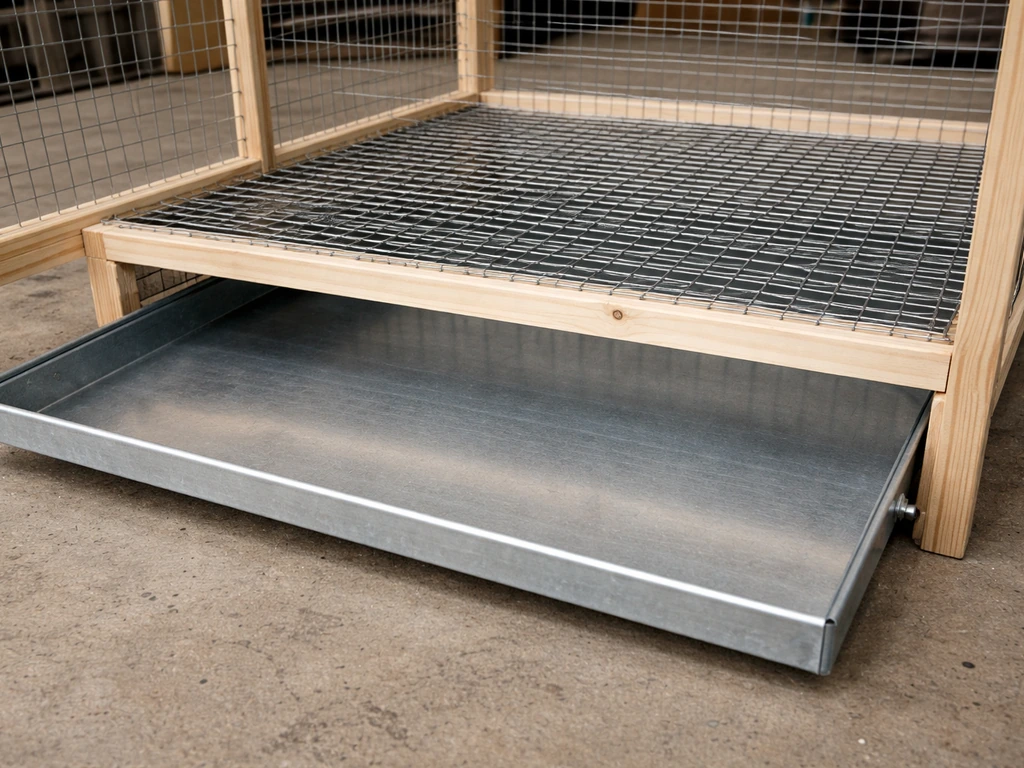
The floor has two components in a good flight cage: a wire grid that lets droppings fall through, and a removable tray below it for easy cleaning. Build the grid from the same stainless mesh as the walls, supported by a frame with cross-braces every 6 to 8 inches so it doesn't bow under the bird's weight. The tray beneath it can be a sheet metal or heavy-gauge aluminum tray with raised edges, cut to slide in and out from the front or back. Line the tray with paper or a safe litter material for simple daily swap-outs. Avoid using gravel or crushed walnut shell as litter since birds will ingest it.
Step 5: Install the Door System
This is the step most builders underestimate. A single door on a flight cage is a bird-escape waiting to happen. Build a double-door airlock entry: an outer door opens into a small vestibule (roughly 12 x 12 inches), and a second inner door opens into the main cage. You close the outer door before opening the inner one. This design, sometimes called an airlock or safety porch, is the same principle used in professional aviaries. The HereBird aviary guide specifically recommends this extra layer as a safety standard, and the Carolina Raptor Center's caretaker protocols treat secure door handling as a non-negotiable. Both doors need two-step latches, and the inner door should swing inward so the bird can't push it open from inside.
Step 6: Add Perches, Anchors, and Reinforcement
Perches go at both ends of the flight space at the same height so the bird has clear flight lines between them. Use natural wood perches (manzanita, dragonwood, java wood) or safe-wood dowels in a diameter matched to your bird's foot: the bird's foot should wrap about two-thirds of the way around the perch. Anchor perches through the wire wall using stainless steel bolts with washers on both sides. Add a rope or rope-style perch in a different zone to provide textural variety. Reinforce all four vertical frame corners with corner brackets, and add cross-bracing to any panel wider than 24 inches to prevent racking when the cage is moved or bumped.
Placement, Airflow, Lighting, and Seasonal Weather Protection
Where you put the flight cage inside your home matters almost as much as how you built it. The wrong spot can cause chronic stress, respiratory illness, or temperature-related health problems even in a structurally perfect cage.
Place the cage against a solid wall on at least one side so the bird has a sense of security and a predictable background. Position it so it gets indirect natural light for several hours a day but is never in direct sunlight through glass, which can overheat the interior rapidly. Keep it away from exterior doors and windows that open, HVAC vents, ceiling fans, and radiators. The RSPCA specifically recommends keeping bird cages away from radiators and drafts, and USDA APHIS inspection guidance for indoor aviaries flags exterior door openings as a draft risk. PetMD reinforces this: drafts cause temperature fluctuations that stress birds and suppress immune function.
Airflow should be gentle and indirect. Your bird needs fresh air circulation, not still stale air, but also not a direct breeze. A ceiling fan running on its lowest setting in a large room works well. Open windows in an adjacent room rather than right next to the cage. For lighting, aim for 10 to 12 hours of light and 12 to 14 hours of darkness daily. A full-spectrum bird-safe LED lamp on a timer works well if natural light is inconsistent. Keep the cage out of the kitchen entirely: cooking fumes, especially any PTFE-based nonstick cookware, can be lethal, and the temperature and humidity fluctuations in a kitchen are too unpredictable.
Seasonally, the main issues are winter drafts and summer overheating. In winter, move the cage away from exterior walls if your insulation is poor, and use a breathable cage cover at night to retain warmth. The RSPCA recommends cage covers specifically for this purpose. In summer, use a small fan to improve air circulation without directing airflow at the cage, and never leave the bird in a room with a closed window on a hot day. Indoor temperature should stay between 65 and 85 degrees Fahrenheit for most common pet bird species. U.S. regulations for indoor bird facilities (9 CFR 3.151) require temperature and humidity to be regulated appropriately for the species, which gives you a sense of how seriously this is taken in professional settings. Apply the same standard at home.
Covers, Accessories, and Mess Control
A cage cover is one of the most practical accessories you can add, but it needs to be done right. Use a breathable fabric cover, never plastic sheeting, that covers three sides and the top while leaving the front partially open for airflow. Measure your finished cage and sew or order a custom cover if needed. Pre-made covers often don't fit DIY builds well, so a canvas or cotton fitted cover with velcro tabs is worth the effort. Put it on at the same time each night so it becomes part of your bird's routine and reduces stress.
For mess control, the removable tray is your best investment (which is why the floor design section above emphasized it). Line it with paper rather than substrate your bird might eat. Position the cage on a waterproof mat or an easy-clean vinyl flooring section that extends at least 12 inches around all sides to catch seed scatter and feather dust. A small handheld vacuum stored near the cage makes daily cleanup a 90-second job instead of a chore. Foraging toys, a swing, and hanging perches keep the bird mentally engaged without cluttering the flight path: keep the center of the cage open and hang accessories to the sides and toward the ends.
Food and water dishes should mount on the outside of the wire (accessed by the owner through small flip-out doors) to keep the interior cleaner and reduce the bird's opportunities to poop directly into its water. Stainless steel dishes are easy to disinfect and don't leach anything. Avoid plastic dishes that crack or stain, since bacteria colonize scratched plastic quickly.
Safety Checks, Maintenance, and Troubleshooting
Before Your Bird Goes In
Do a full hands-on inspection before introducing your bird. Run gloved hands along every interior wire edge and clip. Press every J-clip down firmly. Open and close both doors 10 times and confirm both latches engage fully. Verify bar spacing with calipers at multiple points across each panel, since wire can shift during installation. PetMD's parakeet care sheet also emphasizes that cage bar spacing must be appropriate so your bird can stretch and behave normally without hazardous gaps blank" rel="noopener noreferrer">Verify bar spacing with calipers at multiple points across each panel, since wire can shift during installation.. Shake the cage moderately to simulate movement and listen for any loose hardware. Wipe down all interior surfaces with a 50/50 white vinegar and water solution, rinse thoroughly, and let it dry completely.
Ongoing Maintenance Schedule
- Daily: swap the tray liner, wipe dishes, spot-clean any droppings on perches
- Weekly: scrub dishes with hot water, inspect all latches and door hinges, vacuum surrounding floor area
- Monthly: run gloved hands over all wire panels checking for bent or protruding wire, tighten any loose bolts, check perch anchors for wobble
- Quarterly: inspect the frame for rust or corrosion spots, check powder-coat integrity, clean behind and under the cage
- Annually: do a full wire panel inspection and replace any panel showing rust pitting, thinning wire, or structural damage
Troubleshooting Common Problems
| Problem | Likely Cause | Fix |
|---|---|---|
| Sharp wire edges appearing | Wire shifting or J-clips backing off | Re-crimp all clips along that panel; fold any protruding ends back with pliers |
| Rust spots on frame or mesh | Coating damaged or wrong material used | Sand and touch up with bird-safe powder coat; if mesh is galvanized, replace the panel entirely with stainless |
| Bird escaping or working at latch | Single-step latch or clever bird | Upgrade to two-step carabiner-plus-clip combo on both doors; add an outer vestibule door if not already present |
| Loose perch wobbling | Bolt working free over time | Add a second washer and lock nut; consider switching to threaded perch mount with a hex head |
| Pest intrusion (mites, rodents) | Gaps in wire or tray area | Check where floor tray meets the frame for gaps; add fine mesh around the base; clean and treat with bird-safe mite spray |
| Cage cover not fitting properly | DIY cage dimensions don't match commercial cover sizing | Sew a fitted canvas cover or use binder clips to secure an oversized cover temporarily while a custom one is made |
| Excessive mess spread around cage | No catch mat, wrong tray liner | Add a vinyl mat extending 12+ inches on all sides; switch to full-size paper tray liner changed daily |
One thing I'd add from experience: the problems that sneak up on you are the ones you stop checking for after the first few weeks. Build the monthly inspection into your calendar from day one. A loose bolt on a perch mount or a widening gap at a corner joint is a five-minute fix now and a potential injury later. The cage you build carefully today should last years with that level of attention.
FAQ
Can I use galvanized wire or hardware cloth if I coat it with something safe?
Yes, but avoid using galvanized wire, galvanized hardware cloth, or any metal with an unknown plating. If you use PVC-coated wire as a budget option, inspect every panel for chips, thin spots, and exposed wire before installing, because birds will chew damaged coating.
What kind of lubricant should I use for door hinges and latches?
If any part of the cage requires lubrication, only use bird-safe, food-grade options that do not aerosolize, and apply sparingly to the outside of moving parts. Do not rely on petroleum-based oils that can smear onto feet or be inhaled while the bird explores the cage.
How do I choose perch diameter and placement for a flight cage?
Size your perch diameter so the toes wrap about two-thirds of the way, and install perches at both ends at the same height to preserve the flight line. If your bird cannot comfortably land with toes curled and balanced, increase perch diameter or adjust the perch height, then re-check spacing between wire bars at landing points.
What’s the easiest way to clean a flight cage without stressing the bird?
Build it so you can access cleaning without reaching into the flight path, ideally with removable tray access and a double-door airlock. Also keep the floor wire grid removable or serviceable, so you can replace it if the mesh loosens or bows after years of use.
How can I prevent the floor wire grid from sagging?
Even with stainless mesh, the floor wire can sag over time if the supports are too far apart. Use cross-bracing every 6 to 8 inches as planned, and periodically check for bowing by gently applying downward pressure from below.
How should I test the door safety before putting my bird in?
Do a trial run with no bird first, then introduce gradually. Start with the airlock fully closed, open and close both doors multiple times, and watch the bird for the ability to exploit gaps during transfers. If the bird shows any “push-out” behavior against the inner door, reinforce the latch engagement and confirm the inner door swings inward.
What should I do if my bird escapes during placement or cleaning?
Plan an emergency workflow: keep a separate transport carrier ready, and use the outer door and airlock sequence every time. If a bird bolts, do not chase, instead guide into a corner with the carrier positioned near the exit and close the outer door to stop the escape path.
What cleaning products are safe for stainless mesh and the wire floor?
Avoid abrasive cleaners or strong degreasers on interior surfaces, since residues can irritate skin and lungs. White vinegar and water is a good start, then rinse thoroughly and dry completely before the bird returns.
How do I verify bar spacing is accurate after assembly, not just during measuring?
Calibrate your bar spacing check before you commit by measuring at multiple points on each panel after installation, since wire can shift and widen gaps slightly. Re-check around corners and near doors, where frames and mesh tension can change.
Can I place a flight cage in a room with a heater or HVAC vent?
Yes, but choose location carefully to reduce thermal swings. If the room temperature drops below the bird’s comfort range or drafts come through a gap, use a breathable cage cover at night and keep the cage away from direct drafts from doors, vents, and HVAC registers.
How should I set up lighting with a full-spectrum LED, and how do I avoid overheating?
Use gentle indirect lighting and keep the bird on a consistent light cycle. If using a timer, ensure the lamp is on a stable fixture and placed so the bird cannot fly into it or overheat near it.
What should I use under and around the cage to control mess safely?
If you add a floor cover or liners, keep them food-inert and non-shedding, and avoid materials that can be swallowed or tangles that can snag feet. For scatter control, paper lining in the tray is usually the safest approach, and for outside the cage use washable waterproof flooring.
How do I add toys and swings without ruining the flight space?
Use your flight cage space as your primary exercise zone, but add enrichment at the ends and sides rather than in the open center. Keep swing placements so the bird does not collide with the wire wall while swinging, and secure all toys outside the flight path if possible.