
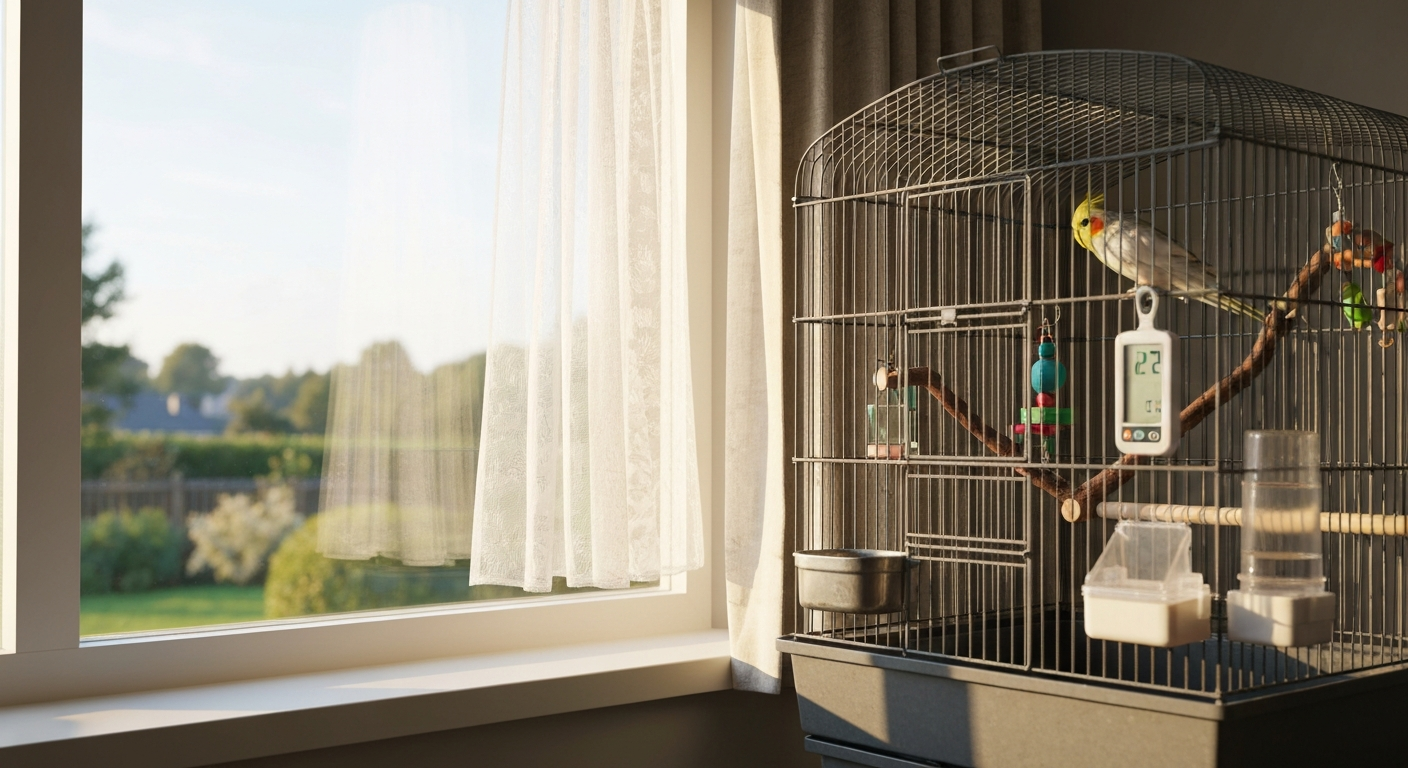
Yes, you can put a bird cage near a window, and for most pet birds it is one of the better spots in the house. If you’re wondering 'can i put my bird cage in my room', the same window-focused checks apply, assess drafts, sun exposure, and predator visibility before choosing the exact spot. Natural light, visual stimulation and a connection to the outside world all support a bird's mental health. The catch is that a window placed incorrectly becomes a source of drafts, overheating, reflected glare, predator stress and collision risk. Get a few practical details right and a window location works beautifully. Get them wrong and you will be dealing with a stressed, sick bird fast.
Should I Put My Bird Cage Near a Window? Safe Guide

Maya Bennett
23 Jul 2026
Quick verdict: can you put a bird cage near a window?
The short-version answer depends on your species, your climate and your specific window. Tropical species like large parrots need warmer, stable conditions and benefit from morning light but can overheat dangerously in afternoon direct sun. Small temperate birds like budgies, finches and canaries handle a wider range but still cannot tolerate cold drafts or sudden temperature swings. What every species shares is a need for one sheltered side of the cage (against a wall or backed by an opaque surface), no cold air infiltration from the frame, reliable shade during the hottest window hours, and protection from predators or stray animals visible through the glass. A north- or east-facing window in most regions gives you the gentlest starting point: good ambient light, moderate morning sun and minimal afternoon heat buildup.
Benefits of window placement for pet birds
Light is the most obvious advantage. A window spot gives your bird a natural day-night cycle that helps regulate sleep, hormone cycles and mood. Even though modern window glass blocks most biologically active UVB (meaning your bird is not getting meaningful vitamin D synthesis from indoor sunlight alone), the visible-spectrum light and the brightness variation across the day are genuinely enriching. Birds are highly visual animals and watching leaves move, weather change and occasional wildlife outside keeps their minds busy in ways that an interior wall simply cannot.
The visual stimulus from outside activity also reduces boredom-related behaviors like feather destructive behavior or repetitive vocalizations. Many bird owners, myself included, notice that birds placed near a window are more active, more vocal in appropriate ways, and more engaged with their toys compared to birds tucked in a dim corner. There is also a practical benefit: natural light makes it easier for you to spot early signs of illness like fluffed feathers, discharge or unusual droppings because you are seeing your bird in proper light every day.
Risks and when to avoid putting a cage near a window
The risks are real and they cluster into four categories: temperature extremes, drafts, stress from predators or reflections, and collision hazard. Direct afternoon sun through glass can raise a cage interior temperature faster than most owners expect. Because glass blocks the convective cooling that would happen outdoors, a bird sitting in a sunbeam through a closed window is essentially in a small greenhouse with no escape route. The Association of Avian Veterinarians (AAV) specifically warns that direct sun can heat birds rapidly and that birds must always have a shaded retreat to self-regulate. If your cage fits entirely within the sunlit zone and there is nowhere to move away from the heat, that window spot is dangerous.
Drafts are the other major risk. Old window frames, single-pane glass and poorly sealed surrounds all leak cold or hot air, and birds are highly sensitive to those fluctuations. The Merck Veterinary Manual notes that if a bird appears cold, the first step is to move the cage away from drafty windows or vents. You do not want to wait until your bird is cold to discover the window leaks. Test the frame before you commit to the spot. Predator visibility is a subtler but equally serious welfare issue: a cat sitting on the sill outside, a hawk on a nearby branch, or even a large dog walking past can trigger repeated alarm responses that chronically stress your bird even if it is never in physical danger.
- Avoid south- or west-facing windows for species sensitive to heat, especially in summer afternoons
- Avoid any window with visible draft infiltration around the frame or sill
- Avoid windows directly above or near heating/cooling vents, radiators or stoves
- Do not place the cage where the entire footprint sits in direct sun with no shaded area
- Avoid windows where outdoor predators (cats, hawks, dogs) are regularly visible and alarming the bird
- Do not place the cage flush against the glass, especially in winter
Species-specific guidance and examples
Different species come from different climates, and that origin shapes how much sun, heat and cold they can handle. The temperature ranges below are general comfort guides from avian care literature. Always verify for your specific bird's health status, age and acclimation history.
| Species | Comfortable Temp Range | Sun Tolerance | Key Window Cautions |
|---|---|---|---|
| Budgies (parakeets) | 65–75°F (18–24°C) | Moderate; tolerates gentle morning sun | Very sensitive to cold drafts; needs sheltered cage side |
| Cockatiels | 65–75°F (18–24°C) | Moderate; enjoys light but overheats in direct midday sun | Draft-sensitive; watch for night frights near uncovered windows |
| Conures | 68–78°F (20–26°C) | Good; active and curious about outside activity | Can stress from visible predators; need partial cover option |
| Large parrots (Amazons, Greys, Macaws) | 72–82°F (22–28°C) | Lower; tropical species need warmth but shade from intense sun | Drafts and cold glass proximity are high-risk; monitor closely in winter |
| Finches and canaries | 65–75°F (18–24°C) | Gentle light preferred; avoid strong direct sun | Very small body mass means temperature spikes affect them faster |
Budgies and cockatiels are probably the most forgiving of the group for a well-managed window spot. They are active during the day, enjoy watching outdoor activity and tolerate a modest temperature range. Conures tend to be bold and curious about the outside world, which makes a window location enriching, but their alertness also means a prowling cat outside will stress them more than it would a calmer species. Large parrots have higher baseline temperature needs and their large body mass does not protect them from cold glass proximity in winter as well as owners sometimes assume. Finches and canaries need the gentlest light conditions of all: a bright, diffuse north or east exposure is usually ideal, with no direct sun hitting the cage.
Choosing window orientation: sun, shade, glare and seasonal sun paths
In the Northern Hemisphere, north-facing windows get the least direct sun year-round and are the safest default for bird cages. East-facing windows get gentle morning sun that typically does not overheat the cage before the bird (and you) are awake and monitoring. South-facing windows get sun for most of the day, especially in winter when the sun is low and can shine surprisingly deep into a room. West-facing windows get the hottest afternoon sun in summer and are the highest-risk orientation for heat stress. In the Southern Hemisphere, these relationships flip: north-facing windows get the strongest sun.
Glare is worth thinking about separately from heat. Even diffuse bright glare from a white-sky overcast day can cause eye discomfort for birds kept in bright cages with no shade option. A simple partial cover on one side or a sheer curtain on the lower half of the window breaks up glare without blocking the beneficial ambient light. Seasonal sun paths matter: a window that provides safe morning light in October may blast your bird with direct afternoon sun in June if the sun angle shifts enough to come around the building edge. I check the sun path in my bird room at least twice a year, once in winter and once at the summer solstice, using a simple sun-path app on my phone.
Distance and height: how far from the glass and how high to place the cage
A cage flush against the glass is problematic for two reasons: cold radiant temperature from the glass in winter (especially single-pane) and the risk of the bird chewing the frame, reaching through the bars toward the glass, or being exposed to any draft that infiltrates the seal. I keep my cages at least 6 to 12 inches (15 to 30 cm) from the glass as a minimum clearance. In very cold climates or with older single-pane windows, 18 inches (45 cm) is a safer buffer. You can verify whether the glass proximity is a problem by holding an infrared thermometer toward the glass surface on a cold day: if the glass surface temperature is more than a few degrees below the room air temperature, your bird will feel that cold radiant zone.
Height matters for your bird's sense of security and for practical temperature stratification. The AVMA recommends placing cages at a comfortable eye level for household interaction, which typically means the top of the cage is at or slightly above human eye level. Practically, this puts the bird's perching zone at roughly 4 to 5 feet (1.2 to 1.5 m) from the floor. At floor level, cold air pools in winter and the bird has no elevated vantage point, which is stressful for most species. Very high placements near the ceiling increase heat exposure in summer since warm air rises. Eye-level placement is not just a convenience tip, it is a genuine welfare recommendation.
Protection from drafts, heat and cold: checks and fixes
How to find drafts before you commit to a spot
The U.S. Department of Energy recommends a simple DIY draft test: hold a lit incense stick or a thin piece of tissue near the window frame, sill and corners on a windy day. For details on visual and thermal inspection methods, see the DOE Guide to Home Energy Assessments, U.S. Department of Energy Guide to Home Energy Assessments — U.S. Department of Energy (DOE). Any wavering or movement toward you identifies a leak. For a more precise check, an infrared thermometer aimed at different parts of the frame will show you cold spots that correlate with air infiltration. If you want to go further, a thermal camera (many hardware stores now rent them) gives you a clear visual map of every leak around the window. Run this test before you place the cage, not after.
Fixes for common draft and temperature problems
- Seal window frame gaps with non-toxic weatherstripping or caulk before placing the cage nearby
- Install a thermal curtain or cellular blind on the window to reduce radiant cold from glass in winter
- Use a partial cage cover on the side facing the window to buffer any residual air movement (a breathable cotton cover, not plastic)
- Add a secondary digital thermometer at cage level and set a mental alert if the reading drops below your species' comfort floor
- In summer, install a sheer UV-filtering window film to reduce heat gain without blocking visible light
- Keep a calibrated hygrometer near the cage: relative humidity below about 40% or above 70% can stress birds independently of temperature
Preventing collisions, reflections and predator risks
If your bird has any supervised out-of-cage time near a window, collision risk becomes a real concern. Solutions for Homes, American Bird Conservancy (Why birds hit glass & prevention) summarizes that reflected sky or vegetation causes birds to perceive a clear flight path and recommends exterior treatments and patterned films to prevent collisions Solutions for Homes — American Bird Conservancy (Why birds hit glass & prevention). The American Bird Conservancy explains that birds perceive reflected sky or vegetation in glass as a clear flight path. A peer-reviewed study on window films found that external application of patterned films significantly increases avoidance behavior in birds, but internal application of the same films is much less effective. If you are treating a window to protect a free-flying bird during out-of-cage time, apply the treatment to the exterior surface or use external screens. Placing decals in a grid pattern no more than 2 to 4 inches (5 to 10 cm) apart across the glass is a practical low-cost option.
For caged birds, the collision risk is lower since they cannot fly at the glass, but reflections still cause stress. A bird that sees its own reflection may become aggressive or obsessed with the perceived rival. A sheer curtain or partial window cover breaks up the mirror effect without darkening the room significantly. Predator visibility is a separate issue: the AAV notes that birds need areas of privacy and security, and a cage with a clear 360-degree view of the outside world including cats, dogs or hawks provides no psychological shelter. Back the cage against a wall on at least one side and use a partial cover or a room divider to give the bird a retreat from the window view.
Nighttime safety and cage covers
At night, a window location can introduce problems that a solid interior wall would not: headlights from passing cars, streetlights, reflected flashes, and noise from outside can all trigger night frights, especially in cockatiels which are famously prone to them. A good cage cover solves this by blocking light intrusion and muffling sound. If your bird panics under a full cover, try a partial cover that drapes over the window-facing side and top but leaves a small section open for air circulation. A lightweight, breathable cotton cover is far safer than plastic or synthetic materials that trap heat and humidity.
Seasonal adjustments: winter, summer and storm planning
Winter is the highest-risk season for window placements. Cold glass radiates a chill zone into the room even without any measurable draft, and heating systems often cycle hard enough to create dry, fluctuating air near windows. In winter I move my cages 6 to 12 inches further from the glass than their summer position, check the weatherstripping on the frame, and add a cellular blind to the window to reduce radiant cold. I also run a hygrometer continuously because winter heating dries the air significantly and drops in humidity affect respiratory health.
Summer brings the opposite problem. Even a north-facing window can build up heat in a poorly ventilated room. Keep a thermometer at cage level and do not rely on how the room feels to you, since birds feel temperature shifts much earlier than humans do. If the cage-level reading exceeds your species' comfort ceiling, add a UV-blocking sheer film to the glass, open a window elsewhere in the room to create cross-ventilation (not near the cage itself), or use a small fan directed at the wall away from the cage to circulate air without hitting the bird directly. During storms, check for new infiltration around the frame: wind-driven rain finds gaps that are invisible in calm conditions.
Pest issues and cage-cover troubleshooting
A window location increases the chance that insects find the cage, especially if the window is ever opened. Fruit flies, gnats and ants are drawn to food and droppings. Keep seed hulls and fresh food cleaned out daily and use a cage tray liner you can swap in under a minute. For ants, the gap between cage stand legs and the floor is the entry highway: place each leg in a small dish of water (a simple ant moat) and keep the area under the cage spotless. Screen any windows you open near the cage with fine mesh that also keeps out flying insects.
Rodents and nesting birds outside the window are a stress source rather than a direct pest risk for a caged indoor bird, but they deserve attention. A mouse scratching at a window screen or a sparrow nest right outside the glass will alarm your bird repeatedly. Seal any gaps around the window exterior that could invite rodent exploration, and if a wild bird nests directly outside, consider temporarily moving the cage to another window until the nest cycle ends. Cage covers that are not fitting correctly can trap moisture and attract mold: if your cover smells musty, wash it weekly and make sure the cage is fully dry before recovering at night.
Safe cage materials and coatings
If you are building or refinishing a cage for a window location, material safety matters as much as placement. Many commonly available spray paints, including standard Rustoleum formulations, are not safe for birds. They contain solvents, VOCs and sometimes heavy metal pigments (particularly in older or specialty formulations) that off-gas into the enclosed airspace around a cage. Birds have highly efficient respiratory systems and are far more vulnerable to airborne toxins than mammals. A paint that seems dry and odor-free to you can still off-gas enough to cause respiratory distress in a bird. If you are looking for bird-safe coating options, the safest choices are paints marketed specifically as bird-safe or formulated for food-contact surfaces, high-quality powder coatings applied and cured at a professional shop, and stainless steel which needs no coating at all.
For a window-side cage that will see UV exposure and temperature variation, powder-coated stainless or stainless steel itself is the most durable long-term choice. If you are using or considering Rustoleum or similar products on any part of your cage build, check the dedicated guidance on bird-safe coatings before you proceed, because the product line includes both water-based and solvent-based formulations with very different risk profiles.
Natural perches and branches near the window
A window location is a great opportunity to use natural branches as perches because the light makes it easier to spot mold, insect damage or wear. The core rule for natural perches is that the wood must come from a non-toxic species and must not have been treated with pesticides, herbicides or any coating. Safe wood species commonly cited in avian care guides include willow, apple, pear, elm, ash, hawthorn, birch and eucalyptus (in small amounts and dried). Woods to avoid include oak (tannin load), cherry (contains cyanogenic compounds), and any treated or pressure-treated timber.
Diameter matters for foot health. A perch diameter that forces the bird's toes to wrap about two-thirds of the way around is a good general rule. For a budgie that is roughly 0.4 to 0.6 inches (10 to 15 mm), for a cockatiel around 0.6 to 0.8 inches (15 to 20 mm), and for larger parrots, variable-diameter natural branches that challenge the foot muscles are ideal. Scrub new branches with hot water, inspect for mites or insect galleries, and let them dry completely before mounting. Replace perches at the first sign of mold or heavy chewing that leaves sharp splinter points. For more detail on sourcing, shaping and safely mounting natural branches in your setup, the guidance on using tree branches in bird cages covers every step.
Cage door policy near a window
A window location changes the risk calculation for leaving the cage door open. The AAV advises that out-of-cage time should happen only in bird-proofed areas: evaluate for drafts, ceiling fans, large windows and older paint before allowing free flight. A large window nearby is a prime collision risk for a bird in free flight. Before you open the cage door near any window, either cover the window with a sheer curtain or treat the glass with external film so the bird cannot perceive it as an open flight path. Close all ceiling fans and check that no other windows are open and creating a through-draft that could push the bird into the glass.
A practical routine that works well is to establish a consistent out-of-cage schedule, always at the same time of day, with the same window treatments in place. Birds adapt quickly to routine and out-of-cage time becomes calmer and safer when the environment is predictable. Never leave the cage door open unsupervised near a window. The question of whether and how long to leave the cage door open generally is worth thinking through carefully for your specific bird and room setup. For detailed guidance on whether and when you should leave your bird cage open, see should i leave my bird cage open.
Mess control near windows
Birds scatter seed husks, feather dander and droppings in a radius that depends on the species and the cage bar spacing. A window location means that mess lands on the sill, windowsill trim and potentially on curtains or blinds. The simplest fix is a deep-sided cage tray that extends slightly beyond the cage footprint and a washable mat or tray liner underneath the stand. I use a cut piece of vinyl flooring under my cages: it wipes clean in thirty seconds, does not absorb odors and can be swapped out seasonally.
For the window sill itself, a removable silicone tray that sits on the sill catches debris and cleans in the dishwasher. Avoid fabric curtains that drape to floor level near the cage: they collect dander, are nearly impossible to fully clean and can pose a hazard if the bird chews them during out-of-cage time. Roller blinds or wooden blinds with a smooth surface are much easier to wipe down. If you have plants on the sill for aesthetic reasons, keep them outside the bird's reach and verify every species is non-toxic (more on that in the next section).
Safe decorative ideas for window-side cages
A window-side cage can look genuinely beautiful without introducing any hazard. The key principle is that anything within beak reach or in the cage's air zone must be non-toxic and structurally secure. Outside the cage on the sill or nearby shelf, bird-safe non-toxic plants like spider plants, basil, African violets and certain ferns add color without risk. Common plants that must stay away from cages include philodendron, pothos, peace lily and anything in the lily family, all of which are toxic to birds.
Inside the cage, toys positioned near the window-facing side of the cage give the bird something to interact with while watching outside activity: foraging toys, chewable wood toys from safe species and foot toys all work well. Avoid toys with zinc hardware (snaps, clasps or quick-links with a dull silver finish are often zinc-plated and toxic if chewed), painted materials of unknown origin, or anything with mirror elements that could amplify the reflection problem near a window. Stick to stainless steel hardware and natural or verified-safe dyed wood for any toy near the window exposure.
DIY fixes and installation checklist
Tools and materials to have ready
- Tape measure (for distance from glass and height from floor)
- Spirit level (to confirm the cage stand or hanging bracket is level)
- Digital room thermometer and hygrometer (place at cage level, not on the wall)
- Infrared (non-contact) thermometer (to check glass surface temp and spot cold zones)
- Thin tissue or incense stick (DIY draft tester for window frames)
- Weatherstripping or non-toxic caulk (for sealing any frame gaps found)
- Sheer UV-filtering window film (to reduce heat gain and moderate reflection)
- External window decals or patterned film (collision prevention for out-of-cage time)
- Breathable cotton cage cover (for nighttime light and sound blocking)
- Vinyl floor mat or silicone sill tray (mess control)
Step-by-step installation
- Choose your window orientation: north or east facing preferred. Mark the proposed cage position on the floor with painter's tape.
- On a cold or windy day, run the tissue or incense draft test around the entire window frame, sill and corners. Note any movement.
- Seal any drafts found with weatherstripping or non-toxic caulk and allow to cure fully before placing the cage.
- Measure the distance from the tape mark to the glass. Confirm it is at least 6 to 12 inches (15 to 30 cm). Adjust if needed.
- Place your stand or hanging bracket and use a spirit level to confirm it is flat and stable.
- Set a digital thermometer and hygrometer at the cage's intended perch height and monitor for 24 hours before the bird goes in. Record the temperature range across the full day.
- Aim the infrared thermometer at the glass surface on a cold day or at peak sun time. If the glass surface is more than 3 to 4°F (about 2°C) different from room air temp, add a cellular blind or sheer film before placing the cage.
- Apply external window decals in a grid pattern (2 to 4 inch spacing) if the bird will have any out-of-cage time near the window.
- Place the cage. Back one side against a wall or add a partial cover on the window-facing side for a sheltered retreat.
- Install a breathable cage cover and test it for fit: no gaps that let in light at the window edge, good airflow at the open side.
- Run a final check: door to room is closed, ceiling fan off, any other windows that create cross-drafts are shut or screened.
Quick safety checks to run before and after installation
Before you move the bird into any new window position, spend ten minutes running through a physical inspection. It catches problems that are easy to miss when you are focused on getting the cage in place. After installation, repeat the temperature and humidity check at 48 hours since some issues, like overnight cold pooling near old glass, only show up after a full day-night cycle.
| Check | What to look for | Pass / Fail action |
|---|---|---|
| Draft test (frame and sill) | No tissue or smoke movement near window edges | Fail: seal gaps before placing cage |
| Glass surface temp (IR thermometer) | Within 3–4°F (2°C) of room air temp | Fail: add cellular blind or increase distance from glass |
| Direct sun footprint | Shade available on at least one-third of cage during peak sun hours | Fail: reposition cage or add sheer film/curtain |
| Predator visibility | No regular outdoor animal activity visible from cage perch zone | Fail: adjust angle or add partial cover on window side |
| Cage height | Perch zone at approximately 4–5 ft (1.2–1.5 m) from floor | Fail: adjust stand height |
| Hygrometer reading | 40–60% relative humidity at cage level | Fail: add humidifier (winter) or improve ventilation (summer) |
| Cage cover fit | No light gaps on window side; air circulation on open side | Fail: adjust cover or use clips to close gaps |
| Collision protection | External decals or film applied if out-of-cage time planned | Fail: apply external treatment before opening cage door |
Pre-install, daily and seasonal checklists
Pre-install (one-time)
- Run draft test on all window frame edges and sill
- Seal any gaps with weatherstripping or non-toxic caulk; allow full cure time
- Confirm window orientation and sun path for your season
- Measure and mark cage position: minimum 6 to 12 inches from glass
- Check proposed cage height: perch zone at 4 to 5 feet from floor
- Apply UV-filtering film or cellular blind if needed for heat or cold
- Apply external window decals or film if any out-of-cage time is planned
- Run 24-hour thermometer and hygrometer baseline at cage level before bird is introduced
Daily checks
- Glance at thermometer and hygrometer at cage level morning and evening
- Check cage tray and sill for debris; wipe if needed
- Observe bird behavior for signs of thermal stress: panting, wing spreading (too hot) or fluffing and huddling (too cold)
- Confirm cage cover is off and ventilating well during daylight hours
- Before any out-of-cage time: close ceiling fans, confirm window treatments are in place, close room door
Seasonal checks (every 3 months)
- Re-run draft test after any weather event that may have shifted window seals
- Check sun path at current season: does direct sun now reach the cage at times it did not before?
- Adjust cage distance from glass if temperature swings have increased in winter or summer
- Inspect weatherstripping and caulk for cracks or separation
- Wash cage cover and inspect for mold or wear
- Check natural perches for mold, insect damage or splintering and replace as needed
- Verify external window film or decals are still intact and adhered on the outside surface
FAQ
Should I put my bird cage near a window?
Maybe — it depends on species, window orientation, air movement, temperature control and what you do to reduce risks. Windows can provide natural light, visual enrichment and a view, but they also bring risks: drafts, rapid temperature swings, overheating in direct sun, reflections that cause collision fears, visible predators or frequent disturbances that stress birds, and limited UVB transmission through glass. Place cages so birds have an option to retreat from sun and view, monitor temperature/humidity at bird level, and treat or screen glass to reduce collision risk.
What are the main benefits of placing a cage near a window?
Natural light and visual stimulation from outside activity; a view can enrich captive birds and reduce boredom if it’s not constantly stressful. Windows can provide daytime brightness and a circadian cue when paired with stable indoor temperatures and a shaded retreat so the bird can choose exposure.
What are the main risks of window placement?
Drafts and sudden temperature changes, overheating from direct sun, reduced or no UVB transmission through typical glass (so don’t rely on window light for vitamin D), glass reflections that trigger alarm/collision responses, visual exposure to predators or busy streets causing chronic stress, and increased insect or pollen entry. Also check for unsafe paints, coatings or nearby household chemicals.
How do I choose orientation, distance and height for a cage near a window?
Orientation: avoid long stretches of direct midday/afternoon sun for species that can overheat; provide a shaded side. Distance: keep cage either very close (<1 m / ~3 ft) to reduce collision speed if the bird can exit toward the window, or place it farther away (>9–10 m / ~30 ft) so outside flight paths don’t reach full speed — or better, treat the glass. Height: at or slightly above eye level for household interaction (AVMA/AAV guidance) while ensuring the bird can retreat lower in the cage to a sheltered spot. Always leave one side sheltered against a wall if possible.
How do I protect a window‑side cage from drafts, heat and cold?
Checklist: 1) Use a digital thermometer and hygrometer at bird level to track ambient conditions. 2) Use an infrared thermometer to check surface and sun‑warmed spots. 3) Test for drafts with a smoke pencil, streamer or IR camera and seal gaps with weatherstripping. 4) Provide a shaded retreat (coverable hide box, dense foliage or cage cover) so the bird can avoid sun or drafts. 5) In winter, increase room temperature if needed rather than moving the bird into a drafty, colder window zone. 6) Avoid placing cage near vents or radiators.
How should I adjust placement seasonally?
In summer: watch for direct sun and high surface temps; add shade, blinds or external awnings; monitor for overheating (panting, drooped wings). In winter: check for cold drafts and window leakage; seal gaps, add insulating film/curtains and keep ambient room temp in species‑appropriate range. During migration periods, reduce nighttime lighting to prevent bird disorientation and collisions.
Next Articles
How to Make an Acrylic Bird Cage: Complete Species‑Safe Guide
Step-by-step guide: how to make an acrylic bird cage with species-specific designs, safe materials, templates, and door/
How to Make a Fake Bird Cage: Safe DIY Plans & Rules
DIY guide: how to make a fake bird cage safely, plans, materials, measurements, ventilation, and welfare checks.
How to Make a Temporary Bird Cage Step by Step
Step-by-step DIY guide to build a safe temporary bird cage now, with sizing, bar spacing, materials, and safety checks.