
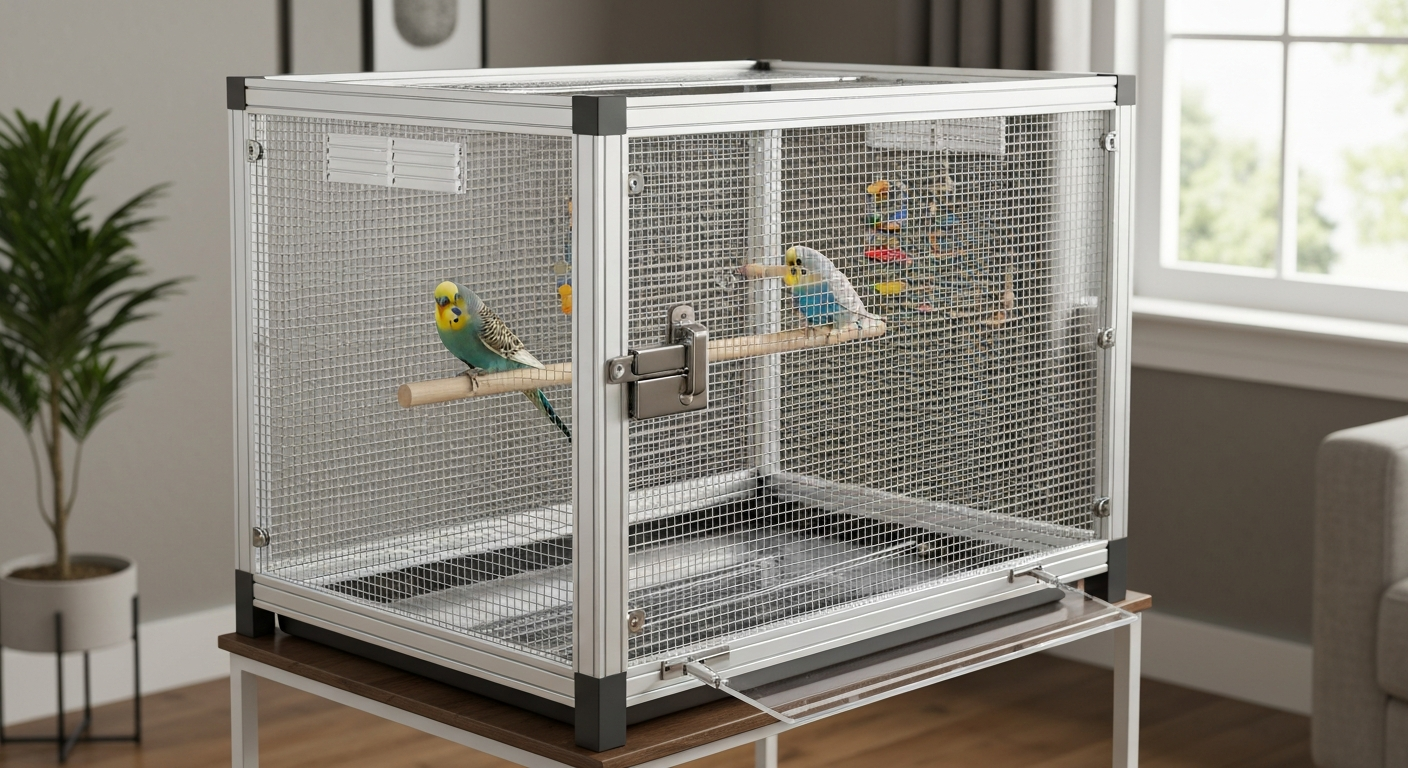
You can build a safe, functional acrylic bird cage from cast PMMA (plexiglass) sheet, aluminum framing channel, stainless steel mesh panels and a handful of bird-safe fasteners. The frame holds the structure rigid, the mesh panels supply the ventilation your bird needs, and the acrylic panels give you clear walls for visibility without the shattering risk of glass. I've built several of these for my own birds, and the biggest lesson is this: design for your specific bird's size and flight pattern first, then cut material to fit, never the other way around. For step-by-step plans, cut lists and detailed assembly photos, see how to build a plexiglass bird cage.
How to Make an Acrylic Bird Cage: Complete Species‑Safe Guide

Maya Bennett
30 Jul 2026
Who this guide is for and what makes acrylic cages worth building
This guide is written for bird owners who want a custom enclosure that fits a specific space, for DIYers who are tired of wobbly flat-pack cages, and for anyone who has priced a large parrot cage and nearly choked. Acrylic (PMMA, sold under brand names like Plexiglas and ACRYLITE) hits a genuine sweet spot: it transmits roughly 92% of visible light, weighs about half what equivalent-thickness glass weighs, and will crack rather than shatter if it takes an impact, all three properties matter when you're building something your bird will live inside. Compared to an all-wire cage it looks cleaner, reduces mess scatter and cuts drafts along certain walls, making it especially popular for budgerigars, finches, and other small softbills where seed spray and feather dander are a constant battle. That said, acrylic alone can never be the whole cage, birds need substantial ventilated mesh area to breathe properly, and a sealed acrylic box would be dangerous. This guide will show you exactly how to balance solid panels with mesh to get the best of both.
Design choices based on your bird's species and behavior
Before you sketch a single panel, think about how your bird actually moves. The RSPCA guidelines and most avian welfare organizations are unanimous on one point: horizontal length and width matter far more than height. Birds fly horizontally, not vertically, so a cage that is wide and long will always serve a flying bird better than one that is tall and narrow. A cage for a pair of budgies needs enough length for at least two full wing-beats between perches, which practically means you want a minimum of 24 inches of unobstructed horizontal flight space for even a small species. Vertical height matters for enrichment and climbing birds like cockatiels and conures, but it should never come at the expense of width.
For small softbills like zebra finches or canaries, the priority is a wide, horizontal cage with very fine mesh, finches dart laterally and need unrestricted side-to-side movement. Acrylic back and side panels work beautifully here because they block the wind and stop seed scatter without reducing visibility. For cockatiels and lovebirds, add more vertical climbing room and perches at different heights. For conures, amazons and other medium to large parrots, the cage needs to be robust: heavier-gauge mesh, thicker acrylic panels to resist beak pressure against any plastic edges, and secure latches that the bird cannot work open. A curious conure will investigate every seam, every fastener head and every gap, so your build quality needs to be genuinely solid, not just presentable.
Minimum dimensions and mesh spacing by species
The table below gives practical minimums drawn from welfare guidelines and humane society recommendations. These are floors, not targets, go larger whenever your space allows. The RSPCA's general formula is helpful as a sanity check: minimum cage width for a pair should equal three times the combined wingspan, and minimum height should be at least three times the bird's head-to-tail length. Single birds need somewhat less, but the horizontal flight rule still applies.
| Species | Single bird minimum (W×D×H) | Pair minimum (W×D×H) | Max bar/mesh spacing | Wire gauge (approx.) |
|---|---|---|---|---|
| Budgerigar (parakeet) | 18×18×24 in (46×46×61 cm) | 24×18×24 in (61×46×61 cm) | 1/2 in (12 mm) | 0.7–0.8 mm |
| Finches (up to 3) | 24×14×18 in (61×36×46 cm) | 36×18×24 in (91×46×61 cm) | 3/8 in (9.5 mm) | 0.7–0.8 mm |
| Lovebird | 18×18×24 in (46×46×61 cm) | 24×18×24 in (61×46×61 cm) | 3/8 in (9.5 mm) | 1.24 mm |
| Cockatiel | 24×24×30 in (61×61×76 cm) | 36×24×36 in (91×61×91 cm) | 1/2–5/8 in (12–16 mm) | 1.24 mm |
| Conure / small parrot | 30×18×30 in (76×46×76 cm) | 36×24×36 in (91×61×91 cm) | 3/4 in (19 mm) | 1.6–1.8 mm |
| Amazon / medium parrot | 36×24×48 in (91×61×122 cm) | 48×36×48 in (122×91×122 cm) | 3/4–1 in (19–25 mm) | 1.6–2.0 mm |
Bar and mesh spacing is a safety issue, not just a welfare one. Gaps that are too wide allow a bird to get its head through and become trapped; gaps that are too narrow stress small birds by blocking the visual openness they need to feel secure. Always verify spacing against the specific bird you have, a petite young budgie needs tighter mesh than an adult.
Acrylic vs glass vs polycarbonate: which to use and when to walk away
All three clear sheet materials come up when people plan a DIY bird cage, and each has a different risk profile. Here is how they compare directly.
| Property | Cast acrylic (PMMA) | Polycarbonate (PC) | Glass |
|---|---|---|---|
| Light transmission | ~92% (excellent clarity) | ~88% (slight yellow tint over time) | ~90% |
| Weight (vs glass) | ~50% of glass | ~50–55% of glass | Baseline |
| Impact resistance | High (cracks rather than shatters) | Very high (bends before breaking) | Low — shatters into sharp shards |
| Scratch resistance | Moderate — scratches more easily than glass | Low — scratches very easily | High |
| Thermal expansion | ~8× higher than glass — must allow for movement | Even higher than acrylic | Low — rigid, cracks under stress |
| Long-term UV clarity | Excellent — UV-stable grades available | Yellows without UV coating | Excellent |
| Solvent bonding | Excellent — bonds cleanly with acrylic cement | Difficult — requires specialised adhesives | Not applicable (silicone only) |
| Bird-safe edges | Smooth when routed/laser cut; must file or flame-polish | Can delaminate at cut edges over time | Dangerous if chipped or broken |
| Cost | Moderate | Slightly higher than acrylic | Low per sheet, but heavy and risky |
My recommendation: use cast acrylic for all solid panels in a DIY bird cage. It bonds cleanly, cuts predictably, stays optically clear for years, and won't turn your workshop into a hazard zone if a panel cracks during a drop test. Polycarbonate is worth considering for a single impact-zone panel (such as a bottom tray or a panel near a heavy-chewing parrot), but its poor scratch resistance means it will look foggy within months under routine cleaning. Save polycarbonate for structural inserts, not display panels.
Why full glass cages don't work for birds
A full glass enclosure looks elegant in product renders, but in practice it creates serious problems for pet birds. If you still want guidance on glass enclosures despite these warnings, see how to make a glass bird cage for construction steps and safety considerations regarding ventilation, weight and breakage. The first and most urgent is ventilation: a sealed glass box has no airflow at all, and even with vented lids or doors you will struggle to hit the blank" rel="noopener noreferrer">10 to 15 air changes per hour that animal housing guidelines recommend for indoor enclosures. Birds have an extremely efficient flow-through respiratory system with air sacs, which means they are far more sensitive to stale air and ammonia build-up than mammals. A partially sealed glass cage that looks clean can still have dangerously high ammonia levels at bird height.
The second problem is weight. A glass panel large enough for a cockatiel cage, say 24×30 inches at 5 mm thickness, weighs roughly 8 kg. Acrylic at the same dimensions weighs around 4 kg. For a full cage that difference compounds quickly and makes handling, cleaning and moving the structure genuinely hazardous. The third problem is breakage. Glass shatters into shards. Even tempered glass, which breaks into blunt pebbles rather than blades, can still injure a panicking bird. Acrylic cracks along stress lines and stays in large pieces. For all of these reasons, glass-only bird enclosures are generally a poor choice and I do not recommend building one. If you want the look of glass with fewer risks, cast acrylic delivers nearly identical visual results with far better practical performance.
Tools, PPE and bird-safe hardware
Tools you will need
- Circular saw or table saw with a fine-tooth blade (80+ teeth for acrylic), OR a CO2 laser cutter (produces flame-polished edges with no blade marks)
- Jigsaw with acrylic-specific or fine-tooth metal blade (for curved cuts only — straight cuts on a table saw are far cleaner)
- Router with a straight/flush-trim bit for finishing edges
- Power drill and drill press if available (for fastener holes and ventilation slots)
- Acrylic drill bits with modified point angle (60–90°) to prevent cracking; standard twist bits can be resharpened to a 60° included angle
- Clamps (at least 4–6 spring or bar clamps), clamping cauls from scrap wood to spread pressure evenly
- Measuring tape, steel rule and marking pen (use grease pencil or wet-erase marker directly on protective film)
- File set and 220–400 grit wet/dry sandpaper for edge finishing
- Heat gun or strip heater for cold-bending if required (not for complex curves — use thermoforming oven for those)
- Rivet gun or pop-rivet tool if using aluminum framing channel with blind rivets
- Wire cutters and aviation shears for mesh panels
- Caulking gun for acrylic cement or silicone bead application
PPE for every session
- Safety glasses or full face shield (acrylic chips during cutting)
- Dust mask rated P100 or FFP3 (PMMA dust is a respiratory irritant; laser cutting produces fumes — ventilate the workspace or use a fume extractor)
- Cut-resistant gloves when handling cut panels (edges are sharp before filing)
- Ear protection when routing or cutting with power saws
Bird-safe metals and fasteners
Use only stainless steel (grade 304 or 316) or anodized aluminum for any hardware that enters the cage interior or contacts your bird. Zinc, galvanized steel and plain steel all carry toxicity risks for birds, zinc poisoning from chewed galvanized wire is a documented veterinary emergency. For mesh panels, 304 stainless steel welded mesh is the industry standard. Aluminum framing channel is suitable for the structural frame as long as it is anodized (not bare aluminum, which can oxidize and leave powder deposits).
| Item | Use | Safe choice | Avoid |
|---|---|---|---|
| Mesh / wire cloth | Ventilation panels | 304/316 stainless steel welded mesh | Galvanized steel, zinc-coated mesh, bare copper |
| Structural fasteners | Frame joints | Stainless steel screws, aluminum blind rivets | Zinc or cadmium-plated screws, brass with lead content |
| Panel-to-frame fasteners | Mounting acrylic to frame | Stainless steel cap screws with nylon washers and oversized holes | Self-tapping screws driven tight (no expansion room) |
| Frame material | Cage skeleton | Anodized aluminum channel or box section | Untreated galvanized steel tube, bare iron |
| Adhesive for acrylic panels | Joining acrylic to acrylic | Weld-On 3 or 4 acrylic solvent cement (IPS Corp) | Super glue (cyanoacrylate — brittle joints), epoxy resins with VOC off-gassing |
| Sealant for mesh-to-frame | Perimeter seal | 100% silicone (once fully cured and aired out) | Polyurethane sealants, solvent-based caulks, any product with fungicide additives |
| Latch hardware | Door security | Stainless steel carabiner-style clips or slide bolts | Zinc die-cast spring latches, any painted hardware |
Adhesives and sealants: the detail that trips people up
Acrylic solvent cement (Weld-On 3 or 4) works by partially dissolving both surfaces and fusing them as the solvent evaporates, the result is a molecular bond, not a surface-contact glue joint. Apply it with a small syringe or applicator bottle along a clamped seam, let capillary action draw it in, hold for 30 seconds, then leave the joint undisturbed for at least 24 hours before loading. Critically, do the bonding in a well-ventilated space away from your birds and allow the finished cage to off-gas for at least 48 hours before any bird goes near it. Silicone sealant used along the exterior of mesh-to-frame joints needs a full 72-hour cure before it is considered safe for bird contact, uncured silicone releases acetic acid (the smell of vinegar) which irritates avian airways.
Panel sizes, thicknesses and support framing
Choosing the right acrylic thickness
Panel thickness is determined by the unsupported span, the longest edge of each panel between framing members. As a working rule: 3 mm (1/8 in) acrylic is suitable for small cage panels up to about 12 inches on their longest unsupported edge. For panels up to 24 inches, use 4.5 mm (3/16 in). For panels 24 to 36 inches, step up to 6 mm (1/4 in). Anything larger than 36 inches should either use 6 mm sheet with an intermediate support bar, or move up to 9 mm (3/8 in). These recommendations assume cast acrylic with a flexural strength of approximately 16,500 psi (114 MPa) as published in ACRYLITE datasheets. Extruded acrylic sheet runs slightly lower, if you are using extruded sheet, go one step up in thickness as a safety margin.
| Panel longest unsupported span | Recommended thickness (cast acrylic) | Notes |
|---|---|---|
| Up to 12 in (30 cm) | 3 mm (1/8 in) | Suitable for small side panels, budgie/finch cages |
| 12–24 in (30–61 cm) | 4.5 mm (3/16 in) | Standard for cockatiel-sized cages |
| 24–36 in (61–91 cm) | 6 mm (1/4 in) | Amazon / conure cages; add mid-span frame bar if near 36 in |
| 36 in+ (91 cm+) | 9 mm (3/8 in) or 6 mm with mid-span bar | Large aviary panels; frame every 24 in maximum |
Thermal expansion: the detail that cracks panels
Acrylic expands at roughly 8 times the rate of glass, about 0.000040 in/in per degree Fahrenheit (72×10^-6 m/m per degree Celsius) according to ACRYLITE manufacturer data. In practice, that means a 24-inch (610 mm) panel in a room that swings 20°C between winter and summer will expand and contract by approximately 0.88 mm. That sounds tiny, but if you have fastened the panel rigidly at both ends with no room to move, that stress will crack it, sometimes months after installation when temperature conditions are exactly wrong. The manufacturer-recommended approach is to leave an expansion gap of approximately 5 mm per metre of panel length at each mounting edge, and to use oversized fastener holes (at least 2 mm larger in diameter than the screw or bolt) with a nylon or EPDM washer so the panel can slide slightly without the fastener bearing the full load.
Planning your panel layout
Sketch the cage as six faces: four side walls, a top and a bottom. Decide which faces will be full acrylic (typically the back wall and one or both side walls), which will be mesh-only (typically the front and at least parts of adjacent walls) and which will be partial, a combination of an acrylic lower skirt to contain mess with a mesh upper section. Mark where the door opening will fall. Calculate each acrylic panel's dimensions by subtracting the width of your framing channel from the face dimension on each edge, then subtracting your expansion gap. Write all measurements on your sketch before cutting anything. For doors and cage fronts, the construction is modular enough that you can treat them as a separate sub-build, this is exactly the kind of project where it helps to think through door design before you lock in your frame dimensions.
Ventilation: the non-negotiable part of the design
Ventilation is the single most important safety factor in an acrylic cage, and it is also the most commonly under-specified by first-time builders. The RSPCA guidance for indoor bird cages states that at least half of the largest side of the enclosure should be open metal grille, net or mesh, not solid material. For a cage with a front face of 30×36 inches (930 cm2), that means at least 465 cm2 of that face must be open mesh. Apply the same half-open rule to the top panel if the cage has a solid lid.
How to calculate your vent area
- Identify the largest solid face of your cage (usually the front or largest side wall).
- Calculate its total area in cm2 or square inches.
- At minimum, 50% of that area must be open mesh, slot vents or grille — this is your minimum vent area for that face.
- Add vent openings on at least one additional face (ideally the top or an opposite wall) to create a cross-flow path rather than dead-air pockets.
- Check that no vent opening is positioned directly at perch height on the windward side — a cold draft across a perch causes chronic chilling, especially in finches and budgies.
Vent slot design and mesh sizing
For a practical build, the simplest ventilation approach is to leave the front face as a full stainless steel mesh panel (or a combination of an acrylic lower section and a mesh upper section), and cut horizontal slot vents into the top acrylic panel, slots 10 to 15 mm wide, covered on the inside with a strip of stainless mesh to prevent the bird from sticking its head or foot through. Alternatively, use a commercial aluminum vent grille insert, routed into the panel from the outside. Whichever method you choose, position at least one vent near the top of each solid wall to allow warm, ammonia-laden air to escape upward while fresh air enters from the mesh front. Never place a vent on the same wall face as the sleeping perch or nest box, you want gentle passive airflow, not a localized draft.
Placement in the room matters too
Even a well-ventilated cage will have problems if it is placed directly in front of an air conditioning vent, a drafty window or a kitchen extractor fan path. Position the cage so the mesh-facing side points toward the room interior, not toward an external wall or air vent. Keep the cage away from the kitchen entirely, Teflon-coated cookware heated to high temperatures releases PTFE fumes that are lethal to birds at very low concentrations, and birds' extremely efficient respiratory systems make them vulnerable to fume exposure that would barely register for a human.
Cutting, joining and assembling the frame
Step 1: cut the frame components
Cut your aluminum channel to length using a miter saw or a fine-tooth hacksaw with a miter box. Deburr all cut ends with a file, aluminum burrs are sharp enough to cut you during assembly and can injure a bird that contacts them inside the cage. Mark each piece with a marker before assembly so you don't confuse similar lengths.
Step 2: cut acrylic panels
Leave the protective film on the sheet until the very last step. Score-and-snap works for straight cuts on sheets up to 4.5 mm, but for anything thicker or for cage panels where a clean edge matters, use a table saw with an 80-tooth carbide blade, feeding the sheet slowly and steadily. Feed direction: protective film side up, score the film lightly with a knife along your cut line first so the blade doesn't peel it. For laser cutting (the cleanest option), 3 mm acrylic cuts well at around 30–60 W at 37–60 mm/s; 5 mm needs 40–80 W at 25–40 mm/s. After cutting, file the edges lightly with 220-grit sandpaper and follow with 400-grit wet, then optionally flame-polish with a propane torch held 10–15 cm from the edge, moving continuously, this produces a glass-smooth edge that won't stress-crack over time.
Step 3: drill mounting holes
Mark fastener hole positions at least 12 mm from any panel edge, closer than this and the panel will crack under expansion stress. Drill at low speed with a modified-point acrylic bit, pressing gently without forcing. Use a backing board of scrap MDF under the panel to prevent tear-out on the exit side. Make each hole at least 2 mm larger in diameter than your fastener to allow for thermal movement.
Step 4: assemble the frame skeleton
Join the aluminum channel sections at corners using inside corner brackets and stainless steel machine screws, or use a L-channel section that covers two faces at once. Rivet the corners if you want a permanent joint; bolt them if you want the cage to be disassemblable. Square up the frame on a flat surface before the fasteners go fully tight, then check diagonal measurements, both diagonals should be equal. A frame that is racked even 2 to 3 mm will cause panels to bind and will make the door gap uneven.
Step 5: mount mesh panels
Cut stainless mesh panels to size using aviation shears or an angle grinder with a cutting disc (wear a face shield, cut mesh wire springs). Fold the cut edge of the mesh over by 5–10 mm using pliers to create a hem, this eliminates exposed wire ends that could catch a bird's leg or toe. Attach mesh panels to the frame by clamping them behind a retaining strip of aluminum flat bar and securing with stainless screws through the flat bar, mesh and into the frame channel. This sandwich method is far more secure than stapling or using J-clips, and it allows a mesh panel to be replaced without disassembling the whole cage.
Step 6: mount acrylic panels
Set each acrylic panel into its frame channel or against its mounting face. Place a nylon washer under each screw head so it contacts the acrylic surface, not bare metal. Drive each screw to snug, never overtighten. You want the panel held firmly but with enough give that it can slide slightly in the oversized holes as it expands and contracts. Apply a thin bead of 100% silicone along any internal seam between an acrylic panel and the frame to prevent seed and dander from packing into the gap. Let the silicone cure for a full 72 hours before closing the cage up.
Door and front options: security and access
Your door design is, practically speaking, the most important functional element of the whole build. A weak latch is an escape waiting to happen. For smaller birds like budgies and finches, a simple slide-bolt latch on a hinged mesh door is sufficient. For cockatiels and lovebirds, use a carabiner-style clip through the latch loop so the bird cannot work the bolt open with its beak. For conures, amazons and any bird with a strong beak and a problem-solving temperament, double-latch the door: a slide bolt plus a secondary carabiner or a separate barrel bolt at the top of the door frame. The door itself should be a mesh-and-aluminum frame unit that swings into the cage rather than outward, an outward-swinging door creates a gap at the top of the opening when ajar, and a bird will find it.
If your cage has an acrylic-panel front wall, you have two practical door options: cut the door opening from an acrylic panel and hinge an acrylic door using piano hinge along one vertical edge, or inset a separate mesh-panel door into an opening framed in the aluminum structure. For step-by-step instructions on how to make a door for a bird cage, see how to make door for bird cage. The second option is better for ventilation and for birds that chew, an acrylic door edge that gets chewed will eventually splinter. The door panel sub-build follows the same panel-sizing and expansion-allowance rules as all other acrylic panels. Building the front panel and door as a modular unit first, then fitting it to the main cage frame, keeps the work manageable.
Quick temporary and portable builds
If you need a temporary cage for a vet visit, a short boarding stay, or a quarantine period while you finish the main build, a pop-together acrylic-and-mesh unit can be assembled without adhesive or permanent fasteners. For step-by-step instructions, see our guide on how to make a temporary bird cage. Use pre-cut acrylic panels slotted into H-profile aluminum channel sections, the channel grips the panel edges and the corners lock with right-angle connectors that screw together without tools. Add a mesh panel as a front face, clip a slide bolt to the frame lip and you have a serviceable short-term enclosure in a couple of hours. These builds don't have the rigidity of a glued and riveted cage, so they are not suitable as permanent housing, but for temporary use with small birds they are practical and quick to clean.
Cleaning, disinfection and mess control
Acrylic cleans easily, but the wrong cleaner will damage it permanently. The manufacturer guidance from ACRYLITE and Plexiglas datasheets is explicit: do not use ammonia-based glass cleaners (Windex and most spray-glass products contain ammonia, which causes micro-crazing on acrylic surfaces). Do not use acetone, MEK, or any solvent-based product. For routine cleaning, daily wipe-down of droppings and dander, use warm water with a drop of mild dish soap and a soft microfiber cloth. Rinse with clean water and dry with a second cloth. For deeper disinfection, a diluted household bleach solution at roughly 1:32 (half a cup of 5–6% bleach per gallon of water, giving around 1,000–1,600 ppm) is appropriate for routine cage disinfection; a 1:10 solution is used for higher-risk situations. Always rinse the acrylic thoroughly with water after any bleach contact and allow the cage to air out completely before the bird returns.
Never use phenolic disinfectants, aerosol sprays, or any product that releases fumes near your birds. Birds' lungs and air sacs are extraordinarily sensitive to airborne chemicals, products that are harmless to you can cause acute respiratory distress or death in a bird in the same room. This applies during construction too: do any painting, solvent bonding or sealant application well away from your birds, and let everything off-gas thoroughly before reassembling.
For mess control, the lower acrylic panel design earns its keep here: a 6-to-8-inch acrylic skirt around the base of the cage walls catches most of the seed, feathers and dander that would otherwise scatter across the floor. A deep, removable tray in the floor of the cage (acrylic sheet or a polycarbonate insert) makes daily cleaning a 60-second job.
Seasonal protection and pest control
In winter, if your acrylic cage sits near a window or in a drafty room, you can clip a breathable fabric cover over the back and sides at night to retain warmth without completely blocking airflow, never use a solid cover that seals the mesh panels, or you remove the ventilation your bird depends on. In summer, check that the cage is not in direct sunlight: a glass or acrylic wall acts as a magnifier and the interior temperature can spike dangerously within minutes in direct sun. Red mites and other cage pests are effectively managed by hot-water cleaning and a bleach disinfect cycle, acrylics' non-porous surface does not harbor mites the way wooden frames do, which is one of the underrated advantages of a proper acrylic build.
Troubleshooting common problems
| Problem | Likely cause | Fix |
|---|---|---|
| Panel fogging or cloudiness | Ammonia cleaner used, or acrylic exposed to solvent fumes | Switch to soap-and-water cleaning; light surface crazing can be polished out with Novus No.1 or equivalent acrylic polish |
| Surface scratches | Abrasive cloth or dry wiping of dusty surface | Always wet the surface before wiping; polish out light scratches with Novus No.2 fine scratch remover |
| Cracked panel near fastener | Hole too small, fastener overtightened, or no expansion gap left | Drill out the hole to oversized, replace the panel section, install nylon washer and re-drive to snug only |
| Bird escaping | Door latch worked open by beak | Add secondary carabiner clip through latch loop; upgrade to double-bolt system for any parrot species |
| Odors building inside cage | Insufficient ventilation — solid panels blocking airflow | Add slot vents to top panel and check that at least 50% of the largest wall face is open mesh |
| Condensation inside panels | Cage in cold spot; warm bird breath hitting cold acrylic | Move cage away from exterior walls; add ventilation to increase air turnover |
| Mesh panel rattling | Retaining strip screws loose | Re-tighten retaining strip screws; add a thin strip of foam tape behind the retaining strip as a vibration damper |
| Acrylic panel warping | Panel fastened too rigidly without expansion allowance | Enlarge fastener holes, install slotted washers, leave 5 mm expansion gap per metre at each edge |
A note on decorative 'fake' cage builds
Decorative or display cage builds, wire-form or acrylic-panel structures made purely as home decor, are a completely different project from a functional bird cage, and it is important to keep them separate. A decorative cage built from craft materials, unsealed metals, lacquered wire or untested plastics is not safe for any live bird and should never be used as housing even temporarily. If you are interested in decorative cage aesthetics, build the piece specifically as decor with no intention of ever housing a bird in it, and keep it out of reach of any bird in the home. The welfare risk is real: birds will chew any accessible material and can be poisoned by finishes, lacquers and soft metals that are completely fine as room decoration.
Final safety checks before your bird moves in
- Run your finger along every interior edge, corner and fastener head — nothing should snag skin; if it does, it will catch a feather or toe.
- Inspect every mesh seam for exposed wire ends or gaps wider than your species' head width.
- Open and close the door 20 times, then try to open the latch from the inside — simulate what a bird will attempt.
- Check that all silicone and adhesive has had a minimum of 72 hours to cure and that the cage smells neutral (no vinegar, solvent or plastic odor).
- Measure the interior perch clearance — the bird's head should clear the cage roof by at least one full body length above the highest perch.
- Verify the cage is level and stable on its stand; rock it slightly to check it won't tip if the bird swings energetically on a side perch.
- Confirm that at least 50% of the largest face is open mesh and that no perch is directly in front of a vent opening.
FAQ
What are the primary species‑aware design rules I should follow when planning an acrylic bird cage?
Prioritise horizontal flight space, ventilation and chew/safety concerns. Use species‑specific minimums as starting points (bigger is always better): - Budgies/finches (small): minimum single bird ~45×45×60 cm (18×18×24 in); bar/mesh spacing ≤12 mm (≈1/2" for budgies; ≤3/8" for finches). - Cockatiels/small cockatoos: minimum ~61×61×76 cm (24×24×30 in); spacing ≤12–15 mm (≤1/2"–5/8"). - Small–medium parrots (conures, caiques): aim ≥76–91 cm length × 45–60 cm depth × 61–91 cm height (30–36" L × 18–24" D × 24–36" H); spacing ≈19–25 mm (3/4" recommended). - Medium parrots (amazons, amazons-sized): aim ≥91×61×122 cm (36×24×48 in) with spacing 19–25 mm up to 1" depending on species. Apply the RSPCA rule: width for a pair ≈ three times combined wingspan; length should allow at least two wing‑beats between perches; height ≈ three times head‑to‑tail length. Always increase size over these minima where possible.
Why choose acrylic/plexiglass instead of full glass for a bird cage?
Acrylic (PMMA) is far less likely to shatter on impact, is much lighter, and easier to machine and bond for custom builds. Compared with glass: acrylic has higher impact resistance, is lighter, and can be thermoformed and laser‑cut; downsides are higher thermal expansion and lower scratch resistance and chemical resistance. Full glass cages are generally poor because they shatter into sharp fragments, are heavy, harder to join safely, and are more likely to create dangerous edges if broken. Design must accommodate acrylic’s higher thermal expansion (plan ~5 mm per metre allowance) and protect against scratching.
Which acrylic type and panel thickness should I use for different sizes/species?
Use cast acrylic (museum/optical quality) for clarity and long‑term durability. Thickness guidance: - Small cages (budgies/finches, small dimensions under ~60 cm): 4–6 mm (3/16–1/4") panels are often adequate for short spans with framing. - Medium enclosures (cockatiels, conures): 6–10 mm (1/4–3/8") depending on span and door openings. - Large enclosures/aviary panels or where birds can climb/lean: 10–15 mm (3/8–5/8") or thicker, especially for long unsupported spans. Use framing, cross‑bracing or metal edge channels to reduce panel flex; follow manufacturer load/deflection tables for unsupported spans.
What about mesh/bars and ventilation when using acrylic walls?
Acrylic walls reduce natural airflow so plan substantial open‑mesh sections. RSPCA guidance: for indoor cages at least half of the largest side should be open mesh (not solid); for aviaries, at least three quarters of one wall open and one‑third solid shelter. Aim for overall ventilation achieving the spirit of ~10–15 air changes/hour at room level—this is a room benchmark; ensure open mesh area allows fresh air flow and escape of heat/moisture. Place open mesh on long horizontal walls for flight lines; ensure mesh bar sizes follow species recommendations for aperture and wire thickness.
Which adhesives, sealants and hardware are safe and effective for bird cages?
Use non‑toxic, low‑VOC products and avoid solvents that craze acrylic. Recommended choices: - Structural adhesive: 2‑part acrylic solvent cement for PMMA where appropriate (use manufacturer‑recommended grades) or clear UV‑curing acrylic adhesives for visible seams. - Mechanical fastening: stainless steel (304 or 316) screws, bolts, slotted holes for expansion, nylon washers to prevent point stress. - Sealants: neutral‑cure (oxime or acetoxy?) — prefer neutral‑cure silicone labelled low‑VOC and bird‑safe; some acetoxy silicones release acetic acid and may attack acrylic—check compatibility. - Avoid cyanoacrylates (superglue) for headliner joints where fumes might be an issue and some types can give off fumes; avoid contact cement or solvent‑based adhesives that release VOCs and craze PMMA. Always check product data sheets for PMMA compatibility and ventilate during curing; allow full cure and off‑gassing before introducing birds.
What tools and shop equipment will I need for cutting and assembling acrylic panels?
Basic to advanced tools: - Measuring & marking: steel rule, square, felt tip for plastics. - Cutting: circular saw with fine‑tooth acrylic blade, jigsaw with plastic blade, or table saw; for precision use laser cutter or CNC router. - Edge finishing: router with flush‑trim bit, files, fine‑grit sanding blocks (wet/dry 400→2000 grit) and polishing compounds or flame/edge polishing for optical finish. - Drilling: high‑speed steel twist bits with backing board to prevent chipping; use low speed and lubricant. - Fastening: drill/driver, countersink, stainless fasteners, slotted drill holes for expansion. - Heat forming: strip heater or oven for bends (follow forming temp ~170–190°C for cast acrylic). - Safety: respirator (when cutting/thermal forming), eye/hand protection, dust extraction.