You make a bird cage cake by baking a round or square layered cake, covering it in a smooth buttercream or fondant base, then building edible "cage bars" from piped chocolate or stiff royal icing and mounting them around the outside before adding a door cutout, a perch, and bird-shaped toppers. The key to keeping it from collapsing is chilling the cake between every major step, using internal dowel supports if you stack tiers, and not making your bars too thin or too tall relative to the cake's diameter.
How to Make a Bird Cage Cake Step-by-Step Guide

Maya Bennett
23 Jun 2026
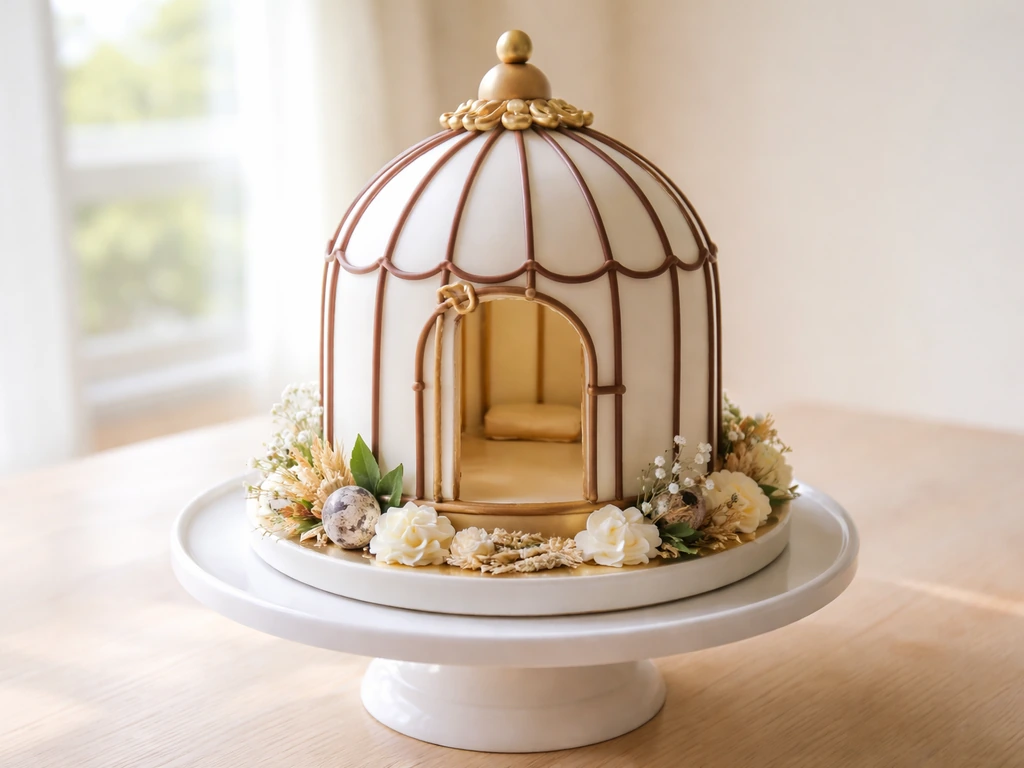
What a bird cage cake looks like
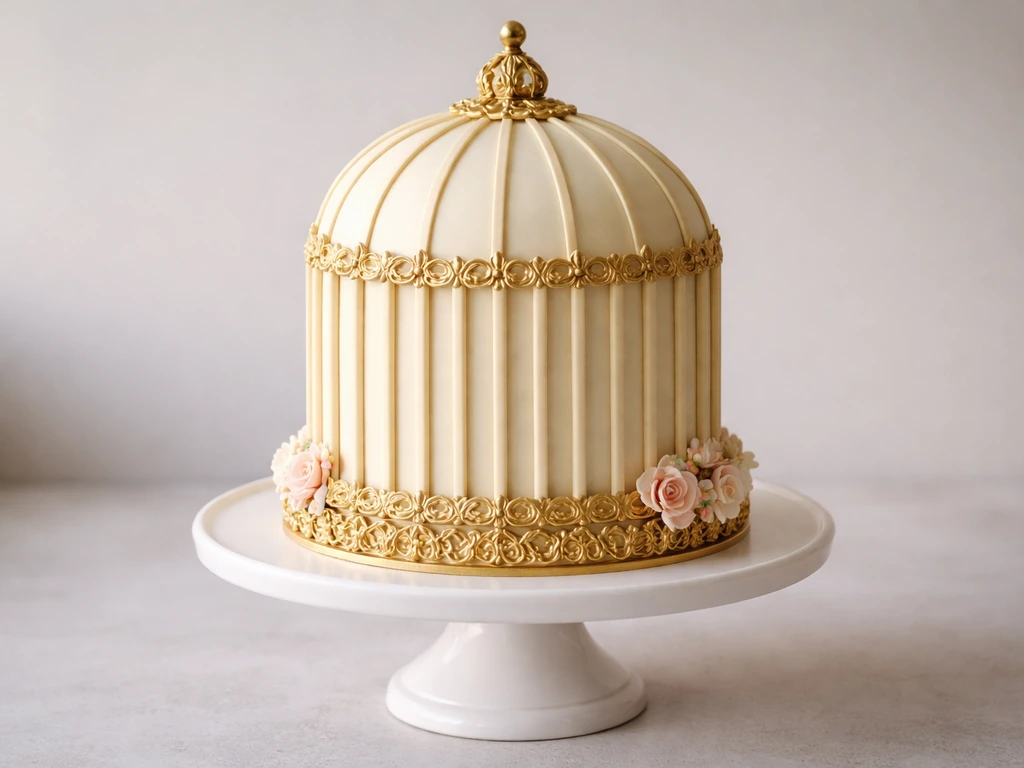
The classic bird cage cake mimics a Victorian domed cage: a round, slightly domed top tier sitting on a wider base, with vertical bars running from top to bottom all the way around. Some versions use a single round layer as the main cage "body" with a dome of chocolate bars arching overhead. Others stack two or three tiers, wrapping each with vertical bar panels. You'll also see flat sheet-cake versions where the cage is piped or painted onto the surface as a 2D illusion, which is the easiest starting point if this is your first attempt.
Common styles break down like this: a fully 3D freestanding cage (hardest, most impressive), a sculpted round cake where the bars sit flush against the frosted exterior (mid-difficulty), and a flat decorated cake with piped or stenciled cage art (easiest). This guide focuses on the 3D exterior bar method, which is what most people picture when they search for a bird cage cake, but I'll flag where the flat version is a valid shortcut.
Everything you need before you start
Cake and frosting
- Two or three 6-inch round cake layers (or four 4-inch layers for a taller, narrower cage shape) — dense recipes like vanilla pound cake or chocolate mud cake hold their shape better than sponge
- Buttercream frosting: about 3 cups for a crumb coat and final coat on a 6-inch double layer
- Fondant (optional): 500g of white or colored rolled fondant for a smoother exterior that holds bar mounts better than buttercream alone
- Gel food coloring in ivory, white, or your chosen cage color — avoid liquid coloring, which thins frosting
Cage bar materials (pick one)
| Material | Best for | Difficulty | Fragility | Notes |
|---|---|---|---|---|
| Tempered dark or milk chocolate | Full 3D freestanding bars | Medium | Breaks if made too thin | Needs tempering for clean snap and shine; avoid if pet birds are nearby |
| Stiff royal icing | Flat piped bars or short vertical sections | Easy-Medium | Snaps if bumped hard | Takes 6 hours to fully dry; excellent for fine lattice detail |
| White chocolate or candy melts | Colored bars, pastel cages | Easy | More brittle than dark chocolate | No tempering needed; melts at lower temperatures |
| Pretzel sticks (thin) | Rustic or quick builds | Easy | Soft if exposed to humidity | Cover with chocolate or candy coating to firm up |
| Sugar or isomalt sticks | Professional showpieces | Hard | Very fragile | Crystal-clear look; not beginner-friendly |
For most home bakers, stiff royal icing or candy melts give the best balance of workability and looks. If you want genuine chocolate bars, dark chocolate tempered correctly gives you the cleanest snap and finish.
Tools checklist
- Cake turntable
- Offset spatula (large and small)
- Bench scraper for smoothing sides
- Piping bags and small round tips (Wilton #2 or #3 for royal icing bars)
- Acetate sheets or parchment paper (for piping chocolate bars flat)
- Ruler and pen for marking bar spacing on parchment
- Wooden dowels or heavy-duty bubble tea straws (for tiered versions)
- Cake drum or thick board sized to your cake
- Non-skid mat for transport
- Thermometer if tempering chocolate
Building the cake itself: base layers and smooth surface
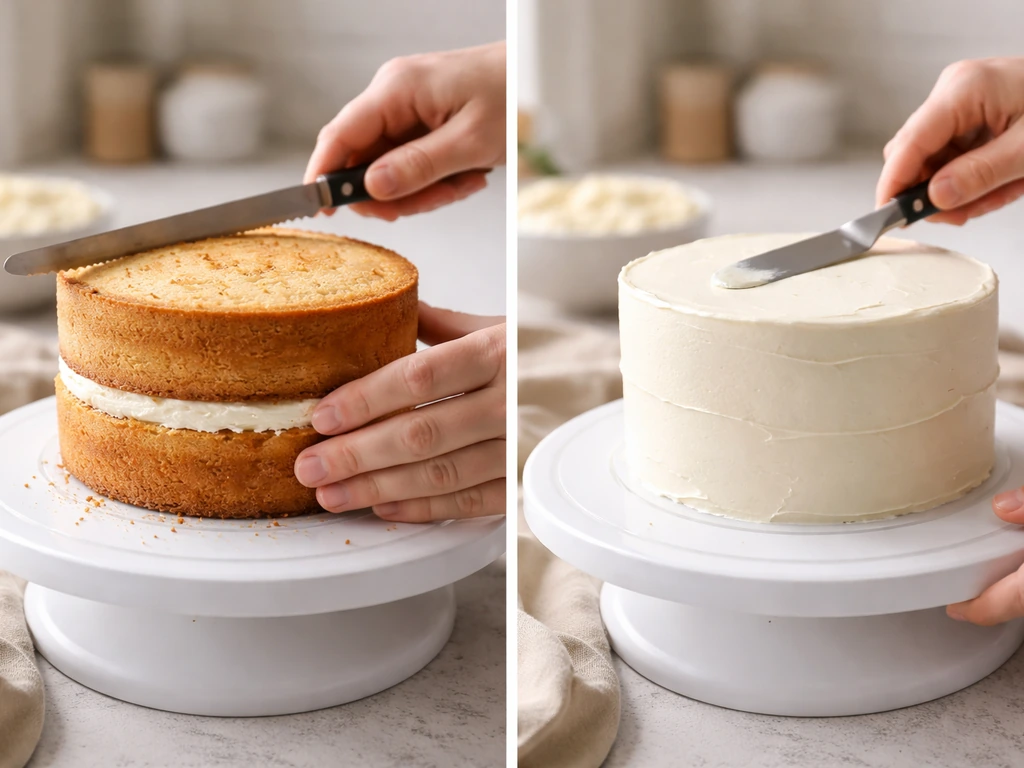
Start by leveling each cake layer with a serrated knife, any wobble here will throw off your bars later. Stack your layers with a consistent filling (buttercream, ganache, or jam), then apply a thin crumb coat of buttercream all over the outside. The crumb coat seals in loose crumbs so your final surface is clean. Refrigerate for at least 30 minutes until the crumb coat is firm to the touch.
Apply your final coat of buttercream or roll out fondant and smooth it over the chilled crumb coat. For bars to sit flush and stay put, you want a flat, smooth, vertical surface on the sides of the cake. If you want it to look extra nice, focus on clean, smooth sides and consistent bar spacing so everything reads as one cohesive cage how to make a bird cage look nice. A bench scraper held at a 90-degree angle against the turntable while you spin it is the fastest way to get that. Chill the cake again for another 20 to 30 minutes after the final coat before you attempt to mount anything on it.
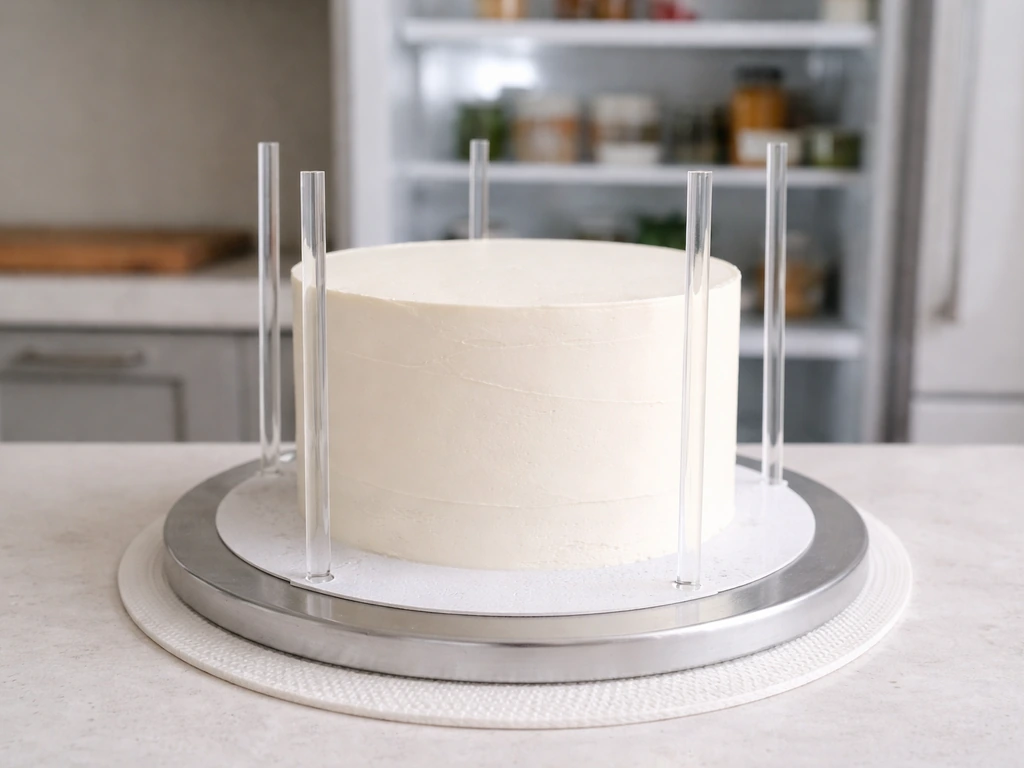
Adding dowels if you're stacking tiers
If your design has a smaller dome tier sitting on top of a wider base tier, you need internal supports. Insert wooden dowels or thick straws vertically into the lower tier, mark where the cake surface hits them, pull them out, cut them flush, and reinsert. Use at least four dowels arranged in a circle inside the footprint of the upper tier. Place a thin cake board cut to the size of the upper tier on top of the dowels before stacking the second tier, this distributes the weight and stops the upper tier from sinking. Skipping this step is the most common reason tiered bird cage cakes collapse before they even reach the table.
Making and mounting the cage bars
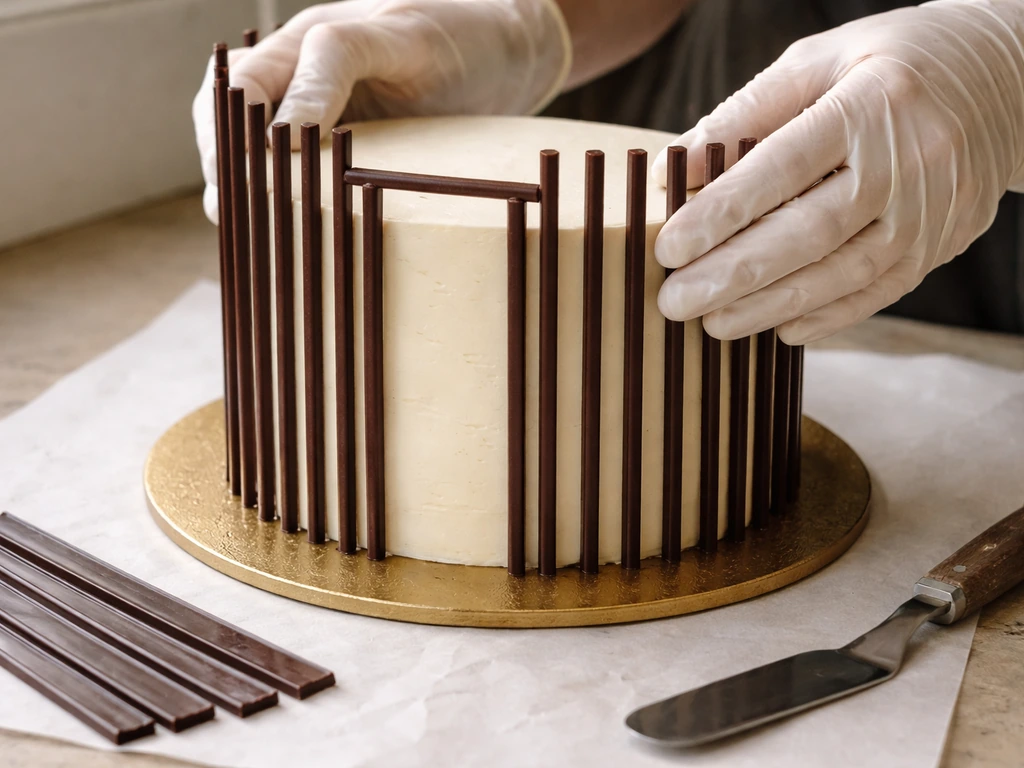
Chocolate bars
Melt your chocolate and temper it: heat dark chocolate to about 115°F (46°C), cool it to 82°F (28°C) on a marble slab or by stirring in unmelted chocolate, then warm it back to 88-90°F (31-32°C) for piping. Tempered chocolate sets with a clean snap and a glossy finish; untempered chocolate can look dull and feel soft at room temperature.
Tape a sheet of parchment or acetate to a flat surface. Use a ruler to draw parallel vertical lines spaced to match your bar spacing (typically 1 to 1.5 cm apart for a realistic cage look). Pipe your melted chocolate directly over each line, making the bars about 3 to 4mm wide, any thinner and they'll snap the moment you try to peel them. Add a horizontal bar at the top and bottom of each vertical bar to connect them into a panel. Slide the sheet onto a level tray and refrigerate for about 10 minutes until fully set. Peel the bars gently off the parchment; they should release cleanly if your chocolate was properly tempered.
Press each bar panel gently against the chilled, firm exterior of the cake. Buttercream and fondant both grip chocolate well. Work around the cake in sections, fitting panels side by side. If a gap appears between panels, pipe a thin line of melted chocolate or royal icing into the seam and let it set.
Royal icing bars
Use stiff-consistency royal icing, which means it forms stiff peaks and holds a sharp edge when piped. Load a piping bag with a #2 or #3 round tip and pipe vertical lines directly onto the smoothed fondant or firm buttercream surface of the cake. Work on a chilled cake so the lines stay sharp. After piping all verticals, add two thin horizontal bands (one near the top, one near the bottom) to frame the cage. Let the piped icing dry fully, at least 6 hours, before handling the cake. Royal icing bars piped this way are less removable than chocolate panels but integrate beautifully into the design.
Adding the door, perch, and bird details

The door
A cage door is the visual focal point and easier to do than it looks. On one side of the cake, leave a rectangular gap in your bar panel (about 4 to 5 bars wide). Pipe or mold a small arched or rectangular frame from royal icing or chocolate using the same method as the bars, this becomes the door outline.
You can hinge it open at a slight angle by propping it against the cake with a cocktail stick or toothpick until it sets, then removing the support. For a fondant cake, roll a small rope of fondant and press it around the door opening as a frame, then add tiny fondant hinges and a round bead for a latch.
The perch
A perch running horizontally across the interior "inside" the cage is a lovely touch. The simplest version: pipe a thick horizontal line of royal icing across the door opening so it appears to cross the cage interior. Alternatively, push a thin pretzel rod coated in matching chocolate or candy melt through the door opening and let it rest against both sides of the cake. If your design has an actual open dome (no cake inside, just chocolate bars), you can insert a dowel wrapped in brown fondant as a real perch.
Bird toppers and decorations
Fondant birds are the easiest edible toppers: roll a small oval body, pinch one end into a tail, add a tiny beak and two small wings. Use gel food color or edible dust to paint feather details. You can also use commercially made sugar birds, wafer paper birds, or printed edible images for a cleaner finish if hand-sculpting isn't your thing. Place one bird perched on the door frame and one or two sitting on top of the cage dome for maximum visual impact. If you want to decorate a real bird cage for a wedding, stick to bird-safe materials and avoid anything toxic to birds decorate a bird cage for a wedding.
For additional styling that ties into the cage theme, thin vines or flowers made from fondant or gum paste look great trailing around the base of the cake and between the bars. If your audience is into real bird keeping, you can add tiny edible elements that reference common cage accessories: a small fondant swing, a round fondant mirror, or miniature fondant seed dishes placed near the door. These details connect well with the decorative ideas explored in guides on how to decorate a large bird cage or how to make a bird cage look nice, adapted here in fully edible form.
Keeping it stable: chilling, supports, and transport
Cold is your best friend throughout this build. Chill the cake after the crumb coat, after the final coat, and again after mounting the bars. Each chill firms the frosting so the bars grip properly and decorations don't slide. Buttercream cakes with dairy fillings should stay refrigerated until about an hour before serving. Fondant-covered cakes without dairy fillings can sit at room temperature for 7 to 10 days in a covered box, but if you have cream, fresh fruit, or custard inside, keep it cold at 40°F (4°C) or below right up until serving time.
For transport, place the finished cake on a non-skid mat inside the cake box. The mat prevents the board from sliding if the box is even slightly wider than the cake. Drive with the box on a flat surface, not on a seat where it can tip. If it's a hot day, a cooler with ice packs around (not under) the cake box helps maintain temperature without soaking the base. Keep the car air conditioning running.
If you have a tall tiered version, consider adding a central dowel that runs straight down through all tiers and into the board. This single long dowel acts as a spine and is the technique many bakers use for wedding cakes that need to survive a longer journey. Push it through a clear cake straw running through the center before inserting so it doesn't cut through your layers unevenly.
When things go wrong: fixes for common problems
Bars snapping or crumbling
This happens when bars are piped too thin or the chocolate wasn't tempered properly. Make bars at least 3mm wide and always test one bar before piping the full set. If a panel snaps during mounting, pipe a small amount of melted chocolate on the back and press the pieces back together on the parchment, then re-chill before trying again. Royal icing bars are actually less likely to snap than chocolate because they flex slightly before breaking.
Sagging or sliding frosting
Frosting sags when the cake is too warm or when you've applied too much too fast. Always chill between coats. If your buttercream is sliding off mid-decoration, pop the whole cake in the fridge for 20 minutes and let it firm up completely before continuing. If the problem is a recipe issue (too much liquid in the buttercream), beat in a tablespoon of sifted powdered sugar at a time until it stiffens.
Bars not sticking to the cake
If your bars keep falling off a fondant surface, very lightly brush the back of the bar with water or a tiny dab of corn syrup before pressing it on. Don't over-wet the fondant or it'll go tacky and start dissolving. On buttercream, bars almost always stick on their own because the surface has enough grip.
Color bleeding
Dark chocolate bars against white fondant can bleed a faint brown tint if moisture gets involved. Keep the cake cold and dry. If you're using colored royal icing bars, let them dry fully (6 hours minimum) before placing them on the cake or the wet icing will bleed into the fondant beneath. Gel colors are far less likely to bleed than liquid food coloring.
Uneven or lopsided cage
Measure your bar spacing before you start mounting. Wrap a strip of parchment around the circumference of your cake, remove it, and mark equal spacing on the paper. Use that paper as a guide to mark dots on the cake before piping or placing bars. A few minutes of planning here saves a lot of frustration.
Food safety and keeping things safe around pet birds
If you have pet birds at home and you're baking this cake in the same space, you need to be aware of a few real hazards. Chocolate is toxic to birds due to theobromine and caffeine, and the darker the chocolate, the more dangerous it is. While your pet isn't going to eat the cake directly, chocolate fumes or crumbs left on surfaces where birds roam can cause serious harm. Bake and decorate in a room your birds can't access, clean surfaces thoroughly after you finish, and don't leave chocolate scraps anywhere a curious parrot or finch could reach them.
Xylitol, which appears in some sugar-free sweeteners and certain frostings marketed for low-sugar baking, is also on the FDA's list of dangerous ingredients for pets. Check your ingredient labels and stick to standard cane sugar-based products when baking in a bird household.
From a human food-safety standpoint, keep any cake with dairy-based fillings (cream, custard, cream cheese frosting) refrigerated at 40°F (4°C) or below until you're ready to serve. Don't leave it sitting out in the food danger zone between 40°F and 140°F for more than two hours total. Fondant-only cakes without perishable fillings are more forgiving at room temperature but still shouldn't sit uncovered for extended periods in warm weather.
If non-edible decorations are on the cake (wire, plastic bird figurines, decorative feathers), remove them completely before cutting and serving. Label them clearly on the cake if guests might not realize they're non-edible. Decorative feathers in particular carry a contamination risk and should stay well away from any part of the cake that will be eaten. Keep all cutting tools clean between uses, and wash your hands after handling non-edible decor before touching the cake again.
A quick safety checklist before serving
- All non-edible toppers, wires, and figurines removed before cutting
- Cake stored at correct temperature (40°F or below if dairy-filled)
- No chocolate crumbs or scraps in areas accessible to pet birds
- Xylitol-free ingredients confirmed if pets are in the home
- Cake not left at room temperature for more than 2 hours if it contains perishable fillings
- Serving utensils clean and separate from any tools used with non-edible decorations
The bird cage cake is one of those designs that looks incredibly complex but breaks down into manageable steps when you tackle each element separately: the cake base, the frosted surface, the bar panels, and the finishing details. If you want to use a bird cage for decoration in everyday life, you can adapt the same visual ideas by styling the cage with greenery, fairy lights, or seasonal accents bird cage cake. Get each stage right before moving to the next, chill religiously between steps, and measure your bar spacing before you commit. That's really the whole secret.
FAQ
Can I make the bird cage bars ahead of time, and how should I store them?
Yes. Let the chocolate bars or royal icing panels fully set, then store them flat in a cool, dry container. For chocolate, keep them at room temperature away from humidity so they do not soften. For royal icing, keep panels in a single layer separated with parchment (or paper towels) and avoid any condensation, then assemble right before serving to prevent smudging or loosening.
What’s the best way to prevent chocolate bars from cracking when I peel them off the parchment?
Use tempered chocolate and test one bar first. When the bars are set, peel slowly from one corner at a time and keep the panel supported, do not let it bend in the middle. If you notice jagged edges or immediate snap breakage, make the bars slightly thicker (stay around 3 to 4 mm) and allow another few minutes of chilling before peeling.
How do I know whether to use chocolate bar panels or royal icing lines for my specific cake?
Choose chocolate panels if you want crisp, removable-looking vertical bars with the strongest structural feel, but you must fit seams accurately. Choose royal icing if your cake exterior is very cold and smooth and you want bars that integrate permanently into the frosting (less likely to detach). If you plan to transport the cake a long distance, chocolate panels often look cleaner, but royal icing can be more forgiving about minor surface irregularities.
My cake is perfectly round, but the bars don’t match the circumference. How can I fix spacing?
Do a quick “dry run” with strips. Before piping or mounting, wrap parchment around the cake and mark consistent intervals, then transfer those marks onto the sheet you will pipe on. If you already piped panels, you can fill tiny mismatches by adjusting seams with a thin chocolate or icing line and then piping a matching top and bottom connector to disguise the repair.
Can I use a dome top without a second cake tier?
Yes, by building the cage visual as a freestanding chocolate or icing dome rather than stacking cake. Keep the dome supports simple and internal, such as a central dowel or a small internal cake board hidden under decorations. Avoid making the dome too tall relative to the cake base because gravity will stress the bars, especially during chilling and transport.
How do I attach a cage door so it looks hinged but stays stable?
For a “hinged” look, pipe or mold the door outline, then prop it only until the frame firms up. Use a single temporary support point (like a toothpick) near the hinge side, then remove it once the icing or chocolate has fully set. If the door is too heavy, make the door frame slightly wider and fill the inside less, so the door outline is sturdy but not bulky.
What if I want the door opening but also want to keep bars behind it from collapsing?
Leave the door gap exactly where you will frame it, then avoid creating isolated thin bar segments. After mounting neighboring panels, reinforce the immediate sides of the door opening by piping a thin chocolate seam or royal icing “corner posts” that connect vertical bars to the top and bottom framing, then let it set before adding the door.
Can I color the chocolate bars, and will it bleed onto fondant?
Yes, but use oil-based or cocoa-butter compatible coloring if you need tint, and keep the cake cold and dry. Colored chocolate can still darken or leave faint transfer if moisture is present. Do not apply colored bars to a warm cake, and avoid touching the chocolate backs with wet hands, then chill after attachment so nothing migrates into the fondant.
How do I prevent buttercream from showing through fondant under the bar panels?
Ensure the fondant is smooth and firm before mounting. After rolling or smoothing, chill until it feels set, then add panels to a stable surface. If your fondant is too soft or too warm, moisture and oils can make it translucent or tacky. Use a light crumb coat under fondant and keep the buttercream layer thin so the fondant does not slump.
What’s the easiest way to keep bar panels perfectly vertical?
Work in sections and use a guide. Mark the cake surface with dots for spacing, then apply the first panel as a baseline. For the rest, press the top and bottom connectors first, then adjust the vertical edge while the chocolate or icing is still tacky. If you see it leaning, stop and re-chill, straightening at room temperature can cause seams to open.
Is it safe to bake this cake in a home with birds?
Be careful with chocolate, especially dark chocolate, because it can be toxic to birds if ingested and residues can be harmful. Bake and decorate in a room birds cannot access, keep chocolate scraps sealed and cleaned up immediately, and avoid bringing any chocolate-adjacent items (like parchment with melted chocolate) into bird-access areas. Also check sweeteners for xylitol, since it is dangerous for pets and may appear in some sugar-free products.
How should I transport a tiered bird cage cake to avoid bar damage?
Use a snug, non-skid base so the cake board cannot slide. If you have a tall tiered design, keep the internal dowel spine and cake boards properly aligned, then transport with the cage fully chilled so bars and seams are firm. Drive with the box level, avoid sudden braking, and do not add fragile topper pieces (like birds) until the destination if the trip is long or hot.
Next Article
How to Make a Temporary Bird Cage Step by Step
Step-by-step DIY guide to build a safe temporary bird cage now, with sizing, bar spacing, materials, and safety checks.