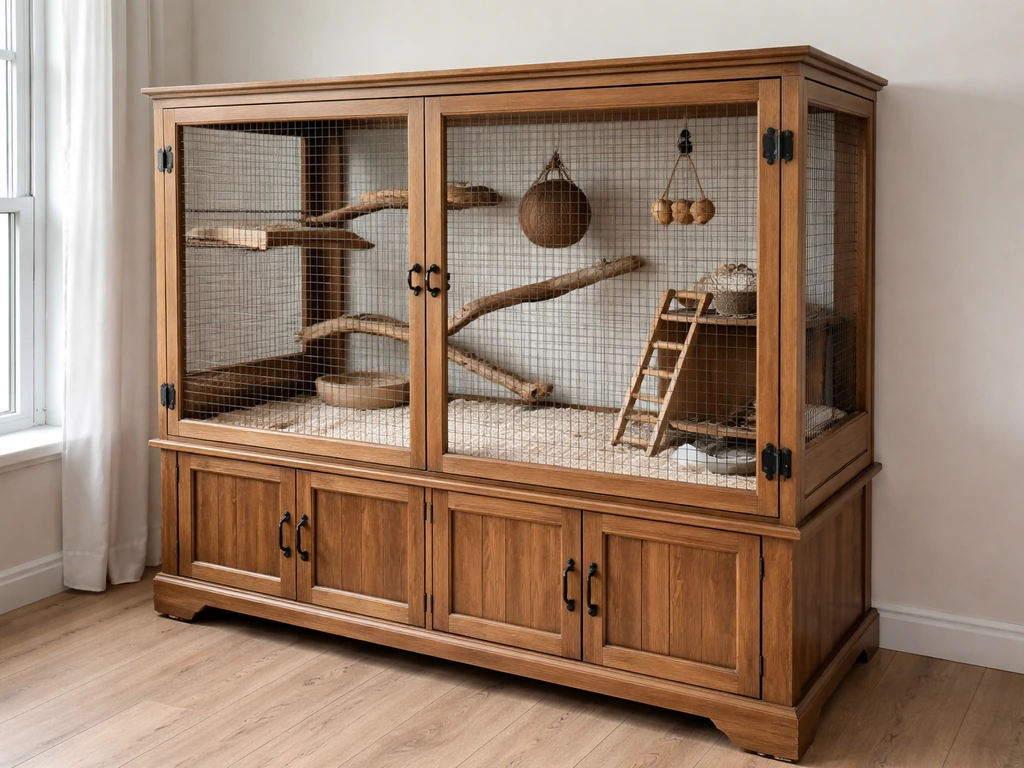
You can turn a wooden hutch into a bird cage, but it takes more than just moving a bird in. The conversion involves checking every material for toxicity, replacing or reinforcing wire panels, adding secure latches, and setting up the interior so cleaning and daily care are actually manageable. Done right, a solid hutch makes a spacious, affordable enclosure for finches, canaries, doves, or even small parrots. Done wrong, it becomes a health hazard or escape route. This guide walks you through the whole process, step by step.
How to Turn a Hutch Into a Bird Cage Safely

Maya Bennett
11 Jun 2026
First: check the hutch materials before you do anything else
This step is not optional. Birds have extremely sensitive respiratory tracts and are vulnerable to chemical fumes, off-gassing wood treatments, and toxic metal coatings in a way most other pets simply are not. A hutch that was perfectly safe for a rabbit can be dangerous for a bird.
Wood and paint checks
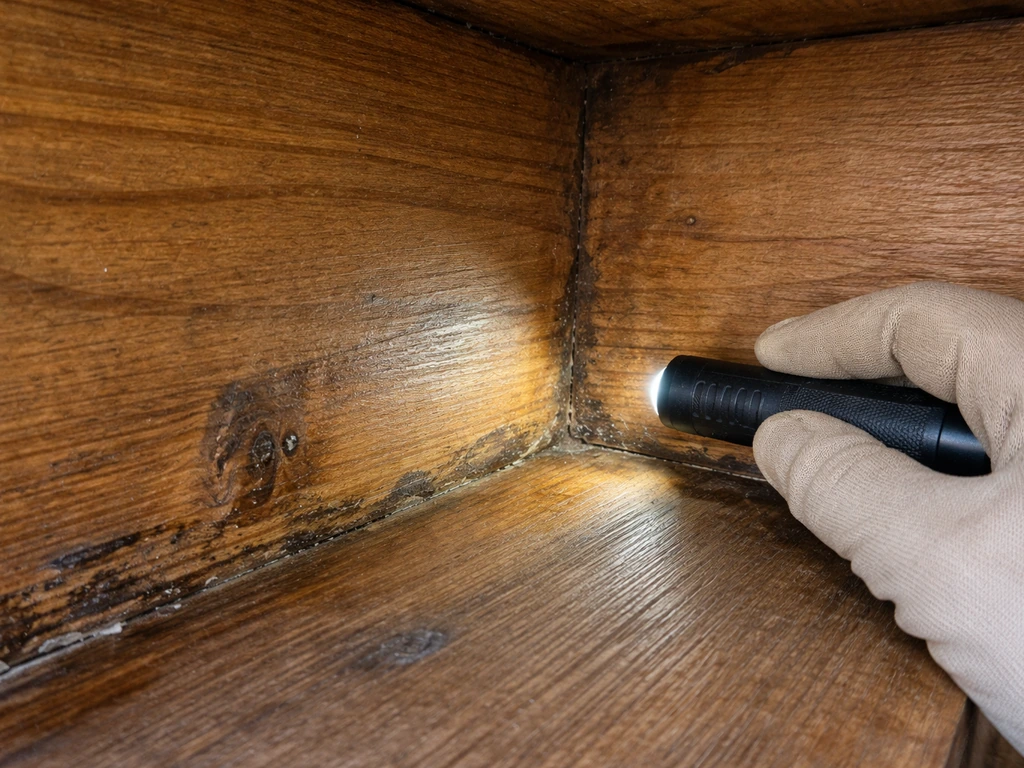
Start with the wood itself. Untreated pine, fir, or plywood is generally fine as a structural base. The problem is almost always what has been applied to it. Pressure-treated lumber contains preservatives that can off-gas and are toxic to birds, so avoid it entirely. Varnish, polyurethane, and most commercial wood stains off-gas VOCs (volatile organic compounds) even after they look dry. If the hutch has been painted, test for lead, especially on older hutches. Any paint that is chipping, flaking, or that your bird might chew should be stripped and replaced with a bird-safe, water-based paint confirmed non-toxic once fully cured. If in doubt, sand the surface back and leave it bare or use a food-safe sealer.
Check every corner and joint for mold, rot, or old pest treatments. Hutches stored outside often get sprayed with insecticides or treated with wood preservers. If you cannot confirm what was used or the wood is heavily weathered and saturated with moisture, it is not worth the risk. Some conversions are not worth doing, and I will cover that more at the end.
Wire and metal hardware checks
Existing wire panels on rabbit hutches are often made from galvanized steel. Galvanized wire is coated with zinc, and birds that chew or pick at wire can ingest toxic levels of zinc. This is a documented risk, not a theoretical one. If the wire is heavily galvanized with a rough, flaky finish, replace it.
If the galvanized wire is smooth and new-looking, you can clean it with a diluted white vinegar solution, rinse it thoroughly, and let it dry completely before use. The same goes for any galvanized hardware cloth or mesh you plan to add. [Ideally, use powder-coated or stainless steel wire, which avoids the zinc risk altogether. ](https://www.
rspca. org. uk/advice/birds/what-kind-of-enclosure-does-my-bird-need/) Also check hinges, latches, staples, and any existing hardware for rust or exposed sharp edges. Rusted metal is a tetanus risk during your build and can injure birds.
Sizing, layout, and ventilation: set the hutch up for birds, not rabbits
Rabbit hutches are designed for floor-dwelling animals. Birds need height and horizontal flight space as much as they need floor area. Before you start cutting or adding anything, assess whether the hutch is actually the right size for the species you are keeping. As a rough guide: finches and canaries need at least 60cm of width to get short flights in; larger doves and cockatiels need considerably more. If the hutch is too short or too narrow, the conversion will just produce a stressed bird in a box.
Ventilation is non-negotiable
Birds produce ammonia from their droppings, and in a poorly ventilated enclosure that ammonia builds up quickly and damages their respiratory systems. A hutch with solid wooden sides on three sides and one mesh front is not enough ventilation. Aim for at least two opposing open mesh panels so air can move through the enclosure. A useful engineering principle is that the total open mesh area should represent a meaningful fraction of the total side area, enough to allow fresh air in and stale air out without creating a cold draft. For outdoor hutches, position the ventilation panels away from prevailing wind and rain, or use a partial overhang to protect against direct weather while maintaining airflow.
If the hutch only has one mesh panel, cut a second ventilation opening on the opposite or adjacent side and cover it with appropriate mesh. Use a jigsaw for clean cuts in the wood frame. Always wear a dust mask when cutting treated or painted wood.
Access doors for daily care
Think through your daily routine before you build. You need to reach food and water without chasing the bird to the back of the enclosure. You need a way to remove a waste tray without opening the main door. And you need emergency access if a bird gets injured. Most hutches have one large front door, which works, but adding a second smaller service door (or converting a panel into one) makes daily management much easier. If you are building an enclosure for smaller birds like finches or lovebirds, the main door needs a secondary catch or a double-door vestibule system to prevent escapes when you open up.
Installing wire panels, doors, latches, and safe internal fittings
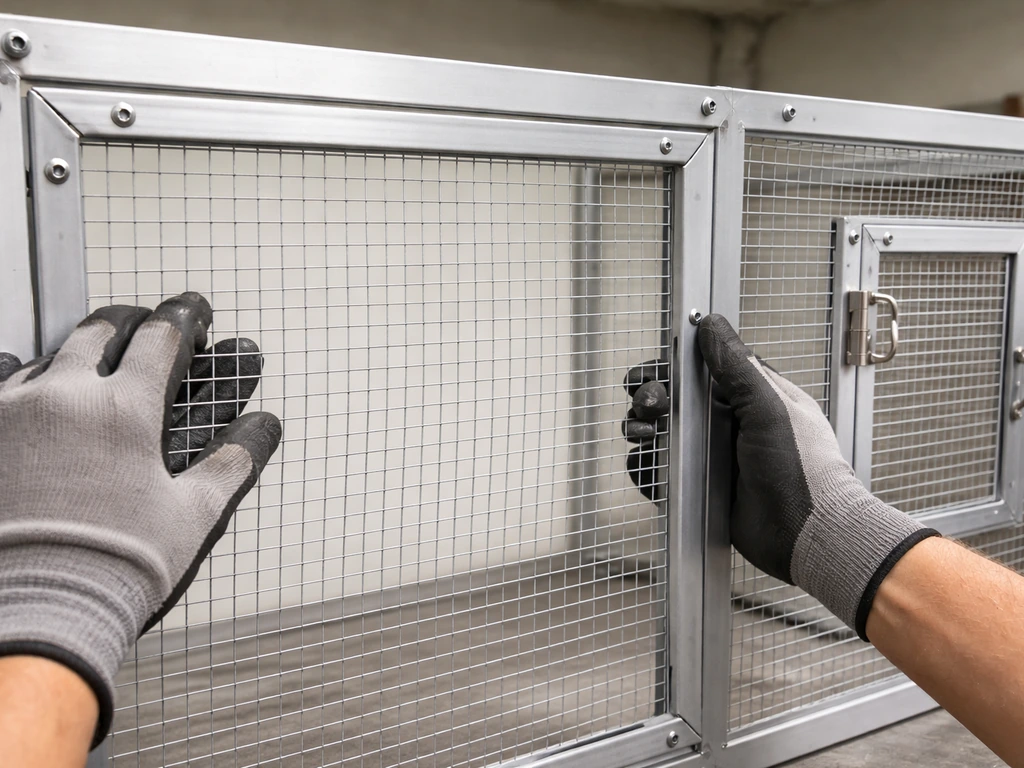
Choosing and fitting the wire
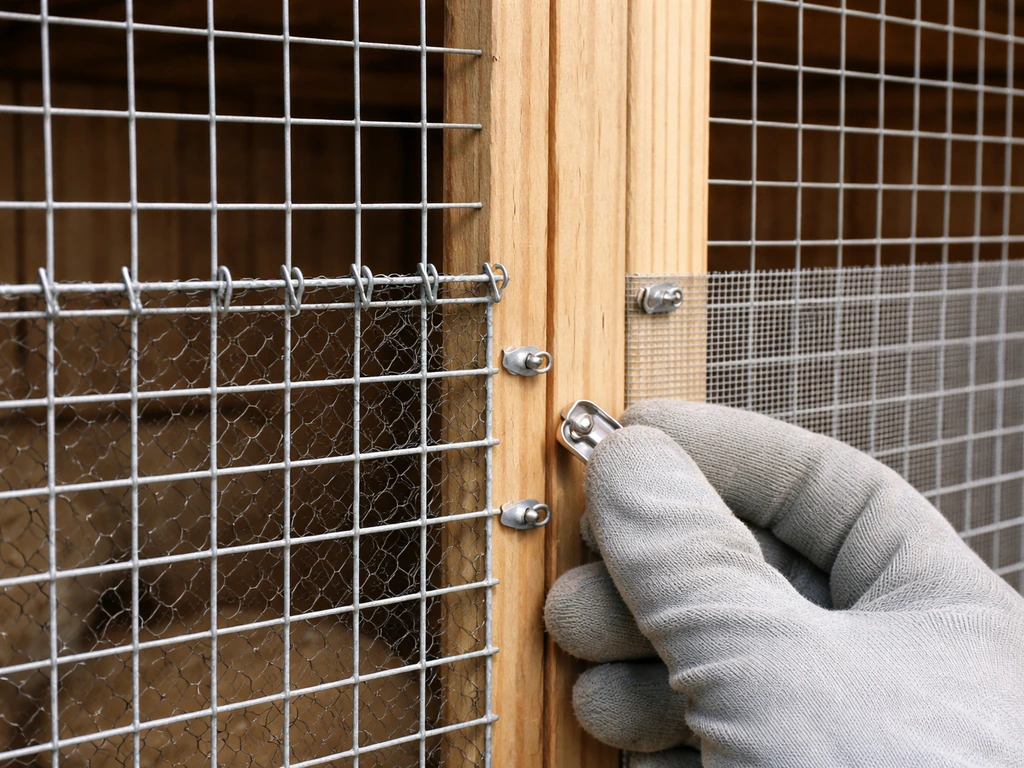
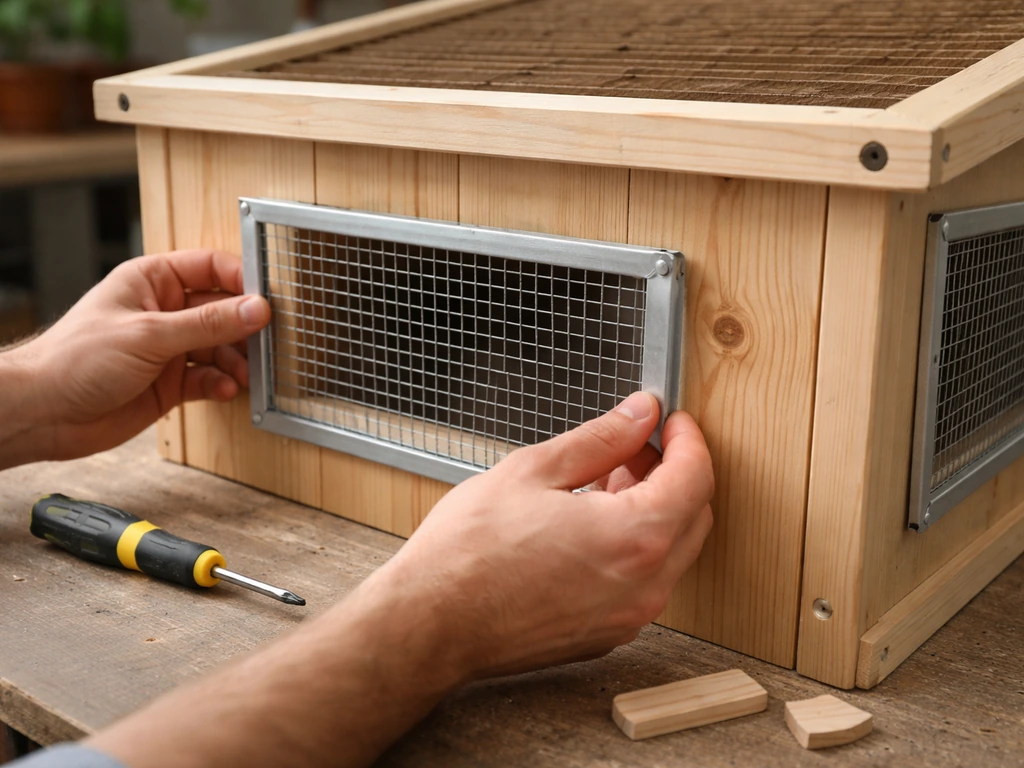
Wire mesh gauge and aperture size both matter. The mesh must be strong enough that the bird cannot chew through it, and fine enough that wild birds cannot reach through from outside. For finches and canaries, 19-gauge welded wire mesh with a 1.25cm (half-inch) aperture works well. For parrots or larger birds, go heavier: 16-gauge or thicker. Avoid chicken wire. It is weak, it corrodes fast, and the apertures are large enough for predators or wild birds to breach.
When you cut wire mesh, every cut edge will have sharp wire tips that can injure birds and handlers. Fold the cut edge back on itself, use wire edge trim (J-channel), or frame the panel in a wooden batten so no raw edge is exposed inside the enclosure. Attach panels using staple gun and fence staples into the wood frame, then add a wooden batten over the top to sandwich the wire. This is stronger than staples alone and covers any sharp points. Check every staple point from inside the enclosure before you put a bird in.
Latches and hardware
Never rely on a single basic bolt or sliding latch for a bird enclosure. Parrots especially are excellent at working simple hardware. Use a two-action latch (one that requires lifting and sliding simultaneously), a carabiner clip through the bolt, or a padlock on any door the bird could reach. For smaller birds the risk is less about the bird escaping and more about predators getting in: cats and raccoons can flip simple lever latches. Use snap-bolt or hasp-and-staple latches rated for outdoor use, and check them for rust every few months.
Internal fittings: what goes inside
Keep the interior hardware minimal and all bird-safe. Use stainless steel or untreated hardwood dowels for perch supports. Avoid softwood dowels that splinter easily. Any hooks or cup holders for feeders should be stainless steel or food-grade plastic, with no zinc or lead-based plating. Mount them securely so they cannot swing and injure the bird, and position them away from perches where droppings will contaminate feed and water.
Setting up the interior for your bird
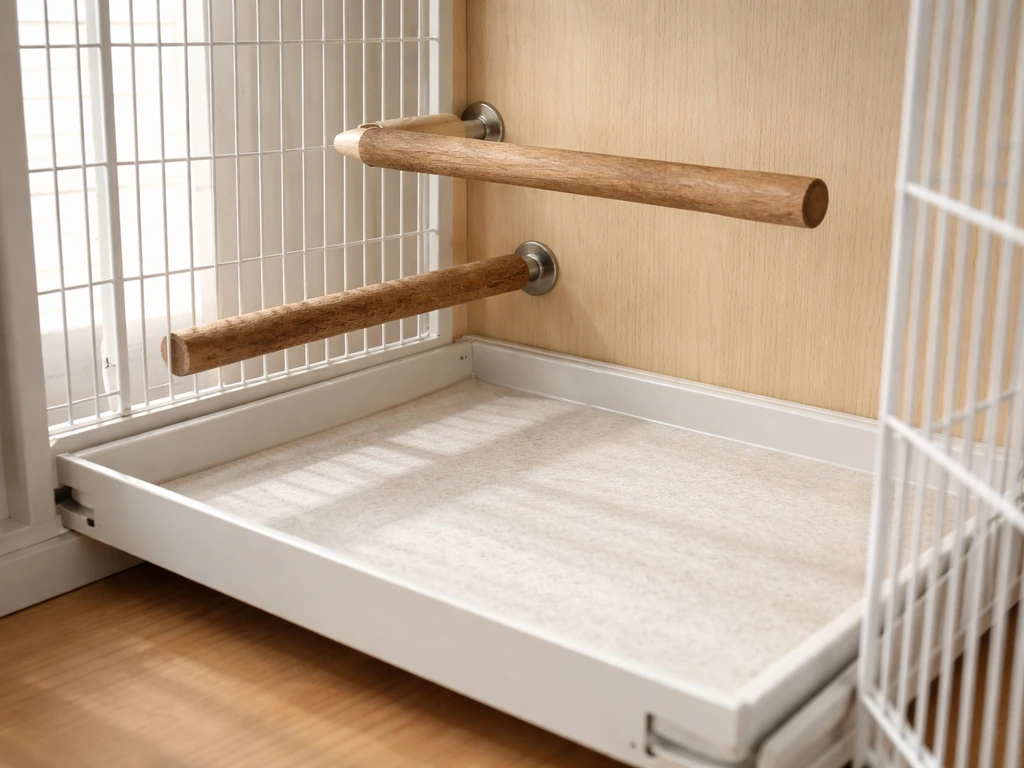
Perches
Perch diameter should match the size of the bird's foot. The right size allows the bird to grip comfortably without the toes wrapping all the way around and overlapping by too much. A budgerigar does well on a 12-15mm diameter perch. A cockatiel needs around 19-25mm.
Natural wood branches (apple, willow, hazel) are ideal because the varying diameter exercises the foot muscles and the texture is easier on the feet than uniform dowel. Use branches from known pesticide-free sources and bake them at 100°C for 30 minutes to kill any insects or mold before putting them in. Position perches at different heights but not directly above each other (droppings from the higher perch will soil the lower one and the bird using it).
Flooring, liners, and nesting areas
The hutch floor should have a removable tray so you can clean it without disturbing the bird. A sheet of marine plywood or galvanized steel tray that slides out from the front or side is ideal. Line the tray with paper: unprinted newsprint, paper bags, or paper cage liners work well. Change this lining daily.
Avoid sandpaper liners (they can cause foot abrasions and birds sometimes eat the grit coating) and avoid cedar or pine shavings, which off-gas aromatic oils that irritate the respiratory tract. If your species uses a nesting box (finches, doves, lovebirds), mount it in the upper portion of the enclosure on one side, away from the main perch traffic. Keep it removable so you can clean it between clutches.
Feeders and water
Position food and water at a comfortable height, not on the floor where droppings accumulate. Use clip-on cups with tight-fitting bases that the bird cannot tip. Water containers should be checked and refreshed at least daily; birds drop food into water and it spoils quickly. Keep feeders away from perches above them for the same reason. If you are housing multiple birds, provide more feeding stations than birds so the dominant individual cannot block access entirely.
Cleaning, mess control, and airflow
A hutch conversion can get smelly fast if the cleaning routine is not built into the design from the start. Daily spot cleaning is the baseline: remove and replace the floor liner, pull out any obviously soiled perches or toys, and top up food and water. This takes five minutes if the tray system works well.
Weekly, do a fuller clean: remove all accessories, wipe down the interior with a bird-safe disinfectant (quaternary ammonium or accelerated hydrogen peroxide products are appropriate choices), rinse everything thoroughly, and let it dry before returning the bird. Never use spray disinfectants or insecticides around birds. The aerosol particles are an inhalation hazard even when the product itself is technically non-toxic.
Fumes and aerosol exposure can cause respiratory difficulty and neurological signs in birds, so avoid aerosol or off-gassing sources around the enclosure aerosol particles are an inhalation hazard.
Ammonia from droppings is the main odor and health problem in bird enclosures. The best control is a combination of daily liner changes and good cross-ventilation. If the enclosure smells strongly of ammonia even with daily cleaning, ventilation is inadequate. Consider adding another mesh panel or raising the enclosure slightly off the ground to improve airflow under the floor. Placing a thin layer of activated carbon under the paper liner can also help absorb odor between changes, but it is not a substitute for ventilation.
Pest-proofing, covers, and seasonal placement
Keeping pests out
The biggest pest risks for an outdoor hutch conversion are rodents, wild birds, and bird mites. Rodents are attracted to bird seed and will chew through wood and light wire to get to it. Use 16-gauge or heavier wire on any panels near the ground and ensure there are no gaps larger than 6mm anywhere in the structure. Rodents can squeeze through surprisingly small openings. If the hutch sits on legs, fit sheet metal baffles to the legs. Do not leave seed on the floor of the enclosure overnight.
Wild birds carry diseases and parasites. Mesh with an aperture of 12mm or less will prevent most wild birds from getting their heads through the wire. Sparrows and starlings are persistent and will try. Check regularly for droppings on the outside of the wire that suggest a wild bird is perching against the mesh.
Bird mites are introduced by wild birds and are extremely difficult to eradicate once established. Prevention is almost entirely about exclusion: seal any cracks or gaps in the wood frame, keep the hutch away from trees where wild birds nest, and inspect the enclosure weekly for signs of mites (small reddish-brown specks, especially in corners and crevices). If you find mites, a thorough clean with a safe mite treatment and temporary re-housing of the bird is necessary.
Covers and seasonal placement
An outdoor hutch needs a weather cover for rain, wind, and cold, but the cover must never block all ventilation. A fitted cover that protects three sides and the roof while leaving one mesh panel open is the right balance. Breathable canvas or heavy-duty polyester covers work better than solid plastic sheeting, which traps condensation and creates a damp environment that promotes mold and respiratory illness. In summer, position the hutch so it gets morning sun and afternoon shade.
Direct afternoon sun can raise the internal temperature to dangerous levels in a hutch with limited airflow. In winter, bring the hutch into a shed, garage, or sheltered position, and check that the temperature stays above the minimum tolerable range for your species. Most temperate-zone birds handle temperatures down to 5-10°C if they are acclimatized, dry, and draft-free, but tropical species like many parrots and finches need warmer conditions.
Safety checks, common problems, and when to walk away
Pre-use safety checklist
- Run your hand over every interior surface and check for splinters, sharp wire ends, protruding staples, and rough edges
- Open and close every door and latch several times, checking for stiff operation, misalignment, or any gap that opens under pressure
- Check all wire panels for loose staples or gaps at the frame joints where wire could pull away
- Confirm all paint, sealant, or wood treatment is fully cured and dry (not tacky, no chemical smell) before introducing birds
- Test the tray removal system with the door closed to confirm you can clean without opening the main enclosure
- Check the enclosure is level and stable so it cannot tip if a bird launches from a perch or a predator bumps it
Common problems and fixes
| Problem | Likely cause | Fix |
|---|---|---|
| Bird chewing the wood frame | Boredom or softwood exposed inside | Cover interior wood with wire mesh; add foraging toys and enrichment |
| Weak or easily opened latch | Unsuitable latch type | Replace with two-action latch or add carabiner clip through bolt |
| Poor ventilation, ammonia smell | Too few open panels or wrong placement | Add a second mesh panel on the opposite side; change liner daily |
| Gap appearing at wire frame joint | Wire pulling loose from staples | Remove wire, re-staple, and add a wooden batten over the edge |
| Difficult to clean (can't reach corners) | Interior depth too great or no tray | Fit a sliding tray; add a second access door on the side |
| Wild bird perching against mesh | Hutch near trees or feeding areas | Move hutch away from cover; fit a secondary fine-mesh guard on outside |
When it is not worth converting
Some hutches should not be converted. If the wood is saturated with rot, if you cannot identify what chemical treatments have been used and the wood has a persistent smell, or if the structure is so soft and degraded that it cannot hold wire panels securely, start from scratch.
A hutch that requires extensive repair to be structurally sound is also questionable: the time and material cost of a full conversion often approaches the cost of a purpose-built aviary panel system, which will be safer and more durable. If the hutch is too small for the species you intend to keep, no conversion will fix that. A bird kept in a too-small space will develop behavioral and physical problems regardless of how carefully the build is done.
If you are working with a larger space or want to build from materials rather than adapt an existing structure, the same principles around wire choice, ventilation, and safe materials apply whether you are building for lovebirds, making a small cage from scratch, or working with recycled materials. If you are starting with scrap wood and repurposed wire, the same material-safety, wiring, and ventilation checks are central to how to make a bird cage from recycled materials. The hutch conversion approach works best when the structure is sound, the dimensions suit the species, and you have confirmed the materials are safe before a single bird goes in. If you are looking for a quick way to make a small bird cage from scratch, the same wire, ventilation, and material-safety principles apply.
FAQ
How can I tell if an old hutch paint or finish is actually bird-safe after I rebuild it?
Don’t assume “dry” means “safe.” VOCs and odor from stains, sealers, or paint can off-gas for weeks, especially in warm weather or direct sun. After stripping or resealing, ventilate the hutch outdoors in shade with airflow for several days (longer if you notice any smell), then do a brief test with no bird inside first, using your nose and checking for lingering fumes.
What should I do if I don’t know what chemicals the hutch was previously treated with?
If you cannot identify the original products used on the hutch, treat the wood as unsafe rather than guessing. Older finishes are the biggest lead risk, and unknown insecticides or preservatives can keep emitting fumes. If you can’t confirm the source, strip back to bare wood and replace any components that were exposed to heavy weather or pesticide use.
Can I add a solid roof or full cover to protect the hutch from rain?
Yes, but only for species that need that level of airflow and only if the cover still leaves protected mesh openings. A partial overhang is safer than a fully enclosed cover, because it reduces rain exposure without trapping humid air that can worsen mold and respiratory issues.
Is it safe to use lighter wire mesh if I have a small, non-chewing bird?
Use mesh that matches your bird’s risk profile, then verify the enclosure is chew-proof. Even small birds can defeat weak wire, so if the bird is a persistent chewer, increase wire gauge and choose welded wire or stainless/powder-coated options. Also check that no raw cut wire edges or gaps remain, because birds often chew at weak points.
What liner can I use besides paper that won’t harm my bird’s feet or breathing?
You can, but only if the litter is inert and you fully prevent grit ingestion. The article recommends avoiding sandpaper liners and aromatic shavings, because they can irritate feet or be harmful if eaten. If you want a different liner, choose something that is easy to change daily (paper-based liners are typically safest) and monitor droppings and foot condition closely.
Can I disinfect the hutch with spray products if I rinse them off?
Don’t spray any disinfectant inside once birds are present, and don’t fog the area around the bird’s cage. Even “pet-safe” aerosols can irritate airways. If you need disinfecting, do it when the bird is out, use a non-spray method recommended for bird enclosures, rinse thoroughly, dry completely, and only then return the bird.
How do I keep the hutch safe during hot days, cold nights, or power outages?
Plan for what happens during power outages and nights. If your enclosure relies on any heat lamps or heaters, secure wiring and keep the warm zone away from mesh gaps and bird access, then use thermostatic, enclosed heating options rather than open hot surfaces. Birds can overheat quickly in enclosed hutches, especially in summer.
What’s the best way to prevent bird mites and wild-bird parasites in an outdoor conversion?
Add exclusion steps before you add a bird. After any mite concern or heavy external activity, inspect weekly for early signs in corners and crevices, seal gaps, and keep the bottom edges protected. If you have multiple birds, isolate any new bird first, because mites and parasites can spread quickly in shared households.
Why does my outdoor hutch conversion smell even when I clean weekly, and how can I fix it?
Yes, by preventing food from becoming a moisture source and a pest attractant. Keep water in stable, tip-resistant cups, remove wet food promptly, and don’t allow seed to accumulate on the floor between cleanings. If the enclosure is outdoors, consider using feeders that minimize spillage and choose mesh openings that don’t invite wild birds to feed through.
How can I make sure my door latch system prevents escapes and also blocks predators?
If the bird keeps getting to the door area, predators can also exploit weak points. Use at least two redundant security layers on access doors, check that hinges and latches cannot be lifted or wiggled, and confirm there are no reach-through gaps around latch hardware.
How do I know the interior layout will be safe for daily cleaning and for emergency access?
Test the layout with a “reach and rescue” check. Before adding the bird, practice reaching food and water, pulling the waste tray, and opening doors fully without snagging or having to reach over the bird. If you can’t do those tasks without chasing, adjust the interior now, because stress and accidental injury are common during early use.