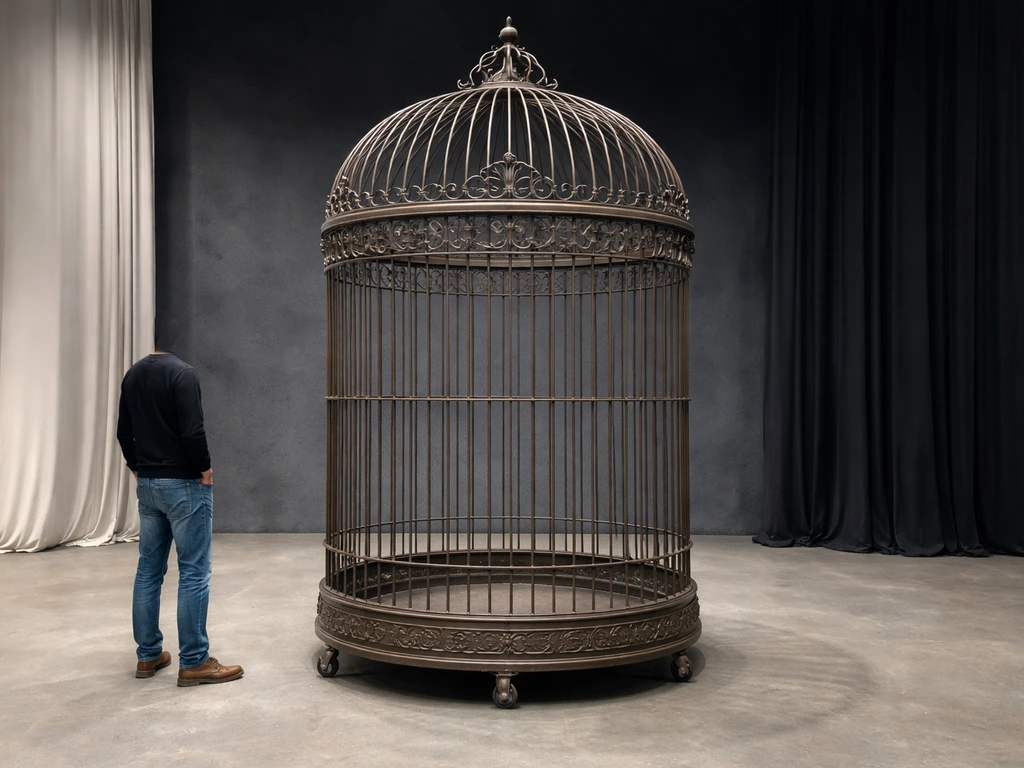
You can build a giant bird cage prop that looks convincingly huge on camera by working from a welded steel square-tube frame, skinning it with galvanized or PVC-coated welded wire mesh, and finishing with a bird-safe paint system. The whole build can be done in a weekend with basic welding or bolt-together hardware, and the result will be sturdy enough to transport, stable enough to stand alone, and safe enough to use around real birds if the production ever calls for it.
How to Make a Giant Bird Cage Prop for Film or Theater

Maya Bennett
5 Jul 2026
Choose the purpose, size, and scale for the giant look
Before you cut a single piece of steel, decide how the prop will be used. A film close-up cage needs to read as enormous relative to the actor, while a theater or event cage just needs to dominate the stage from a distance. Those two goals drive very different sizing decisions.
For film and photography, forced perspective is your friend. A cage that is 6 feet tall and 4 feet wide can read like a 12-foot cage if the camera angle, horizon line, and depth cues are consistent. The key rule: keep the same vanishing point and horizon line for the cage and the human subject in the same shot, or viewers will immediately clock the mismatch. If the actor needs to be inside the cage on camera, build it at least 7 to 8 feet tall and 5 feet wide so movement reads naturally.
For theater and events, where forced perspective is not an option, bigger is simply better. A standard giant cage prop for stage work runs 8 feet tall, 4 to 5 feet wide, and 4 feet deep. That gives you enough visual mass to dominate a mid-size stage without becoming impossible to move. If your venue has a low ceiling, go wider and shorter, around 5 feet tall by 6 feet wide, and add decorative dome or arch details to the top to imply height.
For cosplay or portable event use, scale down to what two people can carry: a 5-foot-tall cage built from 1-inch square tube on a wheeled base is manageable and still looks enormous next to a person. If you are looking for a smaller project, follow these same principles to learn how to make a small bird cage that stays sturdy and safe. Think about doorways early. A 36-inch-wide door is the standard passage point, so design the cage to break into two sections or fold if it needs to fit through one.
- Film/photography close-up: 6 to 8 feet tall, 3 to 5 feet wide, forced perspective does the rest
- Theater/event: 8 feet tall, 4 to 5 feet wide, 4 feet deep, fixed position
- Cosplay/portable: 5 feet tall, 3 feet wide, sectional or wheeled base
- Always check door clearances before the build date, not on load-in day
Safety-first design: avoiding sharp edges, pinch points, and unsafe spacing
Even if this is technically a prop and no bird will ever live in it, treating the safety standards seriously protects performers, crew, and any real birds that might end up near the set. Sharp edges on cut wire or steel tube are the most common injury source, and they are completely preventable.
Every cut wire end needs to be bent inward and then ground or filed flush. Run a cotton glove along every surface before the prop leaves your shop. If the glove snags, the wire needs more work. For steel tube frame cuts, deburr with a flap disc or half-round file until the edge is smooth to the touch.
Bar spacing matters even on props. If there is any chance a real bird will be housed in or near this cage, use the standard companion-bird safety spacing: 5/8 inch to 3/4 inch for small birds like cockatiels and lovebirds, and scale up appropriately for larger species. If you are actually housing lovebirds, you can use these spacing rules as you plan how to make a bird cage for lovebirds that is safe and properly sized. A bird's head lodging between bars is a fatal risk, and it is not worth cutting corners on spacing just because the cage started life as a prop. For a purely decorative prop with zero animal contact, you can use 2-inch square welded wire mesh, which looks dramatic and photographs beautifully.
Pinch points are where two moving parts come together, most commonly at hinges and door latches. Use full-mortise hinges rather than surface-mount strap hinges where possible, and add a 1/8-inch clearance gap between the door edge and the frame all the way around. That clearance prevents binding and keeps fingers safe if someone grabs the frame while the door swings. Check the gap after every coat of paint, because paint builds up and can eliminate clearance over multiple coats.
If the production involves real birds (live animal work), American Humane's filmed-media guidelines require production-level safety planning and approval for any animal in a filmed environment. That means your prop needs to pass inspection before birds are ever placed inside. Build to that standard from day one and you will have no surprises on set.
Materials and tools list
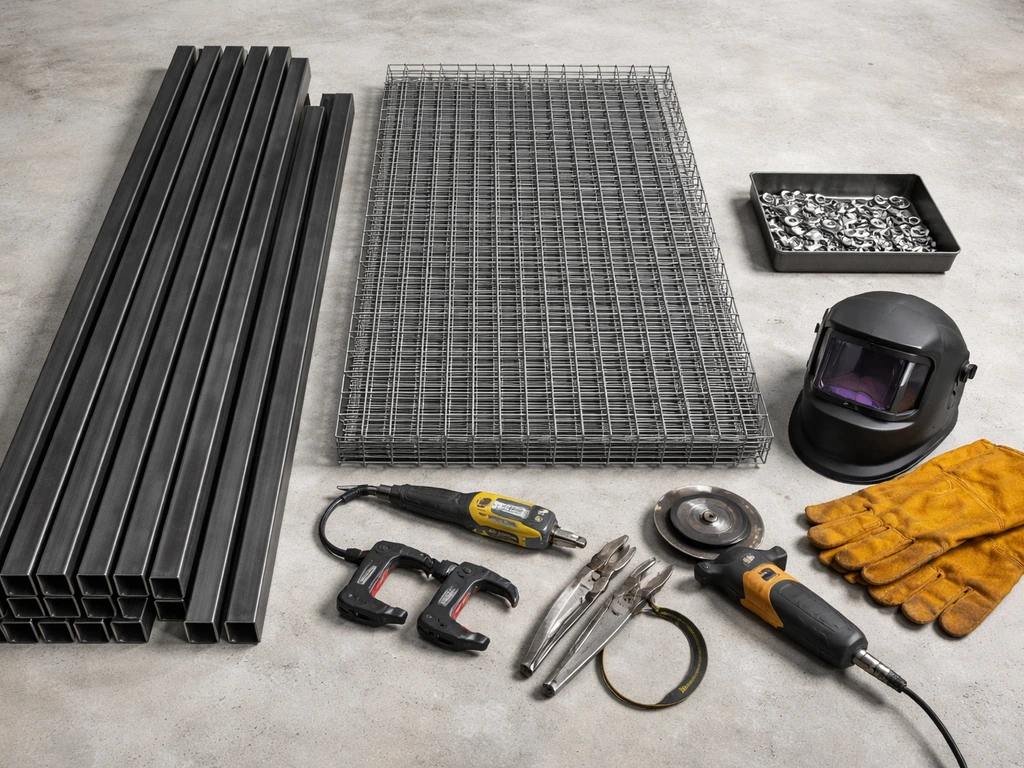
Here is what you actually need to build a sturdy, transport-ready giant cage prop. I have split it into frame, skin, hardware, and finish so you can price and source each category separately.
| Category | Material/Tool | Notes |
|---|---|---|
| Frame | 1.5" or 2" square steel tube, 14-gauge | Heavier for freestanding; 1.5" works for wall-backed or portable props |
| Frame | Steel base plate, 3/16" thick | Weld or bolt vertical uprights to plate for stability |
| Frame | Angle grinder + flap discs | For cutting tube and deburring all edges |
| Frame | MIG welder or bolt-together pipe flanges | Welding is stronger; flanges work if you don't weld |
| Skin | Galvanized welded wire mesh, 14- or 16-gauge, 2" square | For prop-only use; go 5/8"–3/4" spacing if real birds involved |
| Skin | PVC-coated welded wire mesh (black or dark green) | Better for outdoor use; resists rust longer than bare galvanized |
| Skin | Wire staples or hog-ring pliers + rings | Hog rings give a cleaner, more professional finish than staples |
| Skin | Aviation snips (left, right, and straight) | For cutting mesh panels cleanly without distorting the grid |
| Door hardware | Heavy strap or full-mortise hinges, 4" | Use two hinges minimum per door; three for doors over 36" |
| Door hardware | Barrel bolt + padlock hasp | Looks authentic and locks the door securely for transport |
| Door hardware | Piano hinge | Good alternative for lightweight cage doors on portable props |
| Finish | 2K epoxy MIOX primer | Anti-corrosion base coat for any outdoor or humid environment |
| Finish | Aliphatic polyurethane topcoat (black or aged finish) | UV- and weather-resistant; apply over cured epoxy primer |
| Finish | Rust-preventative enamel (spray or brush) | Budget option for indoor-only props; fully cure before use near birds |
| Misc | Swivel casters (4", locking) | Add to base plate corners for transport; lock before use |
| Misc | Zip ties (heavy-duty, black UV-rated) | Temporary mesh attachment during fitting; replace with hog rings for final build |
A note on fasteners: avoid zinc-plated bolts and silver or yellow galvanized screws if there is any chance of bird contact. Zinc exposure from chipped or worn coatings is a real toxicity risk for birds. Use stainless steel hardware throughout, or at minimum specify hot-dip galvanized bolts rather than electroplated zinc, and keep them sealed under your topcoat.
Step-by-step build: frame, base, skinning, and reinforcement
Step 1: Build the base frame
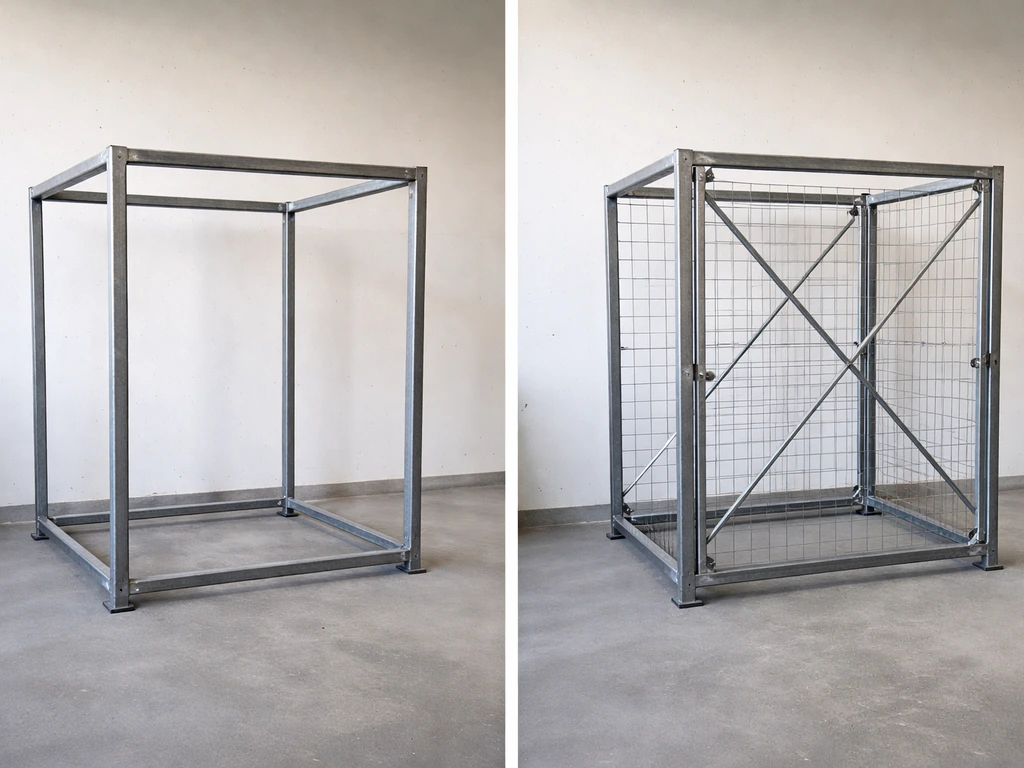
Start with a rectangular base made from 2-inch square tube. For an 8-foot-tall, 4-foot-wide, 4-foot-deep cage, cut two 48-inch lengths and two 48-inch lengths for the rectangle. Weld or bolt these into a flat rectangle, then weld a 3/16-inch steel base plate to the underside of the corners for floor-contact stability. Bolt or weld four 4-inch swivel casters to the base plate corners now, before the uprights go up, because access gets tight later. Make sure at least two casters are locking.
Step 2: Raise the uprights
Cut four vertical uprights from 2-inch square tube to your target height. For an 8-foot cage, cut them at 90 inches to leave 6 inches for the top cap detail. Stand each upright on the base rectangle and tack-weld in place, then check plumb on two faces with a level before committing to a full weld. Out-of-plumb uprights cause every headache downstream: doors bind, mesh panels gap, and the whole cage looks drunk. Brace diagonally with scrap tube across opposite corners to hold plumb while you complete the welds.
Step 3: Add horizontal rails and top cap
Weld horizontal rails at 12-inch intervals up the uprights. This gives you attachment points for the mesh and adds enormous rigidity. The top cap can be a flat rectangle of tube connecting all four uprights, or you can add a dome or arch by cutting and bending additional tube. For an arched dome, cut four pieces of 1-inch square tube, heat the center point with a torch, and bend over a round form (a 5-gallon bucket works). Weld the curved pieces from upright to upright at the top to create the classic birdcage silhouette.
Step 4: Skin with mesh panels
Cut mesh panels to fit each face of the cage using aviation snips. Cut about 1 inch larger than the opening on all sides so you have material to wrap around the frame tube. Attach the panels using hog rings spaced every 4 to 6 inches along every rail and upright. Pull the mesh tight as you work from the center outward toward each corner, otherwise you get sag in the middle panels. Fold all cut wire ends inward so they point into the frame tube, never outward toward performers or animals.
Step 5: Add structural cross-bracing
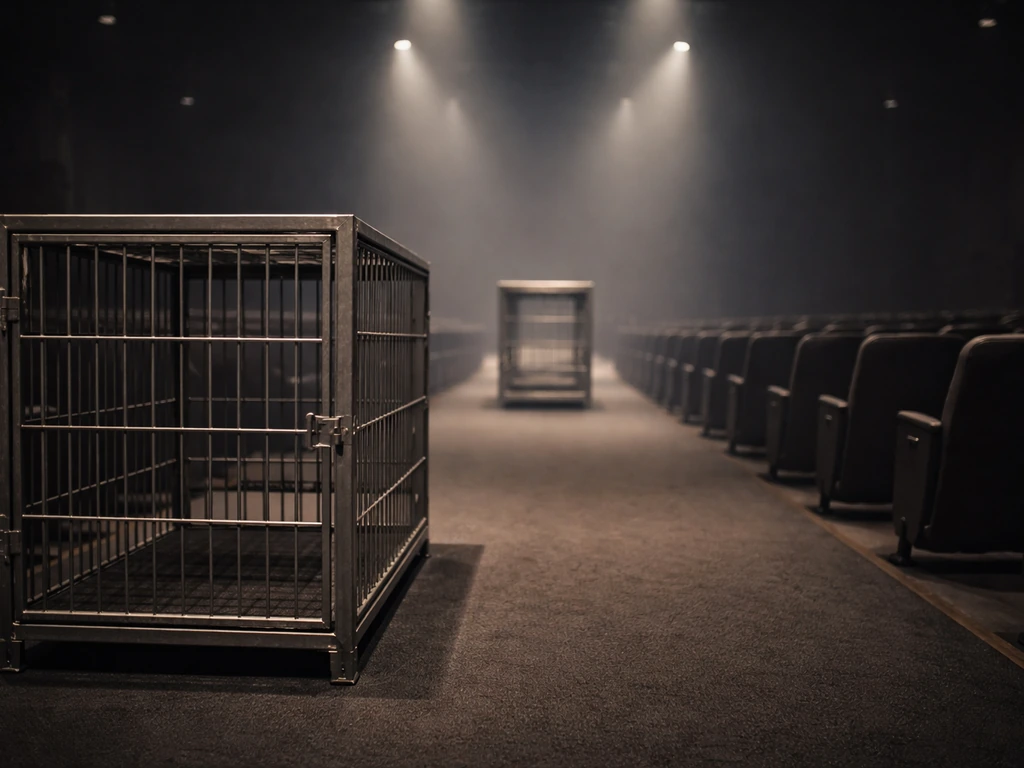
A tall cage that is only skinned with mesh will rack (lean side to side) under transport stress. Add an X-brace of flat steel bar or 1-inch square tube across the back panel inside the cage. Weld or bolt at the center crossing point. This single addition eliminates 90 percent of racking issues. If the cage needs to be fully see-through on all sides (as in a film prop), use slim 1/2-inch round rod for the X-brace so it reads as a decorative element rather than a structural intrusion.
Door, access, and stability testing
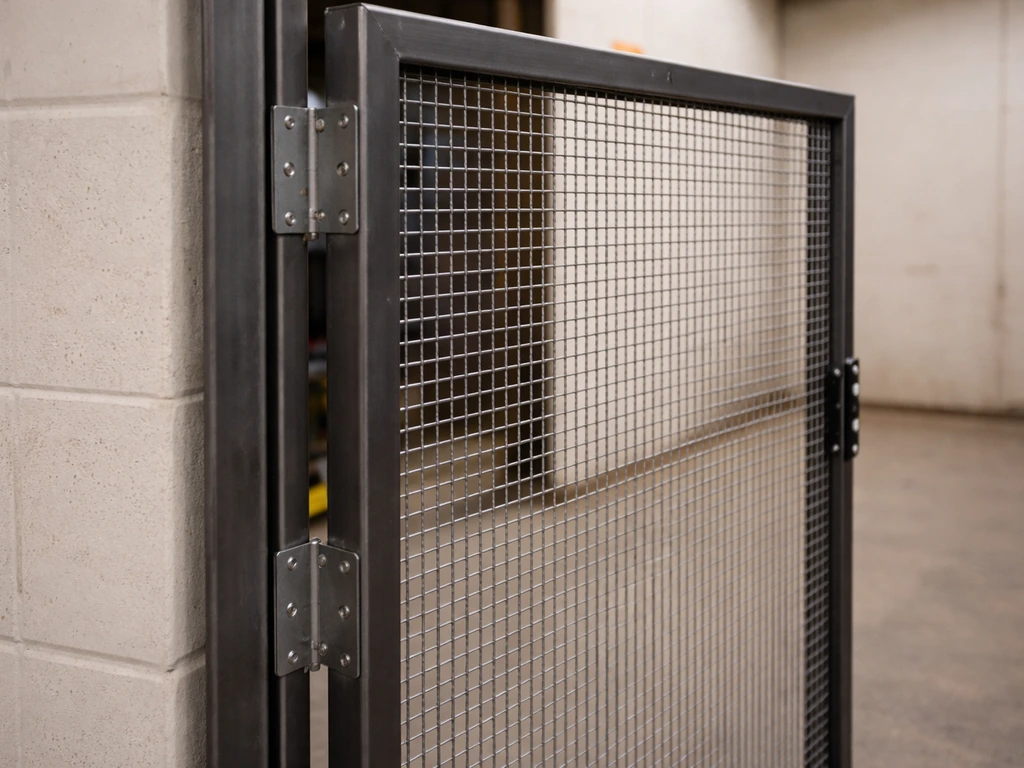
The door is where most props fall apart, both visually and functionally. Build the door as a sub-frame of 1.5-inch square tube, skin it with mesh the same way as the panels, and hang it on three 4-inch full-mortise hinges. Space the hinges evenly: top, bottom, and center. This distributes the door's weight so the frame does not rack over time.
Leave a 1/8-inch clearance gap on all four sides of the door when you hang it. Test the swing before any paint goes on. The door should swing through its full arc and latch without you lifting or pushing the frame. If it binds, the hinge leaves are not seated fully or the frame has a slight twist. Shim the hinge mortise with a card-stock shim, or grind the hinge recess slightly deeper, until the door swings free. Do not proceed to painting until the door works perfectly on bare metal, because paint will only make a marginal door worse.
For locking, a heavy barrel bolt with a padlock hasp looks authentic and is genuinely secure for transport. Add a second barrel bolt at the bottom of the door for a more dramatic, layered look that also prevents door flex during moves.
Stability testing is non-negotiable before the prop goes to a set or event. Load the cage with about 50 pounds of weight (sandbags work) distributed across the top rails and push it firmly from all four sides. If it tips or rocks, the base is too narrow for the height. Add outrigger feet: weld 12-inch lengths of flat bar outward from the base corners so the footprint extends beyond the cage width. Bolt rubber pads to the outrigger ends so they grip the floor without scratching it.
Weatherproofing, cleaning, and seasonal protection
If the cage will ever go outdoors, even briefly, the paint system is where you protect your investment. A bare or cheaply primed steel cage will show surface rust within weeks in humid conditions, and a rusted prop looks bad on camera and creates real edge hazards as the metal pits and flakes.
The right system for an outdoor steel prop is: epoxy primer first, then an aliphatic polyurethane topcoat. Apply the 2K epoxy primer to all bare metal, including the inside faces of the tube that you can reach with a brush on a long handle. Let it fully cure (follow the manufacturer's window, typically 8 to 24 hours), then apply two coats of polyurethane topcoat. This system is used on structural outdoor steel for good reason: the epoxy bonds to the metal and blocks moisture, and the polyurethane resists UV, abrasion, and cleaning chemicals. For indoor-only props on a budget, a rust-preventative enamel applied by brush is acceptable, but it will need touch-ups more frequently.
If you use any spray finish and the prop is near birds, do not bring the birds into the space until the paint has fully cured and you have ventilated the area for at least 48 hours. Birds' respiratory tracts are extremely sensitive to paint fumes and aerosol particles, including from products that seem mild to humans. This is not overcautious: it is a documented cause of bird deaths. The same rule applies to cleaning products used on the cage later.
For seasonal protection, bring the cage indoors or cover it with a breathable weatherproof cover between uses. A cage left uncovered outdoors through a wet season will need repainting every year. Inspect all mesh attachment points (hog rings, staples) after any outdoor storage, because these are where moisture collects and rust starts first. Replace any corroded fasteners immediately before they fail and let a mesh panel come loose.
Cleaning is straightforward: mild soap and water, a soft brush or sponge, and a thorough rinse. Avoid bleach directly on the metal surface, and never use WD-40 or oil-based rust treatments on a cage that will be near birds. Both can leave residue that is hazardous to animals.
Decorative and visual enhancements that keep the prop safe
A raw black-painted cage reads as industrial. To make it read as a beautiful, ornate giant cage, you need a few targeted additions that add drama without adding hazards.
The most impactful upgrade is finials: add decorative caps to the top of each upright. Weld a steel ball bearing (1.5 to 2 inches diameter) or a turned-steel cap to each upright top. These are cheap from metalworking suppliers, they weld in minutes, and they transform the silhouette from DIY box to stately cage. Smooth all weld seams around the finials with a grinding disc and your finger-test before painting.
For an aged or antique look, apply the base topcoat in flat black, let it cure fully, then dry-brush gold or bronze craft paint over the raised edges of the tube and the finials. This creates a convincing patina that reads beautifully on camera and in event lighting. Because the aged layer is a water-based acrylic applied over a fully cured polyurethane base, it does not compromise the underlying protective system and is safe even if a bird contacts the surface after full drying.
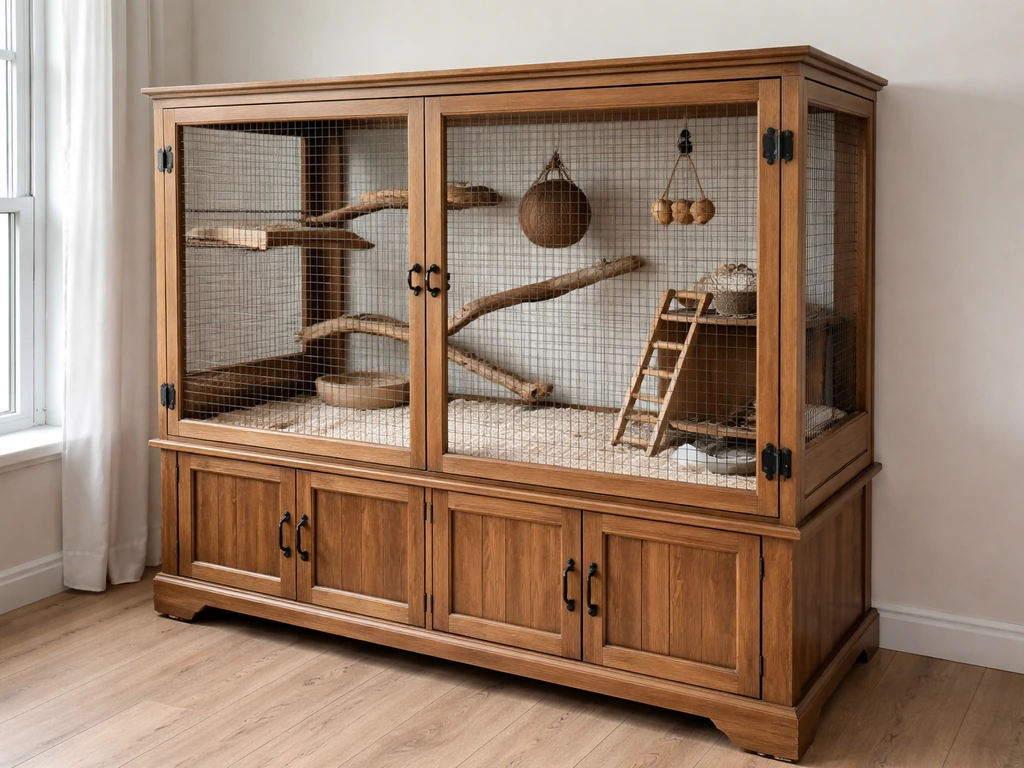
Add a perch bar inside the cage using 1-inch round steel rod welded between two uprights at mid-height. If you are adapting an existing hutch instead of starting from scratch, see how to turn a hutch into a bird cage for related layout and safety considerations. Wrap it with natural sisal rope using food-safe adhesive if birds will use it; leave it as polished steel for a purely visual effect. Either way, it immediately makes the cage interior read as inhabited rather than empty.
For the base and feet, weld decorative curved legs from 1/2-inch round rod and attach them to the base rectangle corners. Curve them outward slightly so the cage appears to sit on ornate feet rather than a flat plate. This detail adds enormous visual elegance and is the single most cost-effective upgrade for making a cage look like a prop from a period film rather than a welded box.
Lighting is the final multiplier. Drape a strand of warm LED fairy lights around the top interior rail. They run cool (no heat hazard), use minimal power, and make the cage glow in ways that a camera absolutely loves. For theater, a single par can focused through the mesh from above creates dramatic shadows that read from 50 feet away.
If you are building similar projects at different scales, note that some of the same material and safety principles apply whether you are making a giant prop, a small bird cage, or repurposing an existing structure. If you specifically want to use recycled materials, plan your scavenged metal and hardware carefully before you start cutting and welding. The spacing and finish rules stay consistent across all of them.
Troubleshooting, final checklist, and next steps
Common problems and how to fix them
| Problem | Likely Cause | Fix |
|---|---|---|
| Cage wobbles or racks side to side | No diagonal bracing; base too narrow | Add X-brace on back panel; weld outrigger feet to base corners |
| Door binds or won't latch | Hinge leaves not fully seated; paint buildup eliminating clearance | Deepen hinge mortise with chisel; sand door edges back to 1/8" clearance |
| Mesh sags or bulges outward | Panels cut too large; not enough hog-ring attachment points | Add intermediate hog rings every 4" along mid-span rails; pull mesh tighter before fastening |
| Sharp wire ends visible or catching | Cut ends bent outward instead of inward; missed during deburring | Bend all ends inward with pliers; run flap disc along exterior faces; cotton-glove test |
| Rust appearing under paint | Bare metal not primed before topcoat; moisture trapped in hog-ring contact points | Strip and re-prime with 2K epoxy primer; replace corroded hog rings; seal contact points |
| Cage tips under side pressure | Center of gravity too high for base width | Lower base height or extend outrigger feet; add sandbag ballast inside base rail |
| Paint fumes lingering near bird area | Insufficient cure time or ventilation | Wait full cure time (48+ hours); ventilate space before reintroducing birds |
| Cage reads as small on camera | Wrong horizon line alignment; camera too close | Lower camera to subject eye level; ensure cage and subject share same vanishing point; add scale reference objects |
Final build checklist
- All tube cuts deburred and smooth; cotton-glove test passed on every face
- All wire mesh ends bent inward; no exposed cut points on exterior
- Door swings through full arc and latches without lifting or pushing the frame
- 1/8" clearance gap maintained on all four sides of door after final paint coat
- Cage stands level and plumb on all four casters; locking casters engage cleanly
- Stability test passed: 50-lb load on top rails, pushed from all four sides without tipping
- Epoxy primer fully cured before topcoat applied
- Topcoat fully cured and aired out 48 hours before use near birds
- All hog rings and mesh attachment points inspected; no corrosion or loose rings
- Finials and decorative elements all welded smooth with no sharp seam edges
- Outrigger feet or base extension in place if cage height exceeds 6 feet
- Bar spacing verified against species requirements if real birds will be housed inside
- No zinc-plated fasteners exposed on interior surfaces
Your next steps
If you have never welded before, the fastest path to a finished prop is to use a bolt-together approach with pipe flanges and pre-cut steel tube from a metal supplier. Many steel suppliers will cut to your dimensions for a small fee, which eliminates the need for an angle grinder at the cutting stage. You will still need one for deburring, but that is a much lower skill operation. Price your materials before you start: a full 8-foot cage in 2-inch square tube typically runs 80 to 150 dollars in steel, 30 to 60 dollars in mesh, and another 40 to 80 dollars in paint and hardware. That is well under 300 dollars for a prop that would cost 600 to 1,200 dollars to rent from a theater supplier.
Once the cage is built, take a test shot before the production day. Set it up, place a person next to it, and photograph from the intended camera position. If it does not read as huge, lower the camera another 6 to 12 inches and try again. Most scale failures on set come from shooting at eye level instead of slightly below it. Getting that camera angle right costs nothing and does more for the giant illusion than any amount of extra steel.
FAQ
Can I use any mesh size for a giant bird cage prop, or does it need to match bird-safe spacing?
If the cage is only decorative and no bird ever contacts it, you can use 2-inch square welded wire mesh for the visual look. If there is any chance a bird will be inside or near the bars, keep bar openings to bird-safe spacing and treat every edge hazard the same way as a real cage (deburr, inspect welds, and avoid sharp cut wire pointing outward).
What’s the best way to prevent a door from binding after the cage is painted?
Don’t paint first and “hope it frees up later.” Before coatings, verify door swing and latch operation on bare metal, then after every coat confirm the 1/8-inch clearance is still present and doesn’t bind. If it tightens after painting, fix hinge mortises or gaps before adding another finishing coat.
If the prop won’t fit through the venue doorway, how should I plan for disassembly?
A common workaround is to build the cage in a main section plus a detachable top cap, or make the door the primary removable part for transport. If you’re passing through a 36-inch doorway, plan a disassembly strategy early (two-section break or fold) and mock it up with the actual ladder height and door clearance at your venue.
How do I keep the cage from rusting if it needs to spend time outdoors?
Use an epoxy primer followed by a polyurethane topcoat for outdoor use, and brush long-reach inside surfaces of the tube where water can sit. After storage outside, re-check hog rings or staples and replace any corroded fasteners before they loosen a panel. Even with good paint, mesh attachment points are the first place moisture-based rust starts.
What fastener materials are safest if real birds might interact with the prop?
For bird safety, avoid any electroplated or zinc-plated hardware if birds could contact the structure, because chipped coatings can expose zinc and create toxicity risk. If you must use galvanized parts, prefer hot-dip and keep them sealed under your topcoat, and test your finish compatibility with the hardware (no fish-eye, peeling, or exposed metal at joints).
How long should I wait before bringing birds near the painted prop?
If the prop will be used in a live setting near birds, run a ventilation and cure plan for any spray products, and don’t introduce birds until the paint is fully cured and the area is aired out for long enough to remove odors and aerosols. Also avoid later using common cage cleaners that can leave residues, because birds can inhale or contact what remains.
Can I make a smaller cage look huge on camera without changing the build dimensions?
Yes, but do the camera test and consider that lighting changes how size reads. If it looks too small, lower the camera slightly below eye level and keep the cage and actor sharing the same horizon line and vanishing point in the shot. Lighting from above can make the bars and depth cues feel more massive even at the same physical scale.
How do I test whether the cage will tip over during transport or stage setup?
For stability, plan for both transport and use. Perform the load test by placing weight on the top rails and pushing from multiple sides. If it rocks, increase the effective footprint with outrigger feet and locking casters, then re-test after adding decorative base details that might shift the center of gravity.
What’s the simplest way to check the cage for sharp-edge safety before delivery?
Use welding and grinding to eliminate sharp edges, then run a cotton glove over every surface. If the glove snags, fix the wire end or deburr again, especially around cut mesh edges, hinge areas, and where the door meets the frame. This quick “snag test” is one of the best ways to catch hazards before anyone handles the prop on set.
What lighting tricks work well, and are LEDs safe for this kind of prop?
Lighting can be added without increasing risk by using cool-running LEDs (for example, warm fairy lights) and routing wiring so it cannot be grabbed or snagged by performers or animals. For theater, stronger stage looks often come from a single top-down source through the mesh, but ensure any lights are mounted securely and kept away from door movement and hot surfaces.
Next Article
How to Turn a Hutch Into a Bird Cage Safely
Step-by-step DIY to convert a hutch into a safe bird cage: check materials, add secure wire, improve ventilation, and sa