Yes, you can use a bird cage for rats, but only if it passes a few non-negotiable safety checks first. Most bird cages fail on bar spacing alone, and the ones that don't will still need flooring modifications before a rat lives in one safely. If your bird cage clears the spacing, size, and materials tests below, a straightforward conversion is totally doable. If it doesn't, I'll tell you exactly what to buy instead.
Can I Use a Bird Cage for My Rats? Safety Guide

Maya Bennett
29 Jun 2026
The key safety checks before anything else
Bar spacing: the make-or-break check
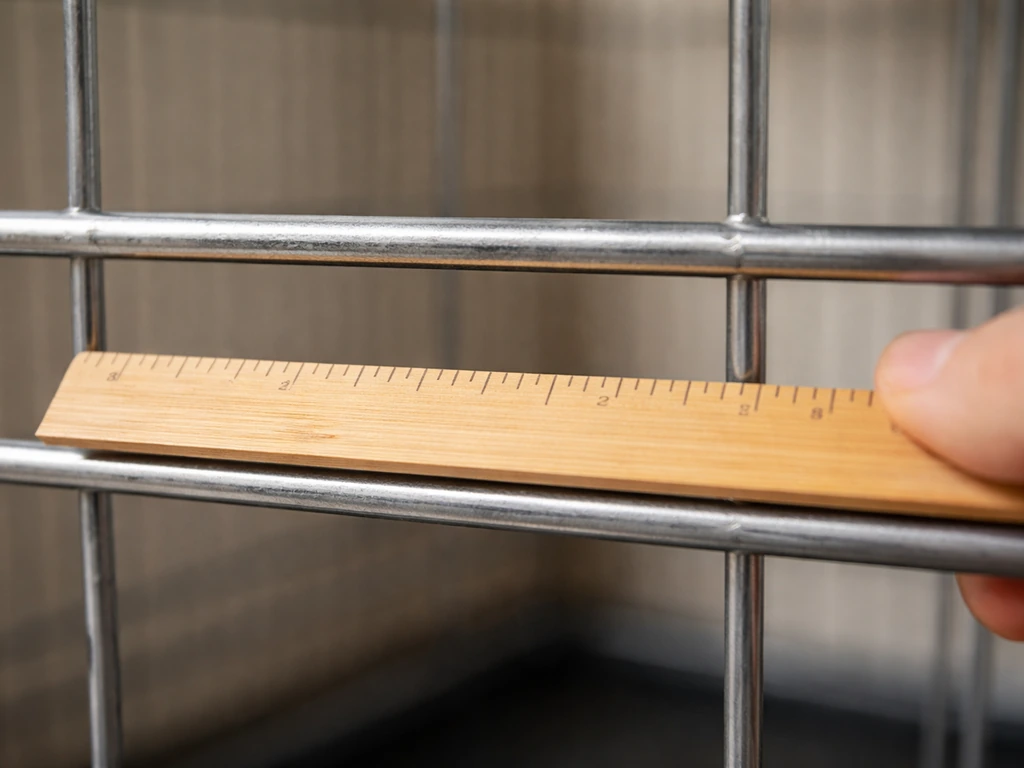
This is the first thing to measure, because if the cage fails here, nothing else matters. Bar spacing needs to be half an inch (about 1.25 cm) or less. The RSPCA puts it plainly: if a rat can poke its head through the bars, the body follows. PetMD's rat care guidance pins the safe maximum at half an inch, and community experience backs that up hard. One inch spacing, which is common on parrot and cockatiel cages, is far too wide. Rats can squeeze through, get stuck mid-body, or catch a leg and injure themselves seriously.
Grab a ruler and measure the actual gap between bars, not center-to-center. Horizontal bars create a climbing ladder effect that rats love, so that part is genuinely a bonus from a bird cage design. But the spacing number is absolute. If it's over half an inch, the cage needs a hardware cloth overlay before it's usable (more on that below).
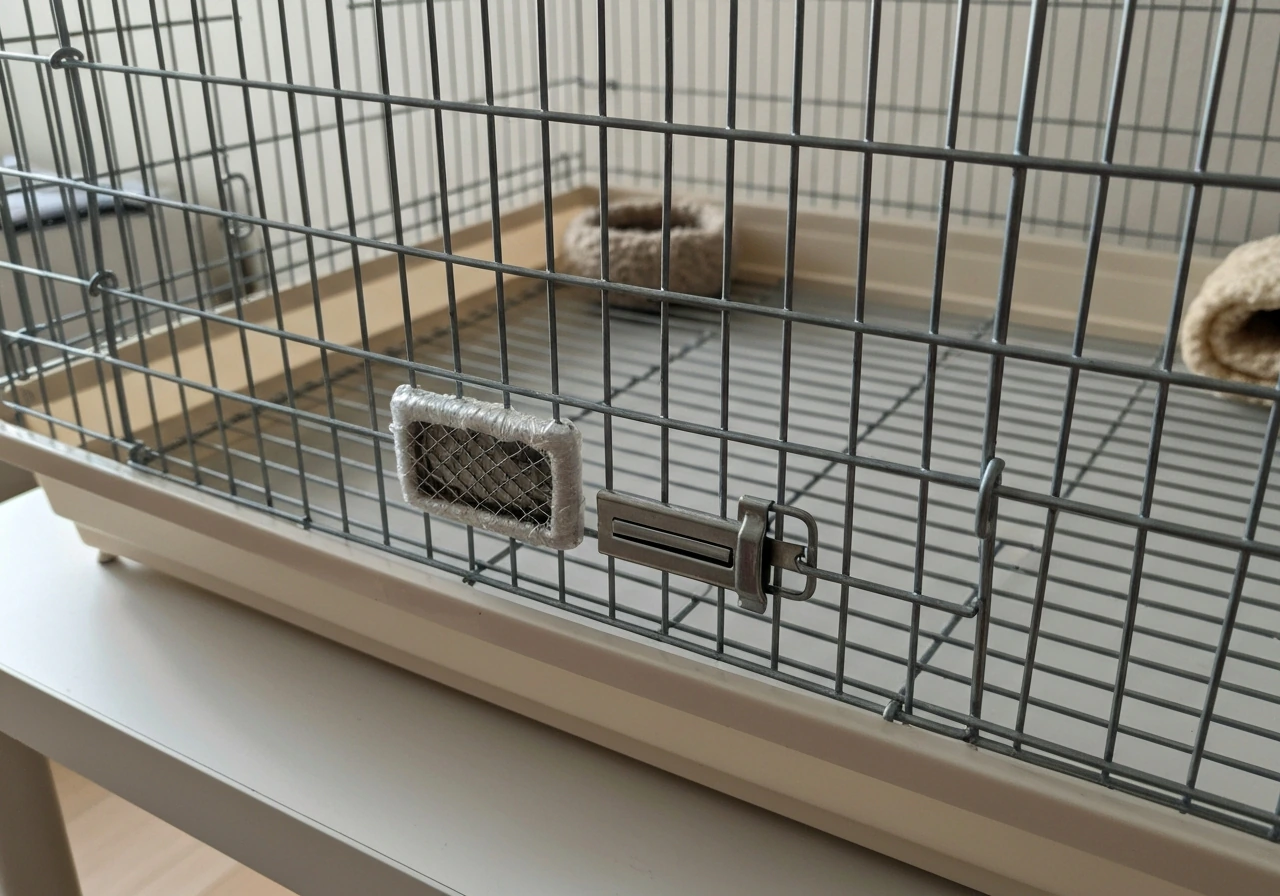
Doors, latches, and escape points
Rats are smart and persistent. Check every door, feeder port, and access panel. Bird cage latches are often simple push-open designs that a rat can figure out quickly. Add a carabiner clip or a small padlock-style clip to any door that doesn't have a twist or lift-and-slide mechanism. Also check the bottom where the cage body meets the tray. If there's any gap between the wire base and the tray edge, a rat will find it. The tray should sit flush against all four sides with no visible gap.
Ventilation and airflow
This is one area where most wire bird cages actually do well. Good airflow matters because ammonia from rat urine builds up fast in an enclosed space, and the RSPCA notes that poor ventilation leads directly to respiratory illness. A respiratory-disease review on the PMC notes that ventilation is important for respiratory disease susceptibility, and that ammonia exposure effects can extend mild infections blank" rel="noopener noreferrer">Good airflow matters because ammonia from rat urine builds up fast in an enclosed space. A wire cage with open sides provides plenty of air movement. The risk is the opposite problem: drafts. Don't position the cage near an air conditioning vent, a fan that blows directly on it, or a drafty window. If you are trying to decide where to put a bird cage in your house for rat safety, focus on ventilation, temperature, and minimizing drafts Don't position the cage near an air conditioning vent. Merck warns that temperatures above 86°F (30°C) can cause heat exhaustion in rats, so in summer you also need to make sure a wire cage in a sunny room isn't turning into an oven.
Size and layout: what rats actually need

Rats need more space than most people expect. PetMD recommends a minimum of 24 inches x 24 inches x 24 inches for a single adult rat. A common rule of thumb is roughly 2 cubic feet per rat, though that's a floor, not a target. More importantly, rats are active, social animals that do best in pairs or groups, so whatever the cage is, it needs to scale up accordingly.
Vertical space matters as much as floor space. Rats love to climb, and a taller cage with multiple levels, hammocks, and platforms gives them far better enrichment than a wide, flat one. Research published in Veterinary Record notes that tiered structures and vertical space are key welfare considerations for pet rat housing. A tall parrot cage with horizontal bars can actually be excellent for this, provided the bar spacing is right and the interior is set up correctly.
Inside the cage, rats need: at least one solid-floor platform or shelf per level, a nest box or enclosed hide, hanging hammocks (fleece is great), a water bottle and food bowl, and enrichment items like ropes or tunnels. Bird cage perches and swings can come out entirely, though a thick rope perch repurposed as a climbing toy is fine.
Chewing-proofing and material safety
This is where bird cage conversions get genuinely risky if you're not paying attention. blank" rel="noopener noreferrer">Rats chew constantly, and the coating on the cage bars is what they'll be chewing on every single day.
Galvanized wire: avoid it
Many budget bird cages use galvanized wire. The zinc coating on galvanized metal is a real problem. Merck lists galvanized metals as a known source of zinc toxicosis in animals, and the mechanism is straightforward: rat urine is acidic enough to corrode the coating over time, and as the zinc degrades, rats ingest it through chewing and licking. The result can include serious liver and kidney damage. If the cage is galvanized, it's not suitable for rats. Look for powder-coated wire instead. blank" rel="noopener noreferrer">Powder coating is durable, doesn't flake in the same way, and is the material standard recommended by rat rescues and the RMCA.
Plastic parts and paint
Plastic trays, feeders, and perch connectors that came with the bird cage will get chewed. That's fine as long as the plastics aren't painted with toxic coatings. Remove any decorative or painted plastic accessories and replace them with plain, untreated versions or skip them entirely. If you're wondering about painted metal parts on the cage frame, the same guidance that applies to painting bird cages applies here: only non-toxic, pet-safe finishes that have fully cured are acceptable. Any chipped, flaking, or unknown-origin paint on second-hand cages should be stripped before use.
How to convert a bird cage for rats: step by step
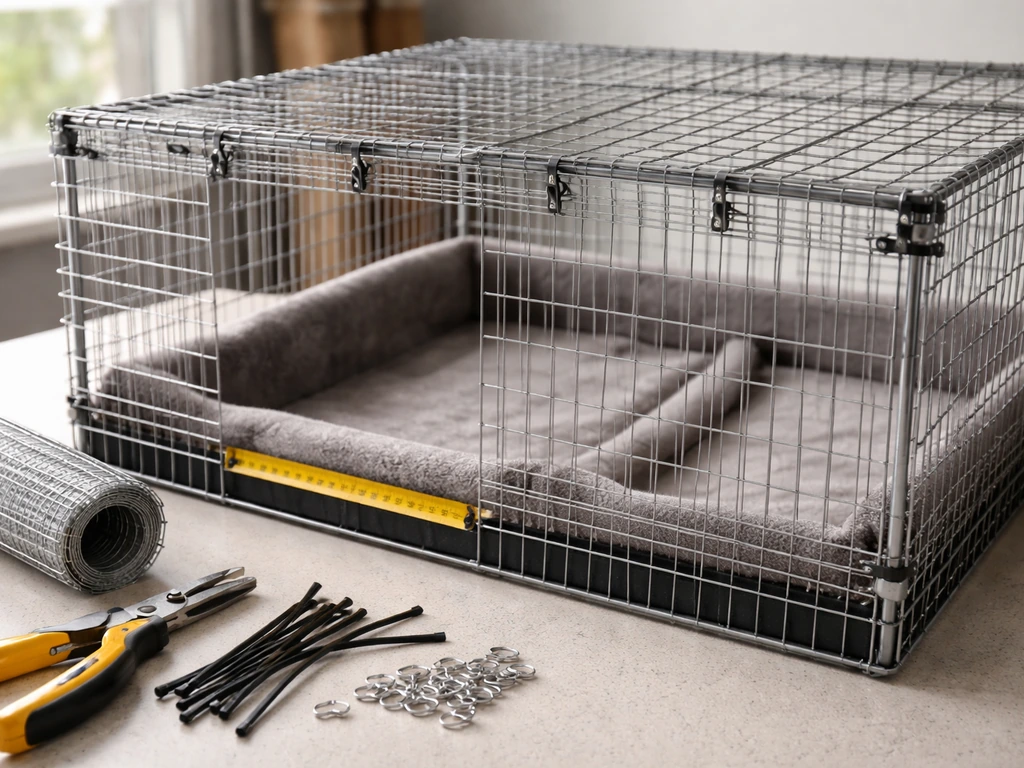
Before you start, you'll want to have these things on hand: a ruler or tape measure, half-inch hardware cloth (if bar spacing is borderline), zip ties or J-clips, fleece fabric or cage liners, a solid shelf or two (untreated wood or plastic board), a nest box, hammocks, and clip-on carabiners for the doors.
- Measure bar spacing in multiple spots on all four sides and the top. If any area exceeds half an inch, cut hardware cloth to cover those sections and attach it with zip ties on the inside. Pull it taut so there are no loose edges a rat can catch a foot on.
- Check and secure every door and access port. Add a carabiner clip to any latch that simply pushes open. Test each one by trying to push it open from the inside with a finger.
- Inspect the base. If there is a gap between the wire floor and the pull-out tray, line the base with cardboard temporarily while you source a tray extender or use a rolled edge of hardware cloth to close the gap.
- Remove the wire floor grate if the cage has one. Wire floors cause bumblefoot, a painful foot condition, and the RSPCA, Merck, and most rat welfare guidelines are unanimous on this. Place a solid liner, thick fleece, or a cut piece of coroplast (corrugated plastic sheet) directly on the tray instead.
- Cover the pull-out tray with a thick layer of safe bedding. Paper-based bedding like Carefresh or plain paper pellets works well. Avoid pine and cedar shavings, which release aromatic oils that can irritate rat respiratory systems. The RSPCA also advises against dusty bedding for the same reason.
- Install a solid platform or shelf at one or more heights. You can use untreated pine board cut to fit and rested on the existing bar grid, or hang a flat hammock-style shelf from the top. Make sure any ramps connecting levels are solid, not wire.
- Add a nest box in the lower or mid section of the cage. A wooden bird nest box works, or a simple ceramic plant pot on its side. Rats need an enclosed, dark retreat.
- Hang fleece hammocks from the top bars or upper corners. These become favourite sleeping and lounging spots and also help break up the interior space vertically.
- Do a final safety pass: check for any sharp wire ends from hardware cloth edges, exposed cut zip tie tails (trim them), and any loose parts the rats could dislodge and get trapped under.
Bedding, mess control, and tray setup
Rats scatter bedding and throw food. The pull-out tray on most bird cages is shallow, which means bedding kicks out through the lower bars constantly. Two fixes work well together: add a plastic tray extender or wrap the lower 4 to 6 inches of the cage exterior with a strip of coroplast to act as a kick guard, and use a deeper layer of bedding (at least 2 to 3 inches) so rats can burrow without hitting the bare tray floor. Clean the tray fully at least once a week, and spot-clean wet patches every couple of days. If you are pregnant, you should also avoid direct exposure to cage cleaning whenever possible and follow your healthcare provider’s safety guidance clean the tray fully at least once a week. This keeps ammonia levels down and your rats' respiratory systems healthy.
When a bird cage just won't work, and what to get instead
Some bird cages genuinely aren't worth converting. Here are the situations where you should skip the DIY and buy a purpose-built rat cage instead.
- Bar spacing wider than half an inch across most of the cage (extensive hardware cloth overlaying is time-consuming and can look and feel flimsy long-term)
- Galvanized wire construction with no powder coating (zinc risk is real and not fixable without replacing the cage entirely)
- Total interior volume under 2 cubic feet per rat you plan to house
- No way to remove the wire floor grate or fit solid flooring without major structural changes
- Flaking or unknown paint on a second-hand cage that can't be safely stripped and refinished
If you're buying new, look for cages specifically marketed for ferrets or rats. These typically come with half-inch or smaller bar spacing, powder-coated wire, pull-out solid base trays, and multiple levels already built in. Popular options in this category run roughly 36 inches tall and 24 inches wide for a pair of rats, which gives you the vertical enrichment space rats thrive in. Avoid small rodent cages marketed for hamsters or gerbils: they're almost always too small and often have bar spacing that's either too wide or too narrow for rats.
| Feature | Bird Cage (converted) | Purpose-built Rat Cage |
|---|---|---|
| Bar spacing | Often 1 inch or more; needs hardware cloth overlay | Typically 0.5 inch or less out of the box |
| Wire material | Often galvanized (zinc risk) | Usually powder-coated |
| Floor type | Wire grate common; must be removed | Solid tray or pull-out base standard |
| Vertical space | Often very good (tall parrot cages) | Varies; check dimensions before buying |
| Door/latch security | Basic push latches; needs clips added | Multi-point latches more common |
| Cost | Free/low if you already own it | Typically $60 to $200+ depending on size |
| Modification required | Significant: flooring, spacing, latches | Minimal: add hammocks, enrichment only |
The bottom line is that a bird cage can work for rats, but it earns that right only after passing every check above. If you are thinking about putting a rat’s cage outside, make sure it is weather-safe and stays within safe temperature and airflow ranges putting a rat cage outside. A large parrot cage with half-inch horizontal bars, powder-coated wire, a solid-floor modification, and secured doors can be a genuinely great rat home. A cheap finch cage with galvanized one-inch bars should go straight in the bin for this purpose. Do the measurements first, then decide.
FAQ
If the bar spacing is safe, can I use the cage as-is without modifications?
Not automatically. Even if the bars are close enough, many bird cages have shallow pull-out trays and bar-adjacent gaps where bedding can spill or a rat can get a paw caught. If you convert one for rats, plan on adding a deeper, fully enclosed base surface (solid shelf or liner) plus a tray kick guard so bedding cannot fall through the lower wire area.
Can I use a bird cage with galvanized bars if I seal it or paint over it?
No, galvanized wire is the main no-go. Zinc toxicosis is linked to rats ingesting zinc as the coating degrades, especially with acidic urine over time. If you already own a galvanized cage, either replace the cage or replace the entire wire section with powder-coated wire, you cannot reliably “seal” galvanized bars in a way that prevents chewing and eventual zinc exposure.
What’s the best way to measure bar spacing for rat safety?
Measure the gap between bars using the actual open space (not the thickness of the bar, and not center-to-center). Also check both directions: horizontal bar cages and vertical bar cages can each have different spacing, and a cage that meets the limit in one direction can still be unsafe in the other.
If my cage’s bar spacing is a little too wide, how do I correctly secure hardware cloth?
Half-inch hardware cloth is the common fix when bar spacing is borderline, but make sure the cloth is secured so there are no loose edges or sharp cut wire ends that can injure a rat. Use zip ties or J-clips on the frame and check it again after the first week, because chewing and cleaning can loosen weak attachment points.
Are bird cage latches really rat-proof?
Hanging doors and access panels are the most common escape points. If the latch can be pushed, lifted, or manipulated without two hands, assume a rat will learn it. Add a secondary barrier like a carabiner clip or a small padlock-style latch on every door and removable section that a rat can reach.
Where should I place the cage to prevent respiratory issues and overheating?
Avoid placing the cage where airflow is either stagnant or too direct. Good ventilation means fresh air exchange, not wind. Keep it away from HVAC vents, strong fan streams, and drafty windows, and in summer prevent the cage from heating up above about 86°F (30°C). In winter, avoid cold drafts across the cage floor.
How can I tell if my cage placement has too much draft?
Wire cages often have open sides that ventilate well, but drafts can still be a problem. A practical check is to observe whether your rats are huddling in one corner, breathing heavily, or keeping away from a specific side of the cage during strong airflow. If you see that behavior, reposition the cage rather than just adding more bedding.
What parts of the bird cage setup should I remove or replace besides the bars and tray?
Treat any plastic that came with the bird cage as “probably chewable” and “probably replaceable.” Remove painted, decorative, or unknown-origin accessories, and replace them with plain, untreated options. If the water bottle or food dish mounts are plastic, secure them so they do not drop into the tray area where rats chew at mounting points.
How do I manage bedding mess and ammonia if the cage tray is shallow?
Yes, but plan for frequent cleaning. Rats produce ammonia quickly, and a shallow tray encourages bedding to foul the base area sooner. Use a deeper bedding layer (so they can burrow without reaching bare tray), add a kick guard to reduce bedding fall-through, and spot-clean wet areas every couple of days while doing a full tray clean at least weekly.
What should I use for solid flooring and platforms, and what can go wrong?
If you use untreated wood shelves or platforms, verify there is no varnish, stain, or hidden coating, and replace them if they become soft from moisture or urine. Plastic boards can work well, but make sure they sit securely so a rat cannot wedge bedding between the board and the wire frame.
Can I use a used bird cage from the past, and how do I vet it safely?
Second-hand bird cages are a bigger risk than most people expect because of unknown finishes, prior exposure to chemicals, or flaking paint. Strip any chipped or peeling coatings, verify all finishes are pet-safe and fully cured if repainted, and replace any parts that show rust, flakes, or rough degraded areas where rats chew.
When is it better to stop DIY and buy a purpose-built rat cage?
If you cannot meet the bar spacing limit and the cage is also galvanized, it is usually not worth converting. Likewise, skip conversion if the cage cannot be modified into a truly solid base without major gaps, or if secure latching is impossible. In those cases, buying a rat or ferret cage that already has small bar spacing and solid trays is safer and usually cheaper long-term.
Is the 24 x 24 x 24 inch minimum still the right target if I want more than one rat?
Rats are social, so the best setup depends on how many rats you plan to keep, not just the cage size. If you will keep a pair or group, scale up floor area and vertical enrichment together. A common minimum for one adult rat is 24 x 24 x 24 inches, but multiple rats need more than the single-rat minimum because they add mess, competition, and activity levels.
Next Article
Can I Clean My Bird Cage While Pregnant Safely? Guide
Pregnant and want to clean a bird cage safely? Get step-by-step cleaning, PPE, cleaner dos and donts.