
Assembling an HQ bird cage takes most people 45 to 90 minutes when they work through a logical sequence: build the stand and base first, seat the tray and grill, raise the side panels, lock in the top frame, then fit doors, seed guards and accessories. The tricky parts are not the steps themselves but the small things that cause problems later: panels seated at a slight angle, a grill that won't slide because a rail is bent, or a door latch that looks closed but pops open. This guide walks you through every stage, tells you exactly where to pause and check your work, and covers the safety and species-specific decisions that should happen before a single bolt goes in.
HQ Bird Cage Assembly Instructions: Complete DIY Guide + Photos

Maya Bennett
17 Jul 2026
Who this guide is for and what it covers
Whether this is your first flat-pack cage or you've built a dozen, the same failure points show up again and again: missing hardware discovered halfway through, panels that go on in the wrong order, and bar-spacing assumptions that turn out to be wrong for your bird. I wrote this guide for bird owners at every level, from someone setting up their first budgie home to an experienced DIYer building a large parrot flight. You'll find a full tool and parts checklist, a photo-based walkthrough shot list you can use with your phone, numbered assembly steps for each stage, and a troubleshooting section covering the issues that show up most often in customer reviews and community forums. There are also sections on safe materials, species-appropriate bar spacing, placement, seasonal care, customization, and a maintenance schedule.
HQ bird cage types and common variations
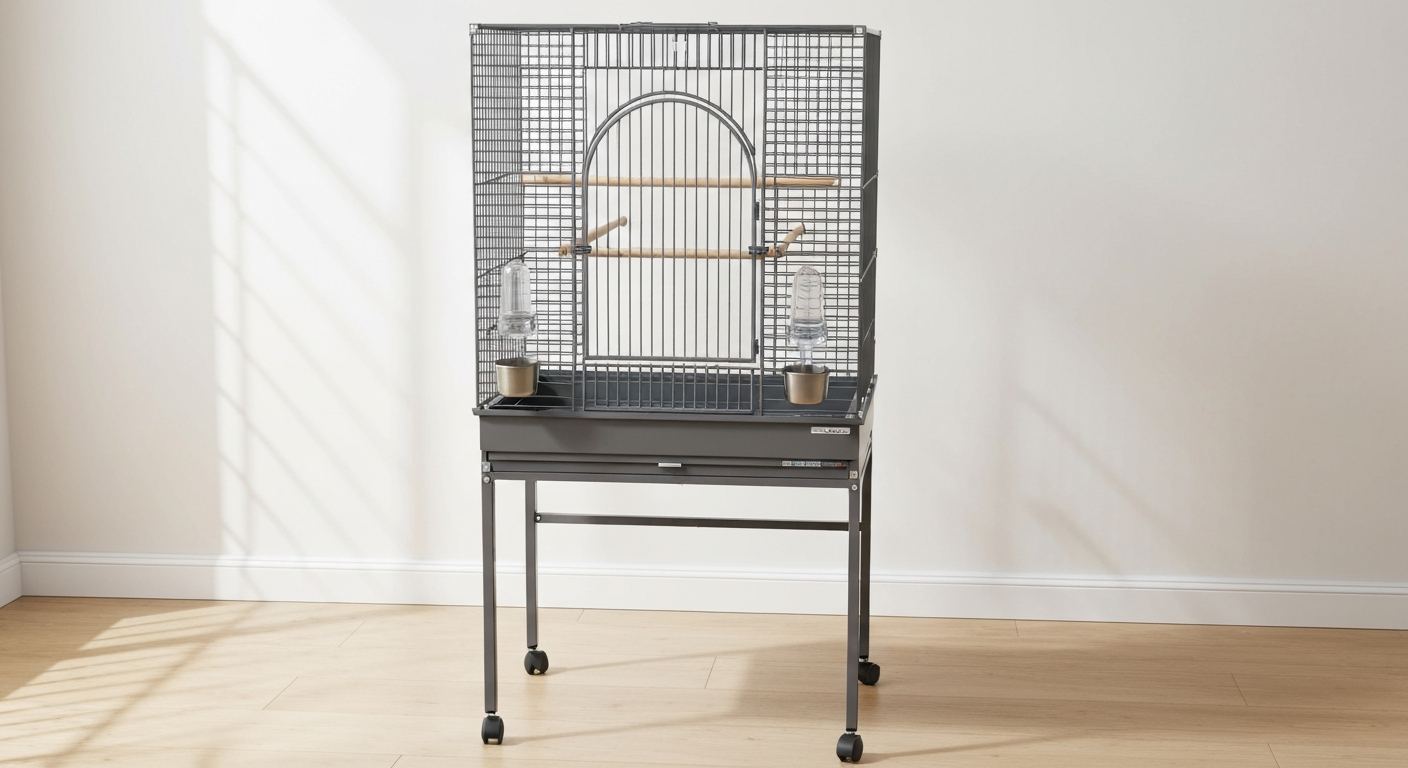
HQ-style bird cages sold under retail and house brands typically fall into two broad groups: standing flight cages (usually 52 to 65 inches tall overall, with a stand welded or bolted on) and tabletop or compact models (18 to 30 inches, no integrated stand). Within those two groups you'll find a few recurring design variations that affect assembly order and what parts you'll receive.
- Single front door vs. multiple doors: larger models often have a main arched door plus one or two smaller feeder-access doors on the sides
- Slide-out debris tray with a separate pull-out wire grill sitting above it: common on 52-inch-plus models, the grill seats in internal rails and the tray runs in outer runners
- Playtop vs. flat or domed top: playtop versions ship with an extra tray and perch bar for the roof section, adding 6 to 12 parts to the inventory
- Removable seed guards (skirts): plastic or acrylic strips that clip to the lower exterior to catch kicked seed and debris
- Caster wheels: most standing models include four casters, two locking; these thread directly into pre-drilled holes in the stand legs
- Bar orientation: some models run vertical bars on the sides and horizontal bars on the front and back; the orientation affects which panels go on first and how corner connectors seat
Common HQ-pattern dimensions you're likely to encounter are 52-inch, 53-inch and 61-inch overall heights. The 61-inch playtop version shares much of its base architecture with the 53-inch model but adds a separate upper tray section and additional frame connectors at the roof. If you're working with a cage labeled Yaheetech, Zeny, or PawHut, the core assembly sequence in this guide applies, though your hardware counts and door configurations may differ slightly. Model-specific notes appear throughout.
Before you touch a single bolt: safety and species checks
This is the section most people skip, and it's the one that matters most. Running these checks before assembly saves you from fully building a cage that isn't safe for your bird.
Bar spacing by species
Bar spacing is a head-entrapment and escape issue, not just a preference. Use the table below as a minimum guide. If your cage arrives with wider spacing than your species requires, do not use it without adding a secondary interior panel or mesh liner, and consult an avian veterinarian before housing a bird in a mismatched cage.
| Species group | Recommended bar spacing | Minimum cage width |
|---|---|---|
| Finches, canaries | 1/4 inch (6 mm) | 24 inches (60 cm) |
| Budgerigars (parakeets) | 1/2 inch (12 mm) | 18–24 inches (45–60 cm) |
| Cockatiels, lovebirds | 1/2 inch (12 mm) | 24 inches (60 cm) |
| Conures, small Amazons | 3/4 inch (19 mm) | 24–36 inches (60–90 cm) |
| African Greys, medium parrots | 3/4–1 inch (19–25 mm) | 36 inches (90 cm) |
| Macaws, large cockatoos | 1–1.5 inches (25–38 mm) | 36+ inches (90+ cm) |
Coating and finish safety
Zinc and lead are the two heavy metals most commonly responsible for toxicosis in pet birds. Galvanized wire (coated in zinc) is a known hazard: birds chew wire, ingest particles, and can develop heavy-metal poisoning with symptoms including weakness, regurgitation, and neurological signs. Before assembly, inspect every wire panel and hardware piece for white powdery residue (zinc oxide), sharp flaking paint, or any coating that scratches off easily. If you cannot confirm from the manufacturer's documentation that the finish is powder-coated and lead/zinc-free, contact the vendor before proceeding. Do not use cages with galvanized or unknown metallic plating for birds that chew wire, which includes nearly all parrots.
Gap and door latch checks
Before assembly, test every door latch mechanism by hand. Spring-loaded latches should require deliberate pressure to open: parrots, including small species like budgies, can work a simple push-latch open within days. Check that the door frame, when held up to light, shows no gaps larger than your target bar spacing at the hinge side or latch side when closed. Any gap wide enough for a head to enter is wide enough for an entrapment injury. On 52-inch and larger models, also check that the seed-guard clips engage without flex: a poorly seated seed guard can create a gap between the guard and the lower panel bars.
Tools and parts checklist
| Item | Type | Notes |
|---|---|---|
| Phillips-head screwdriver (No. 2) | Required | Use by hand first; power drivers risk stripping |
| Flat-head screwdriver (medium) | Required | For prying apart snap-fit connectors and adjusting seed-guard clips |
| Adjustable wrench or 10 mm combination spanner | Required | Most HQ-style cage bolts are M5 or M6 |
| Needle-nose pliers | Required | Seating cotter pins and bent bar correction |
| Rubber mallet | Required | Seating panels into corner connectors without bending |
| Measuring tape | Required | Confirming bar spacing and tray fit |
| Spirit level (small) | Required | Checking stand and base frame before raising panels |
| Power drill with Phillips bit (variable speed) | Recommended | Speeds up bolt tightening; set torque low |
| Zip ties (small, stainless or nylon) | Recommended | Temporary alignment hold during assembly |
| Marker pen or masking tape | Recommended | Labeling identical parts that differ by tiny measurement |
| Phone or camera | Recommended | Photo-documenting each stage |
| Gloves (nitrile or work gloves) | Recommended | Cut protection; wire ends are sharp |
Most HQ-pattern standing cages use M5 bolts (5 mm diameter) with either a hex nut or a wing nut, and M4 self-tapping screws for seed-guard and accessory attachments. If your model manual lists torque specs, follow them. In the absence of printed specs, hand-tight plus a quarter-turn (roughly 3 to 5 Nm) is appropriate for M5 bolts into pre-tapped steel; do not exceed this or you risk stripping threads in the hollow tube connectors.
Parts inventory by common group
| Part group | Typical quantity (52–53" model) | Typical quantity (61" playtop) |
|---|---|---|
| Stand legs (vertical tubes) | 4 | 4 |
| Lower crossbars / stretchers | 4 | 4 |
| Upper frame rails | 4–6 | 6–8 |
| Side wire panels | 2–4 | 2–4 |
| Front panel (with door frame) | 1 | 1 |
| Back panel | 1 | 1 |
| Roof panel | 1 | 2 (main + playtop) |
| Slide-out debris tray | 1 | 2 |
| Wire grill (sits above tray) | 1 | 2 |
| Corner connector blocks | 4–8 | 8–12 |
| Door(s) with hinges | 1–3 | 1–3 |
| Seed guard / skirt sections | 2–4 | 2–4 |
| Caster wheels (2 locking) | 4 | 4 |
| Wooden perches | 2–3 | 3–4 |
| Food/water cup hooks + cups | 2–4 | 2–4 |
| M5 bolts + hex nuts | 16–24 | 24–32 |
| M4 self-tapping screws | 8–12 | 12–16 |
| Wing nuts (for seed guards) | 4–8 | 8–12 |
Unboxing and initial inventory
Do this step on a clean floor with good lighting, and do it before you throw any packaging away. Customer reports and third-party reviews consistently flag missing screws, bent bars, and warped trays as the most common out-of-box problems with budget and mid-range retail bird cages. Catching these now takes ten minutes; discovering them after the cage is half-built costs an hour.
- Slit the outer box along the seams rather than tearing: if a part is damaged and you need to return it, you'll want intact packaging
- Lay all panels flat on the floor and group them by type: side panels together, roof panels together, stand components together
- Open the hardware bag and sort fasteners into small cups or sections of an egg carton; count each type against the parts list in your manual
- Photograph every panel before handling it further: a date-stamped photo showing any pre-existing bends, paint chips, or scratches is your evidence if a warranty claim becomes necessary
- Run your fingers along every wire panel edge to check for sharp wire ends that were not finished cleanly at the factory; these need to be filed or capped before the cage is used
- Check that the slide-out tray sits flat: hold it up and sight along the long edge; more than 3 mm of bow will cause it to bind in the rails
- If any part is missing or visibly damaged, stop here and contact the vendor before assembling further; most manufacturers require you to flag damage within 24 to 72 hours of delivery to qualify for replacement parts
Keep the inner foam or cardboard dividers: they make useful padding when you need to stand a panel on edge during assembly without scratching the finish.
Photo walkthrough: what to shoot and how
You don't need anything beyond a smartphone. Good documentation photos serve two purposes: they help you follow your own steps if you need to disassemble for moving or cleaning, and they give you evidence if something goes wrong. Here is the shot list I recommend for every HQ-style cage build.
| Shot | What to capture | Lighting/framing tip |
|---|---|---|
| Wide overview: parts laid out | All components organized by group on the floor | Shoot from above (standing on a chair); natural light from a window to one side |
| Hardware bag contents | Sorted fasteners next to the manual's parts list | Macro mode; place a ruler in frame for scale |
| Base/stand assembled | All four legs and crossbars connected, level checked | Shoot from low angle to show all four feet flat on floor |
| Underside of base frame | Caster mount points and bolt heads visible | Torch or phone flashlight held to one side to show thread engagement |
| Tray seated in rails | Tray fully inserted, pull-handle visible at front | Side-on close-up showing tray flush with outer frame |
| Panel seating close-up | Corner connector receiving a panel edge | Tight frame on the connector; show bolt started but not fully tightened |
| Door latch detail | Latch in closed position, then open position | Two shots side by side; show the full travel of the latch mechanism |
| Seed guard clip | Guard clipped to lower panel, gap between guard and bar | Shoot from below looking up; show any gaps clearly |
| Final assembled: front | Complete cage from front, door closed | Stand 6 to 8 feet back; full-height portrait orientation |
| Final assembled: level check | Spirit level sitting on top frame showing bubble centered | Close-up; include the frame in the background for context |
For each step photo, place a Post-it note or piece of masking tape with the step number in the corner of the frame. When you come back to review or share the images, you won't have to guess which bolt tightening sequence you were on. Consistent bright lighting (daylight or a single lamp) and a plain floor background make details easier to see than a cluttered room.
Step-by-step assembly
Stage 1: Stand legs and lower base frame
Work on a clean, flat surface. If your floor is carpet, place a sheet of cardboard or a drop cloth down: wire ends scratch flooring and fine carpet fibers can tangle in caster mounts. Have your rubber mallet, adjustable wrench, spirit level, and the M5 bolt bag ready.
- Identify the four stand legs: on most HQ-pattern models they are identical tubes; check your manual to confirm top and bottom ends (some have a pre-drilled caster hole at the bottom only)
- Thread one caster into the bottom of each leg by hand until it sits flush; do not use a wrench yet — you need to be able to adjust height slightly during frame squaring
- Connect the lower horizontal crossbars to the legs using corner connector blocks: start all four connectors finger-tight only, with bolts started but not tightened
- SAFETY PAUSE: before tightening anything, place your spirit level across two opposite legs and then across the other pair. If the floor is uneven, adjust caster height now — most casters have 5 to 10 mm of thread adjustment
- Once level is confirmed, tighten the crossbar bolts in a cross pattern (front-left, back-right, front-right, back-left) to distribute stress evenly; hand-tight plus a quarter-turn is sufficient
- Grip the assembled base frame at two opposite corners and apply gentle racking force: the frame should feel rigid with no twist or creak; if it flexes, check that all four connector blocks are fully seated against the tube ends before re-tightening
- Now fully tighten the casters with a wrench: engage the locking mechanism on the two designated locking casters and confirm the frame does not roll
- COMMON MISTAKE: over-tightening the corner connector bolts at this stage. The connectors are cast zinc alloy on most budget models and will crack under excess torque. If you feel the bolt bottoming out, stop — additional turns are not adding clamping force
- Photo check: take the base/stand assembled shot and the underside shot now (see photo shot list above)
Stage 2: Tray rails and lower cage floor frame
Most 52-inch and larger HQ-pattern cages have a lower cage frame that sits on top of the stand and forms the perimeter that the wire panels will attach to. The slide-out tray and grill seat inside this frame.
- Identify the four lower cage frame rails (these are thinner and usually shorter than the stand crossbars); lay them out in a rectangle on top of the stand frame
- Attach the lower cage rails to the upper ends of the stand legs using the same corner connectors or a separate set (check your manual): start all bolts finger-tight
- Slide the debris tray into the cage frame from the front or the front-right corner depending on the model: it should move smoothly with no more than 5 mm of side play; if it binds, the rails are not yet square — loosen the corner connectors slightly and tap the frame into alignment with the rubber mallet before re-tightening
- Seat the wire grill on top of the tray: it should sit flat on the internal ledge of the lower frame with no more than 2 to 3 mm of vertical movement; if it rocks, check for a bent rail on the grill itself — a gentle bow can be corrected by pressing the center of the grill onto a flat surface
- ALIGNMENT CHECK: with the tray and grill seated, sight down the length of the lower frame from the front. All four corners should be at the same height. Place the spirit level across the grill surface: maximum acceptable deviation is 3 mm over the full tray length
- Tighten the lower cage rail connectors to the same torque as the stand: hand-tight plus a quarter-turn
- SAFETY NOTE: the gap between the tray rails and the lower cage frame edge is a pinch point when the tray is being slid in or out. Make sure this clearance is sufficient for your hand to move freely; if it is tight, identify which rail needs adjustment before the cage is in use
Stage 3: Side and back wire panels
Wire panels are the heaviest individual components. If you're working alone, lean them against a wall in order of installation (back panel first, then sides, then front) so you can pick them up without searching.
- Install the back panel first: hold it vertical and engage the bottom edge into the lower cage frame channel or bolt points; start two bolts at the bottom corners finger-tight to hold it in position
- Engage the top edge of the back panel into the upper frame rails (these may need to be held in place with a zip tie temporarily while you connect the side panels)
- Install the left side panel: engage bottom and back edges into their respective channels; start bolts finger-tight at all four corners
- Install the right side panel in the same way
- ALIGNMENT PAUSE: before tightening any panel bolts, step back and view the cage from the front. All panels should be vertical, not leaning inward or outward at the top. Panels that splay outward at the top are the most common alignment issue and happen when the lower frame is not perfectly square — correct the frame before the panels go on, not after
- Tighten panel bolts in a sequence: bottom corners of all three panels first, then top corners; this pulls the panels into the frame evenly rather than torquing one corner against another
- SAFETY CHECK: run your hand across every exterior panel joint after tightening. There should be no gap wide enough to insert a fingernail between panel edge and frame rail. Any gap is a potential toe-entrapment point for the bird
Stage 4: Front panel, doors and latches
- The front panel usually ships pre-assembled with the main door hinged in place; if not, attach the hinges to the door frame before mounting the front panel
- Engage the front panel bottom edge and connect finger-tight at all corners, same as the side panels
- Open and close the main door several times before tightening the front panel fully: confirm the door swings without rubbing on the frame and closes flush with no gap at the latch side
- Tighten the front panel bolts in the same bottom-first, top-second sequence used for the side panels
- For models with side feeder-access doors: install these now by sliding the door into its frame channel from above; the door should drop into position with a click or stop tab at the bottom
- LATCH SAFETY CHECK: test every latch with deliberate outward push pressure as a bird would apply. A latch that opens under 500 g of pressure (roughly the weight of a small water bottle pressing outward) is too loose for any parrot species. If the latch is spring-loaded, verify the spring is fully engaged. Replace with a carabiner clip or add a secondary clip if the latch feels marginal
- PHOTO TIP: take the door latch detail shots now while the cage is at a comfortable height to reach
Stage 5: Top frame and roof panel
- On most standing models, the upper frame rails were started in Stage 3; complete their installation now by tightening all upper corner connectors
- Place the roof panel onto the upper frame: it typically rests on an internal ledge or clips into slots on each rail; confirm it is seated on all four sides before adding any fasteners
- If the model has a decorative finial or center mounting point on the roof, attach this last — it is aesthetic and does not affect structural integrity
- For playtop models (common on 61-inch versions): the playtop tray and its frame section attach above the main roof. Assemble the playtop perch bar and tray as a sub-unit first on a flat surface, then lift the assembled unit onto the cage top and bolt through the pre-drilled holes in the main roof frame. Two people are strongly recommended for this step due to the height and weight involved
Stage 6: Seed guards, perches, cups and accessories
- Seed guard sections clip to the exterior of the lower cage panels: align each section so that the lip faces outward and the clip hooks engage the horizontal bars; press firmly until each clip clicks
- CHECK: with all seed guard sections fitted, look at the junction between the guard lip and the panel bar from below. The gap should be less than the bar spacing of your cage — no gaps that a small bird could push through from below if they escape the cage and walk under it
- Fit the wooden perches by pressing the threaded end through the bar grid and securing with the wing nut on the inside; position perches at different heights (at least 15 cm apart vertically) and away from food/water cups so waste does not contaminate feed
- Hang food and water cups in their hook brackets: confirm each cup hook is fully closed — open hooks are a foot-entrapment hazard; if a hook spring is weak, use pliers to reduce the gap
- SPECIES CHECK: for finches and canaries, position perches closer to the bars so small feet can grip the bar and perch simultaneously if they choose; for parrots, ensure perches are positioned so the bird can stand without its tail touching the cage floor or any lower bar
Final assembly checklist
- All bolts tightened to hand-tight plus a quarter-turn; none over-torqued
- Spirit level confirmed on top frame: bubble centered
- Tray slides in and out smoothly with no binding
- Grill sits flat with no rocking
- All doors open and close without rubbing
- All latches require deliberate pressure to open
- No gaps wider than target bar spacing at any panel joint or door edge
- Seed guards fully clipped with no gaps at lower edge
- All cup hooks fully closed
- Perches at different heights, not directly above food/water cups
- All wire ends inspected and no sharp protrusions inside the cage
- Casters rolling freely on unlocked pair; locked pair fully engaged
Where to put the cage (and what to protect it from)
Cage placement is a welfare decision, not just a decor one. The RSPCA's housing guidance for pet birds emphasizes that cages should allow full wing extension in all directions, be positioned away from direct sunlight and cold drafts, and be at or near eye level so birds can see human activity without feeling exposed or cornered. See Housing and Environments for Pet Birds, RSPCA for detailed cage-dimension and wingspan-based sizing guidance that supports these placement and space recommendations Housing and Environments for Pet Birds — RSPCA. In practice, this means avoiding exterior walls in winter (cold radiated through the wall), windows with direct afternoon sun (temperature spikes over 30°C can be dangerous), and kitchens where cooking fumes and non-stick cookware vapors are an acute toxicity risk for all bird species.
- Position the cage against an interior wall with one side against the wall: this gives the bird a sense of security without blocking visibility
- Maintain at least 30 cm clearance from heating vents and radiators
- In summer, ensure the room does not exceed 30°C at cage height; birds housed near the ceiling of a warm room experience significantly higher temperatures than the thermostat reading
- In winter, place a cage cover or towel over three sides at night to retain warmth without blocking ventilation at the top; never cover fully as CO2 can accumulate
- Avoid placing cages near scented candles, aerosol sprays, or air fresheners: avian respiratory systems are highly sensitive to volatile organic compounds
Safe customizations and modifications
Customizing a cage is a great way to enrich your bird's environment without buying a new setup, but material choice matters. The same zinc and lead risks that apply to cage wire apply to any hardware you add. Here are safe and proven modifications.
- Stainless steel additional perches: 304 or 316 grade stainless is safe; avoid chrome-plated or galvanized hardware store dowels
- Natural wood branches (apple, willow, birch, hazel): untreated branches from pesticide-free sources provide grip variety and are safe for chewing; avoid avocado, oleander, or any branch from a treated garden
- Foraging stations from food-safe rope or untreated sisal: hang inside the upper half of the cage; inspect monthly for fraying that could tangle toes
- Acrylic seed catchers as an upgrade to plastic seed guards: thicker acrylic versions are more durable and easier to clean than the clips included with most retail cages
- Adding a lock to an existing latch: a small stainless steel carabiner through the latch ring costs under $2 and makes any spring latch significantly more secure for parrots
- Interior platform perch at mid-height: cut a piece of untreated hardwood to span between two bar sets and secure with stainless wing nuts; this gives larger birds a flat resting surface
Cleaning and maintenance schedule
A consistent cleaning routine is the single biggest factor in preventing both pest infestations and disease in a cage environment. Wildlife rehabilitation standards from the NWRA/IWRC recommend a sequence of: remove debris, scrub with detergent, rinse thoroughly, allow to dry, then apply disinfectant at label dilution with adequate contact time. For a household pet cage, this translates to the following schedule.
| Frequency | Task | Method/product |
|---|---|---|
| Daily | Remove and wash food/water cups | Hot water and dish soap; rinse thoroughly; air dry or dry with clean cloth |
| Daily | Slide out debris tray, discard waste, wipe clean | Paper towel to remove solids; damp cloth for residue; replace liner |
| Weekly | Remove grill and tray; scrub both | Dish soap and warm water; rinse; allow to dry before replacing |
| Weekly | Wipe all interior perches and bar surfaces | Unscented soap solution on a cloth; rinse with clean damp cloth |
| Monthly | Full disassembly clean of all accessible panels | 1:32 dilution of 5.25% household bleach in water (approximately 1 tablespoon per 2 cups water); apply, leave 10 minutes contact time, rinse thoroughly, allow to dry completely before returning bird |
| Monthly | Hardware inspection | Check all bolts for looseness; tighten any that have backed off; inspect latches for wear; replace any cracked plastic components |
| Every 3–6 months | Full pest inspection | Check for red mite (Dermanyssus) signs: tiny red or brown specks in cage corners and joints, especially visible at dawn; consult a vet if infestation suspected |
Red mite infestations are particularly common in cages kept in warm rooms year-round. The mites live in cage joints and crevices during the day and feed on birds at night. Treatment involves thorough cleaning, disinfection of the cage structure, and treatment of the bird as directed by an avian veterinarian. Environmental control (heat treatment or approved miticides applied to the cage, never directly to the bird) is described in Merck Veterinary Manual guidance on parasitic diseases of pet birds.
Troubleshooting common problems
Tray won't slide in or binds halfway
The most common cause is that the lower cage frame is slightly out of square. Loosen all four lower cage rail connectors, insert the tray, and then re-tighten the connectors with the tray in place as a template. The tray itself should also be checked: hold it up against a straight edge. A warped tray (bow over 5 mm) will bind in any frame. If the tray is warped, contact the vendor for a replacement rather than forcing it, as a forced tray can crack at the corners.
Bent or bowed wire panels
Minor bows (less than 10 mm deviation over the panel length) can often be corrected by laying the panel flat on the floor and applying body weight through a piece of flat wood to avoid point-loading. For more significant bends, or bends at a bar junction, contact the vendor: a structurally compromised panel has reduced bar-entrapment resistance and should not be used. Never attempt to re-bend galvanized or coated bars with pliers, as this damages the protective coating and creates sharp raw metal edges.
Door latch too loose or spring broken
The fastest fix for any spring latch that feels marginal is to add a small stainless steel carabiner or a split D-ring through the latch ring. This takes 30 seconds and costs almost nothing. If the hinge is misaligned and causing the door to sag (which stresses the latch), loosen the hinge bolts, lift the door to its correct position, and re-tighten. A door that sags even 5 mm at the latch side creates a gap that small birds can push through.
Missing screws or hardware
HQ-pattern cages use standard metric fasteners available at any hardware store. M5 x 10 mm hex bolts with M5 flange nuts are the most common size; M4 x 8 mm self-tapping screws cover most accessory mounts. If you cannot source exact replacements locally, the original manufacturer or vendor parts line is the safest option. Do not substitute with non-coated or zinc-plated hardware inside the cage where birds can contact or chew it.
Seed and debris mess control
If the included seed guards are too shallow or are not catching debris effectively, the simplest upgrade is to replace them with deeper acrylic skirts (80 to 100 mm depth rather than the standard 50 to 60 mm). You can also place a large tray or rubber-backed mat under the entire cage footprint to catch anything that gets past the guards. For birds that are active flingers (many conures and cockatiels will flick seed intentionally), fitting a full-length acrylic panel on the messiest side of the cage is a common and effective DIY modification that doesn't restrict ventilation.
Casters won't lock or are wobbly
Budget caster mechanisms can fail quickly if the cage is rolled frequently on hard flooring. Check that the caster stem is fully threaded into the leg: an incompletely threaded stem rocks under load. If the locking tab is broken, replace the entire caster; they are standard 50 mm stem-fit casters available at hardware stores. Do not use a cage on unlocked casters unsupervised, as an unexpected roll can destabilize the cage if the bird shifts weight suddenly.
How this applies to PawHut, Yaheetech, Zeny and similar models
The assembly sequence and safety checks in this guide reflect the shared architecture across the most common HQ-pattern retail cages. PawHut models (including the D10-033 and D10-062 series) follow the same base-first, panels-second, top-last sequence, with model-specific bar spacing listed in their downloadable PDF manuals. Yaheetech 52-inch standing flight cages use an essentially identical lower frame and tray-grill system, with the primary differences being door count and seed-guard design. For step-by-step Yaheetech 52 bird cage instructions, consult the official Yaheetech assembly manual for that exact model. Zeny 53-inch and 61-inch models both use this same architecture; the 61-inch playtop adds the upper tray section covered in Stage 5 above. For model-specific guidance, see the Zeny 61" bird cage instructions for step-by-step diagrams and parts lists. For model-specific step diagrams and parts lists, consult the Zeny 53 bird cage instructions for exact assembly details. If you are working from one of those model-specific manuals, the numbered steps here map directly onto the diagram stages in those PDFs. The bar spacing for your specific model should always be verified against the spec sheet before housing any bird, regardless of which brand label is on the box.
A note on welfare and when to get professional advice
A well-built cage is only one part of keeping a bird healthy. The Association of Avian Veterinarians (AAV) recommends an avian-specialist veterinary check within the first few weeks of acquiring any new bird, and annual wellness exams thereafter. If your bird shows any signs of distress after moving into a new cage, including feather plucking, excessive screaming, loss of appetite, or balance problems, consult an avian vet promptly. Heavy-metal toxicosis from cage coatings can present subtly and progress quickly. When in doubt about a coating, finish, or material, the safest decision is always to hold off and verify before the bird goes in.
FAQ
What primary model-specific documents are required to produce accurate assembly instructions for an HQ bird cage and its common sibling models (PawHut, Yaheetech 52", Zeny 53"/61")?
Obtain official manufacturer assembly/user manuals and product pages for each model (PDFs or product listings) containing: labeled parts lists with part IDs and quantities; exploded diagrams or step-by-step assembly drawings; fastener types and sizes; tray/caster/perch specifications and dimensions; safety warnings and finish/coating notes. Source examples: PawHut and Yaheetech PDF manuals and Zeny product pages (manufacturer PDFs and retailer listings such as Manuals.plus, RetailMarket.net, Wayfair).
Which verifiable measurements and specifications must be documented for safety and species-appropriate checks?
Record exact external cage dimensions (height/width/depth), internal usable space, door opening sizes, tray size and fit, bar spacing (measure in inches/mm), perch diameters and materials, and weight/load limits for perches/toys. Use authoritative bar-spacing guidance (MSD Veterinary Manual table) and RSPCA cage-space/wing‑extension rules to match species. Note any galvanization/finish descriptions from manufacturer docs and flag unknown coatings for toxicity checks (AAV/MSPCA guidance).
What photographic assets and photo annotations are needed for a step-by-step, publication-ready photo walkthrough?
High-resolution photos for each major assembly step: parts laid out with labeled part IDs; close-ups of fasteners and tool orientation; alignment/attachment points (doors, hinges, casters, tray stops); critical safety checks (bar spacing, sharp edges, finish). Provide scale references (measuring tape), exploded-assembly overlays, before/after images for tricky steps, and annotated callouts for torque/hand-tightening vs. fully tightening. Source reference: manufacturer exploded diagrams and labeled part lists for photo-callouts (PawHut/Yaheetech PDFs).
What tool checklist should be included and how should tool usage be specified?
List all tools with sizes and suggested alternatives: Phillips and flat screwdrivers, hex/Allen keys (sizes per manual), adjustable wrench, pliers, rubber mallet, tape measure, level, safety gloves and eye protection. For each assembly step specify required tool, torque guidance (hand-tighten vs. snug), and recommended order to prevent misalignment. Cross-check with manufacturer-specified fastener types in their manuals to ensure correct bit sizes. Refer to manufacturer manuals for fastener lists/IDs (PawHut/Yaheetech PDFs).
Which pre-assembly inspection and parts-verification checks are essential?
Before starting: compare received parts against manufacturer part list (counts/IDs); inspect for bent bars, warped trays, stripped threads, missing screws, rust or flaking coatings; verify caster/tray fit and door alignment. Photograph discrepancies and contact retailer/manufacturer immediately with order/model and part IDs. Include a printable parts checklist based on the model's official parts list (from product manual PDFs).
What safety and materials‑toxicity checks must be included for bird welfare?
Document checks to identify hazardous coatings/metals (galvanization, painted or unknown flake-prone finishes). Advise testing/confirming absence of lead/zinc exposure risks; recommend only powder-coated, stainless, or tested finishes for birds. Include AAV position statements and MSPCA-Angell/Pet Poison Helpline guidance on heavy-metal toxicosis and signs to watch for. Instruct to avoid cages with missing finish info and to consult an avian veterinarian if exposure is suspected. Cite AAV position statements and MSPCA resources for authority.
Next Articles
Zeny 61 Bird Cage Instructions: Step-by-Step Assembly Guide
Step-by-step Zeny 61 bird cage assembly, setup, stability checks, and fixes for misaligned doors and tray fit.
How to Make an Acrylic Bird Cage: Complete Species‑Safe Guide
Step-by-step guide: how to make an acrylic bird cage with species-specific designs, safe materials, templates, and door/
How to Make a Fake Bird Cage: Safe DIY Plans & Rules
DIY guide: how to make a fake bird cage safely, plans, materials, measurements, ventilation, and welfare checks.