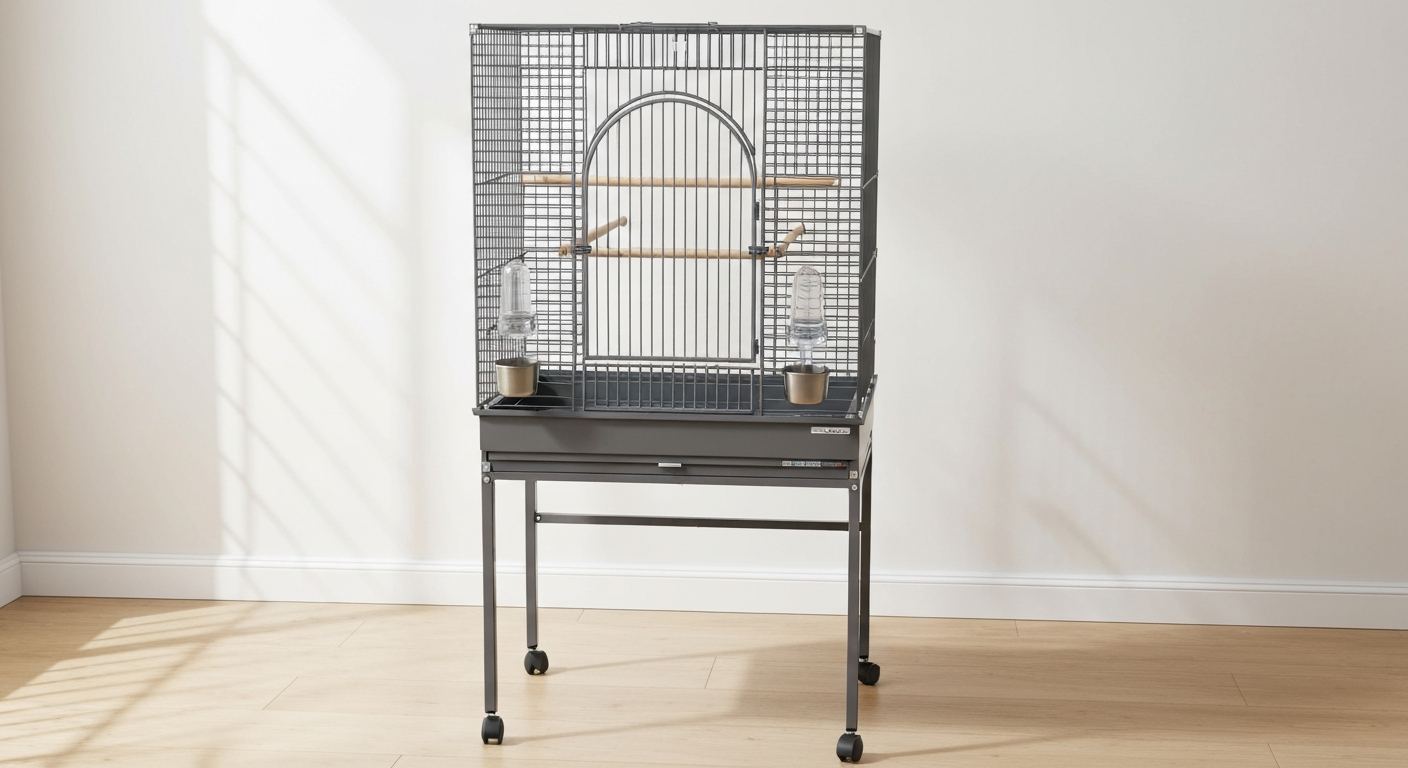
The Yaheetech 52" bird cage (model #610958, also listed as Y00845A) goes together in roughly 45 to 60 minutes with the included hex wrench, no extra tools strictly required. You get a rolling steel flight cage that assembles to 31.1" L x 20.4" W x 52.0" H, ships with 3 wooden perches, 4 plastic feeders, a slide-out tray, a lower storage shelf, casters, and all the screws you need. This guide walks you through every stage: unboxing and inventory, safety checks, step-by-step assembly, interior setup for common species, placement, cleaning, and what to do when parts are missing or don't fit.
Yaheetech 52 Bird Cage Instructions: Assemble, Setup & Care

Maya Bennett
25 Jul 2026
What this guide covers and who it's for
If you just ordered a Yaheetech 52" cage and want to get it built correctly the first time, you're in the right place. I've put together this walkthrough for bird owners assembling the cage at home, caregivers setting it up for cockatiels, conures, budgies, or similar mid-size parrots, and DIYers who want to customize or troubleshoot after assembly. The instructions apply to the hammered black, white, and similar powder-coated variants sold through Amazon, Walmart, Chewy, and yaheetech.shop. Where the steps overlap with other 52" flight cage designs like PawHut, Zeny, or HQ models, I'll flag the relevant differences so you can adapt.
Before you start: time, difficulty, and workspace setup
Budget 45 to 60 minutes for a straightforward build, longer if this is your first time or if you want to photograph each stage. Difficulty is genuinely low, roughly a flat-pack furniture level, but the cage panels are heavy steel and awkward to maneuver solo. If you can get a second person to hold panels in place while you drive screws, the process goes faster and you're less likely to scratch the finish.
For workspace, clear a floor area of at least 5 feet by 5 feet. Lay down a moving blanket, a large piece of cardboard, or an old sheet to protect the powder-coat from scratching while panels are flat. Good lighting matters both for assembly and for checking hardware, so work near a window or bring in a work light. If you're documenting the build with photos (which I strongly recommend for insurance and warranty purposes), shoot each stage before you tighten anything permanently.
- Estimated build time: 45 to 60 minutes for one person, 30 to 40 minutes with a helper
- Difficulty: easy to moderate; no power tools required
- Minimum floor space: 5 ft x 5 ft clear area
- Surface protection: moving blanket, cardboard, or old sheet under panels
- Photo tip: shoot an overview of every part before assembly, then one shot per major step
Complete parts list and fasteners checklist
The Yaheetech model #610958 manual uses an exploded-parts diagram with labeled cells (parts marked 1 through 10 and hardware codes). Before you touch a screwdriver, lay every piece out on your protected floor and match it against this checklist. I recommend grouping identical parts together and counting twice, once when you pull them from the box and once when you match them to the diagram.
| Part | Description | Typical Qty | How to identify it |
|---|---|---|---|
| 1 | Base frame / bottom pan assembly | 1 | Largest flat piece; slide-out tray slot visible |
| 2 | Side panels (wire mesh) | 2 | Rectangular wire frames, matching pair |
| 3 | Front panel (door side) | 1 | Includes hinged access doors |
| 4 | Rear panel | 1 | No doors; mirror image of front panel |
| 5 | Top/roof frame | 1 | Smaller rectangular wire frame with arch or flat top |
| 6 | Stand legs | 4 | Straight metal tubes, often with pre-drilled holes |
| 7 | Lower storage shelf/grate | 1 | Flat wire shelf fits between stand legs |
| 8 | Wooden perches | 3 | Smooth-sanded dowel rods with screw-end fittings |
| 9 | Plastic feeders/cups | 4 | Small plastic cups with spring-clip brackets |
| 10 | Slide-out waste tray | 1 | Thin metal or plastic tray; fits base slot |
| A | Caster wheels | 4 | Two fixed, two swivel with locking tabs |
| C | Hex-head screws (assorted) | Per diagram | Multiple lengths; sort by length before starting |
| Tool | L-shaped hex wrench (Allen key) | 1 | Included in hardware bag; fits all cage screws |
Sort your screws by length immediately after unboxing. Mixing up short and long screws is the single most common assembly mistake I see, and it can strip threads or leave connections loose. The included Allen wrench fits all fasteners on this model, so you technically need nothing else, though a short Phillips screwdriver can help with certain bracket styles depending on your variant.
Tools required and optional extras
Yaheetech includes one L-shaped hex wrench with the cage and it covers every fastener in the build. That said, a T-handle or ball-end hex wrench in the same size makes tightening much easier on your hands, especially for the caster bolts which need a firm turn. Here's what I keep on hand for this build:
- Included Yaheetech hex/Allen wrench (required, use this to confirm screw sizes)
- T-handle or ball-end Allen wrench, matching size (strongly recommended, saves hand fatigue)
- Rubber mallet (optional, helpful for seating panels that fit snugly)
- Needle-nose pliers (optional, for holding a nut in a tight spot)
- Marker or masking tape (for labeling sorted hardware piles)
- Smartphone or camera (for photo documentation at each stage)
- Mild dish soap and a clean cloth (for wiping down surfaces before assembly)
For a photo-ready tool layout before you start, arrange everything on a light-colored surface and snap one reference shot. This shot is useful if you need to contact Yaheetech support or describe a missing part, because you can clearly show what hardware arrived with your order.
Pre-assembly safety checks
This step gets skipped constantly and it really shouldn't be. Before your bird ever goes near this cage, run through these checks. Some are about your safety during assembly; most are about your bird's long-term safety.
Inspect the powder-coat and metal finish
Yaheetech's own product notes acknowledge that some cages arrive with minor surface rust spots, particularly at weld points or cut edges. Check every weld and every wire cross-point under good light. Light surface rust on exterior welds can be treated with a bird-safe rust converter or lightly sanded and touched up with a pet-safe, non-toxic paint. Any flaking coating inside the cage is a bigger concern: flaking finish can be ingested by birds, so any chipped patches on interior wire surfaces should be addressed before the cage goes into service.
Check bar spacing for your species
The Yaheetech 52" typically ships with bar spacing around 0.6" (approximately 1.5 cm), which aligns with the range used on comparable PawHut 52" models. Veterinary guidance from the Merck Veterinary Manual recommends bar spacing of roughly 1/2" to 5/8" for smaller parrots like budgerigars, cockatiels, and lovebirds. Measure your specific cage's bar spacing with a ruler before housing any bird. A bird that can get its head through a bar gap and not back out is at risk of injury or death.
Hardware and fastener inspection
Check every screw for burrs or sharp edges. Run your thumb along the threads; they should feel clean. Sharp fastener edges inside the cage interior are a hazard because parrots investigate everything with their beaks and feet. Any bolt end protruding into the cage space should be covered with a smooth plastic cap or replaced with a flush-head equivalent. Check door latches on the front panel: they should open smoothly but require a deliberate push or lift to open. Parrots, especially the smarter ones, will figure out a loose latch.
Bird safety during and after assembly
Keep your bird in a separate room while you assemble the cage. Metal dust and fine powder-coat particles can become airborne when panels knock together, and birds have extremely sensitive respiratory systems. Once assembled, wipe down all interior surfaces with a damp cloth and allow the cage to air out for at least a few hours, preferably overnight, before introducing any bird. This is especially important for new cages that may carry a faint chemical smell from the coating process.
Unboxing and inventory: verify every part before you start
Open the box carefully, slitting tape rather than tearing, to preserve the packaging in case you need to return or exchange anything. Pull parts out one at a time and lay them flat on your protected floor. Don't stack panels on top of each other; lay them side by side so you can see what you have.
- Photograph the box exterior and any shipping damage before opening
- Photograph the inside of the box with all packing material visible
- Remove each piece individually and lay it on the floor
- Photograph all parts spread out in one wide shot (this is your 'what I received' record)
- Open the hardware bag and sort screws by length into labeled groups
- Photograph the sorted hardware next to the parts diagram from the manual
- Cross-reference every item against the parts table in this guide
- Note any damaged, missing, or incorrect pieces before you begin
Missing parts happen. Walmart buyer reviews for this cage have documented cases where the slide-out tray arrived in the wrong size or didn't fit the base slot. If anything doesn't match, photograph it clearly and contact Yaheetech before assembly. Replacement parts can be requested via [email protected] (U.S. store contact) or [email protected] (manufacturer contact on the PDF manual). Having your order number, photos, and the model number (#610958 or Y00845A) ready will speed up the process significantly.
Step-by-step assembly: base, stand, and casters
Start from the bottom up. The stand goes together first, then the casters attach to the stand legs, and the base frame sits on top of that completed stand. This order means you won't be flipping a half-finished cage around on the floor.
- Lay the four stand legs flat. Match pre-drilled holes and identify the top and bottom ends (the bottom end has the caster mounting hole; top end connects to the base frame).
- Connect the lower storage shelf/grate between the stand legs using the shorter hex screws. Finger-tighten all four corners before snugging any of them down fully.
- Photograph the stand frame flat before you stand it up.
- Attach one caster wheel to the bottom of each leg. Two casters are fixed directional; two have swivel and lock function. Place the swivel-lock casters at the front (door side) for easier maneuvering.
- Tighten caster bolts firmly with the hex wrench. These take the full weight of the loaded cage, so don't leave them hand-tight.
- Stand the leg assembly upright. Check that all four legs sit flat on the floor and that the structure doesn't rock. Adjust any loose connections now.
- Photograph the completed stand with casters attached.
- Set the base frame / bottom pan onto the top of the stand. Align the mounting holes on the base corners with the matching holes on the stand legs.
- Insert and finger-tighten the base-to-stand screws at all four corners.
- Test that the slide-out waste tray slides in and out of the base slot smoothly before tightening the base screws fully. A tray that binds now will be harder to fix later.
- Once the tray slides correctly, tighten all base-to-stand corner screws firmly.
Step-by-step assembly: side panels, front, rear, and roof frame
With the base and stand solid, you're ready to build the cage body upward. This is where a second pair of hands really helps: one person holds panels vertical while the other drives screws.
- Position one side panel vertically against the base frame, aligning panel mounting tabs or brackets with the base-frame holes.
- Insert screws loosely into the lower connection points. Do not tighten yet.
- Repeat with the opposite side panel so both sides are loosely attached and the cage body starts to take shape.
- Photograph both side panels loosely attached: this is a good stage to check that both panels are the same height and that the wire mesh is facing inward (smooth side out).
- Attach the rear panel between the two side panels. Align all corner brackets and finger-tighten.
- Attach the front panel (the one with hinged doors). Align corner brackets with both side panels, finger-tighten.
- Check that all four vertical panels sit square: the top edges should be level and the corners should align. Look down from above if possible.
- Photograph the four-panel cage body before attaching the roof.
- Now go around all lower and corner connections and tighten firmly with the hex wrench. Work in a sequence (front-left, front-right, rear-left, rear-right) to avoid pulling one corner tighter than another.
- Lift the roof/top frame and seat it onto the top edges of the four side panels. Align mounting holes and insert screws.
- Tighten roof screws in the same cross-pattern sequence.
- Open and close each door to confirm hinges swing freely and latches engage properly. Adjust hinge screws if a door sags.
- Give the entire assembled cage a gentle shake and check for any movement at joints. Re-tighten any loose points.
- Photograph the completed cage exterior from all four sides.
Installing perches, feeders, and the interior setup
The cage ships with 3 wooden perches and 4 plastic feeder cups. How you place them matters more than most people realize, because poor placement leads to waste contamination and forces unnatural postures that stress a bird's feet and joints.
Perch placement
Mount perches at different heights rather than all at the same level. The highest perch should be near the top of the cage interior, which is where most birds prefer to rest and feel secure. Place a second perch at mid-height and a third lower, closer to feeder level but not directly above the tray (droppings fall down, and you don't want a perch positioned so the bird fouls its own food). The World Parrot Trust recommends using perches of varying diameters and textures to exercise foot muscles and prevent pressure sores. The three included dowel perches are a starting point; supplement with a natural wood perch or a rope perch for variety, sized appropriately for your species.
| Species | Recommended bar spacing | Perch diameter range | Notes |
|---|---|---|---|
| Budgerigar | 1/2" or less | 3/8" to 1/2" | Tiny feet; smaller diameter perches preferred |
| Cockatiel | 1/2" to 5/8" | 1/2" to 3/4" | Yaheetech 52" bar spacing fits comfortably |
| Lovebird | 1/2" to 5/8" | 3/8" to 5/8" | Confirm bar spacing; lovebirds escape-test gaps |
| Conure (small) | 5/8" to 3/4" | 5/8" to 3/4" | Good fit for this cage size |
| Conure (large/Green Cheek) | 3/4" | 3/4" to 1" | Check 52" cage bar spacing for larger conures |
Feeder cup placement and water setup
Clip the 4 plastic feeders to the interior wire using their spring-clip brackets. Place at least one feeder at perch height so birds can eat without climbing down to the floor. Keep feeders away from perches above to prevent fecal contamination. For water, either use one of the included cups as a water bowl or invest in a sipper bottle attachment for cleaner water access. Replace water daily. The included plastic feeders are fine for dry seed but use stainless steel or ceramic dishes for any wet food or fruit to prevent bacterial buildup in scratched plastic.
Toys and enrichment
The Association of Avian Veterinarians emphasizes enrichment rotation as a key welfare practice. Hang two or three toys from the roof frame attachment points or cross wires, but don't overcrowd the cage: birds need clear flight paths between perches, especially in a 52" cage where smaller parrots may actually fly short distances. Rotate toys every one to two weeks to maintain novelty. Avoid toys with zinc or lead components, loose strings long enough to entangle a foot, or very small bells a bird could trap its tongue in.
Where to place the cage in your home
Cage placement directly affects bird health and behavior. The general rule is: in the room where the family spends most time, against a solid wall (not freestanding in the middle of the room), away from windows with direct afternoon sun, and never in or adjacent to the kitchen.
- Place one side of the cage against a wall so the bird has a 'safe corner' to retreat to
- Avoid direct sunlight for more than 1 to 2 hours; overheating is a real risk
- Keep away from all cooking areas: Teflon/PTFE fumes from non-stick pans are lethal to birds
- Avoid drafty spots: exterior door entries, air vents blowing directly at the cage
- Keep at least 12 to 18 inches of clearance above the cage top to allow heat to dissipate
- The rolling casters mean you can move this cage seasonally: away from a cold exterior wall in winter, toward natural light in the morning
Cleaning routine and pest control
The slide-out waste tray is the cage's best maintenance feature. Line it with newspaper, plain paper towel, or a cage-liner cut to fit, and pull it out daily. Don't use scented or printed newspaper as liner if your bird steps on the tray. Full cage cleaning should happen weekly for a single small-to-medium parrot, more often for multiple birds.
- Daily: pull and replace the waste tray liner, rinse feeder cups, refill water
- Weekly: remove perches and scrub with hot water and unscented dish soap, rinse thoroughly and dry before reinstalling
- Weekly: wipe down interior wire surfaces with a bird-safe disinfectant or a diluted white vinegar solution (1:1 with water), rinse and dry
- Monthly: inspect all welds, screws, and joints for rust or loosening; re-tighten any fasteners that have worked loose
- Monthly: rotate or replace perches if they show deep scoring from beak sharpening
- Seasonally: do a full disassembly clean if the cage is used outdoors or in high-humidity environments
For pest control, red mites are the most common issue in bird cages. They hide in seams, under perch end-caps, and inside hollow tubes during the day. If your bird is scratching or restless overnight, inspect the cage in the dark with a flashlight: mites appear as tiny moving red dots on the wire. Treat with a bird-safe mite spray and wash all cage components thoroughly. The powder-coated surface resists mite attachment better than raw metal, which is a reason to keep the finish in good repair.
Seasonal protection for this cage
The Yaheetech 52" is designed as an indoor cage but many owners move it to a porch or covered outdoor area in warm months. If you do this, cover the top and three sides with a breathable cage cover or outdoor fabric during peak sun hours to prevent overheating. Bring the cage back indoors once outdoor temperatures drop below 65°F (18°C), sooner for tropical species. Moisture is the biggest enemy of the powder coat: if the cage stays damp overnight, rust will develop at welds within a season. In humid climates, wipe the cage frame dry after any rain exposure. In winter, keep the cage away from single-pane windows where surface temperatures can drop significantly even indoors.
Safe customization and DIY modifications
The Yaheetech 52" is popular for DIY expansions because it's modular. The most common modification I've seen documented in the bird-owner community is connecting two cages side by side by removing adjacent side panels and securing them with zip ties or custom-cut wire connectors to create a double-width flight space. Done carefully, this effectively doubles flying room for around $360 total, with a community-documented version using zip ties to join two cages at the matching wire grid lines. If you try this, make sure the connection is completely smooth with no sharp wire ends protruding into the combined interior, and that all entry points between the two sections are at least as large as your bird's wing spread.
For smaller customizations, you can add extra perches by threading natural wood dowels (sanded smooth, free of toxic wood treatments) through the wire bars and securing them with stainless steel hex bolts. You can also attach a mineral block or cuttlebone holder to the interior wire using a stainless steel clip. Avoid any aftermarket parts that use galvanized (zinc-coated) wire inside the cage: zinc toxicosis is a documented risk in parrots that chew on galvanized metal.
Troubleshooting common problems
The slide-out tray doesn't fit or binds
This is the most-reported issue for this cage. If the tray is too wide, too narrow, or hits a lip when sliding, first confirm that the base frame screws are all the same tightness: an overtightened corner can warp the slot opening slightly. If the tray is genuinely the wrong size (and this does happen based on verified buyer reports), contact Yaheetech with your order number and photos of the tray and the slot. They do supply replacement trays. In the meantime, a cut piece of heavy-duty plastic sheeting or a baking tray of the correct dimensions makes a workable substitute.
Panels won't align or corner joints gap
Loosen all screws on the problem corner back to finger-tight, reposition the panels, and re-tighten in a cross pattern. Never tighten one corner fully before the others are started: this pulls the frame out of square. If a screw hole has stripped, a slightly larger self-tapping screw of the same head type, or a stainless steel bolt with a matching nut, will restore the joint.
Surface rust appearing after assembly
Light surface rust at weld points is documented on some Yaheetech cage units. Address it early: let the area dry completely, lightly sand with 400-grit sandpaper, wipe clean, and apply a thin coat of bird-safe, non-toxic spray paint or a dedicated rust-inhibiting primer. Products labeled as safe for use around pets when fully cured are widely available at hardware stores. Don't let rust spots go untreated: they spread under the powder coat and eventually undermine structural connections.
A door latch won't stay closed
Check that the door panel screws haven't loosened, which lets the door sag and misalign with the latch. Re-tighten the door hinge screws first. If the latch itself is loose or bent, add a secondary bird-safe lock: a small carabiner or a spring-snap clip through the latch ring works well. Parrots particularly benefit from a latch that requires two separate actions to open, which reduces escape risk.
Finding the manual and sourcing replacement parts
The official Yaheetech 52" assembly manual for model #610958 is available as a downloadable PDF. The Yaheetech 52-inch Wrought Steel Standing Large Flight King Bird Cage User Manual (manuals.plus listing) lists the assembled cage dimensions as approximately 31.1" L x 20.4" W x 52.0" H. It is hosted on the Amazon product listing page under 'Technical Details' or 'Documents' and on yaheetech.shop under the product's resource section. The manual includes a QR code on its cover page that links directly to the download. It contains the full exploded-parts diagram, a labeled parts grid with quantities for every fastener and component, and manufacturer contact information.
- Model numbers to reference: #610958 or Y00845A (check your box label for the exact variant)
- Manufacturer support email (PDF/manual): [email protected]
- U.S. store contact (yaheetech.shop): [email protected]
- PDF manual location: Amazon product listing (Documents section) or yaheetech.shop product page
- When contacting support: include your order number, the model number from the box, and clear photos of the issue or missing part
How this cage compares to similar 52" models
If you're assembling a different 52" cage and landed on this guide, the assembly sequence for comparable models is nearly identical because they share the same modular panel-and-stand design. Here's a quick comparison of the major specs:
| Model | Assembled dimensions | Bar spacing | Included perches | Included feeders | Notable differences |
|---|---|---|---|---|---|
| Yaheetech 52" (#610958) | 31.1" L x 20.4" W x 52.0" H | ~0.6" (1.5 cm) | 3 wooden | 4 plastic | Hammered black and white variants; PDF manual on Amazon |
| PawHut 52" (D10-075) | ~30.7" L x 20.4" W x 52" H | ~0.6" (1.5 cm) | Varies by variant | Varies by variant | Manuals.plus has full instruction PDF; slightly narrower base on some variants |
| Zeny 53" | ~31" L x 20" W x 53" H | Varies; verify before purchase | 3 perches typical | 4 cups typical | Very similar build; 53" height on some spec sheets |
| Zeny 61" | ~31" L x 20" W x 61" H | Varies; verify before purchase | 3 perches typical | 4 cups typical | Taller variant; extra stand height; assembly steps identical to base 52" process |
| HQ bird cage (52" class) | Varies by model | Varies; check spec sheet | Varies | Varies | Multiple sub-models; HQ manual steps closely parallel Yaheetech panel-attach sequence |
The assembly steps in this guide will get you through a PawHut, Zeny, or HQ 52" build with minimal adjustment. For model-specific assembly notes on the larger variant, see the Zeny 61" bird cage instructions for step-by-step guidance. For step-by-step instructions specific to the Zeny 53 cage, see the Zeny 53 bird cage instructions. For HQ models, see hq bird cage assembly instructions for model-specific guidance. The main practical difference between these cages is the exact fastener style (some use Phillips head rather than hex), so confirm your included wrench type before you start. Bar spacing, which determines species suitability, can differ between colorways and production runs even within a brand, so always measure your specific cage rather than relying purely on published specs.
FAQ
What primary manufacturer documents should I obtain before writing an assembly and care guide for the Yaheetech 52" bird cage?
The official Yaheetech model PDF/manual (model #610958 and listed Y00845A variants) is essential — it contains exploded parts diagrams, the parts grid (fastener counts), step-by-step assembly diagrams, included tools (Allen wrench) and manufacturer contact info ([email protected] / [email protected]). Downloadable copies are hosted on Amazon and Yaheetech product pages (example PDF: https://m.media-amazon.com/images/I/B1mlJvBftSS.pdf). Also capture the Yaheetech product page(s) with photos/specs (yaheetech.shop product listing) to verify 'what's in the box' and retail packaging images.
Which retailer pages and product listings are useful to verify parts, dimensions and included accessories?
Use major retailer listings (Chewy, Walmart, Amazon product pages) that repeat product specs and show in-box photos or descriptions. These commonly confirm assembled dimensions (~31.1" L × 20.4" W × 52.0" H), included perches (3 wooden), feeders (4 plastic), casters, slide-out tray and stand. Keep copies of review text and product spec blocks in case of variant differences (e.g., Chewy, Walmart, Amazon, manuals.plus).
What authoritative avian husbandry sources should be cited for species‑appropriate cage setup (bar spacing, perch size, enrichment)?
Cite veterinary and avian welfare authorities such as the Merck Veterinary Manual (bar‑spacing and minimum cage sizing tables), the Association of Avian Veterinarians (AAV) position/husbandry statements (enrichment, health checks), and trusted charities/aviculture resources (World Parrot Trust / Parrots.org) for recommendations like 'biggest cage possible', diverse perch diameters and rotation of enrichment. These sources supply species‑level guidance for budgies, cockatiels, conures, and parrots.
What model‑specific technical details must the article include for accurate assembly instructions?
Include the exact parts list and fastener counts from the Yaheetech parts grid (labels and quantities from the PDF), the assembly sequence with referenced diagrams/pages, which hardware is supplied (Allen wrench, screws, casters), and exact dimensioned panels and door locations. Also note the slide-out tray and feeder locations, plus factory-finish notes (powder-coat) that affect handling and painting. Reference the PDF page/artwork for exploded views and fastener codes.
Which pre‑assembly safety checks and preparations should be documented?
Document steps to inspect boxed contents against the manufacturer parts list (verify all numbered parts and hardware C/A counts), check for damaged/wrong parts (e.g., ill-fitting tray), verify bar spacing and weld integrity, protect surfaces when assembling (cardboard on floor), assemble with two people for heavy panels, and wear gloves/eye protection. Include instructions for contacting Yaheetech support and retailer returns if parts are missing or damaged.
What species‑appropriate interior setup guidance should be given and what references support it?
Provide per‑species recommendations: recommended minimum cage footprint and bar spacing (use Merck and AAV tables), perch variety (multiple diameters and textures; cite World Parrot Trust and AAV), placement of feeders/water away from debris, toy rotation schedules and safe materials, and bathing options. State numbers/dimensions as ranges tied to species (e.g., budgies: ~1/2" bar spacing; cockatiels: 1/2"–5/8"; conures/small parrots: 5/8"), and cite Merck/AAV for exact spacing guidance.
Next Article
HQ Bird Cage Assembly Instructions: Complete DIY Guide + Photos
Step-by-step HQ bird cage assembly guide with tool lists, safety checks, photo tips, maintenance & troubleshooting.