Set up perches by placing at least two or three perches at different heights, using varied diameters and textures so your bird's feet grip different pressure points each day. Mount each one securely to the cage bars, keep every perch away from the area directly above food and water dishes, and make sure there's enough clearance so your bird's tail doesn't brush the cage wall. That's the core of it. Everything below fills in the details so you can get it right the first time without guesswork.
How to Set Up Perches in a Bird Cage: Step-by-Step

Maya Bennett
12 Jun 2026

What good perch setup actually looks like
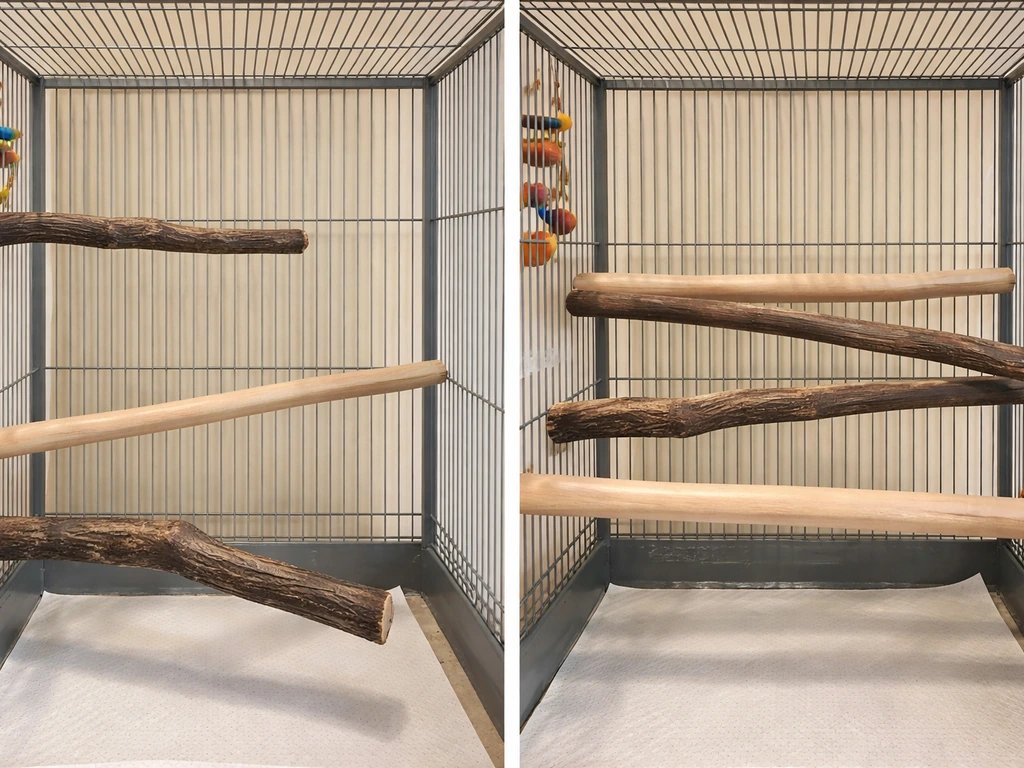
A well-set-up cage has perches at two or three distinct heights, uses at least two different diameters, and keeps clear flight or hop paths between them. The bird can move from a low perch to a high perch without bumping into walls, feeders, or toys. The highest perch is the sleeping spot, and it sits well away from the top of the cage so the bird doesn't feel crammed against the ceiling.
Food and water bowls are never directly below any perch. The bird's tail has clearance from the side bars when it's perched normally. Foot health is the real test: if you flip your bird gently and check the pads on the underside of its feet regularly, there should be no redness, sores, or flat worn patches. That's what you're aiming for.
Think of the perch layout as a mini climbing route. The bird should be able to step or hop between perches without a big jump that risks a fall, but perches shouldn't be so close together that they crowd the space or make it hard to flap. If you're setting up a cage for a parakeet, budgie, conure, or similar small-to-medium bird, two to four perches is usually the right number for a standard cage. More perches in a tight space just create clutter and make cleaning harder.
Choosing perch materials, diameters, and sizes
Diameter is the most important spec to get right
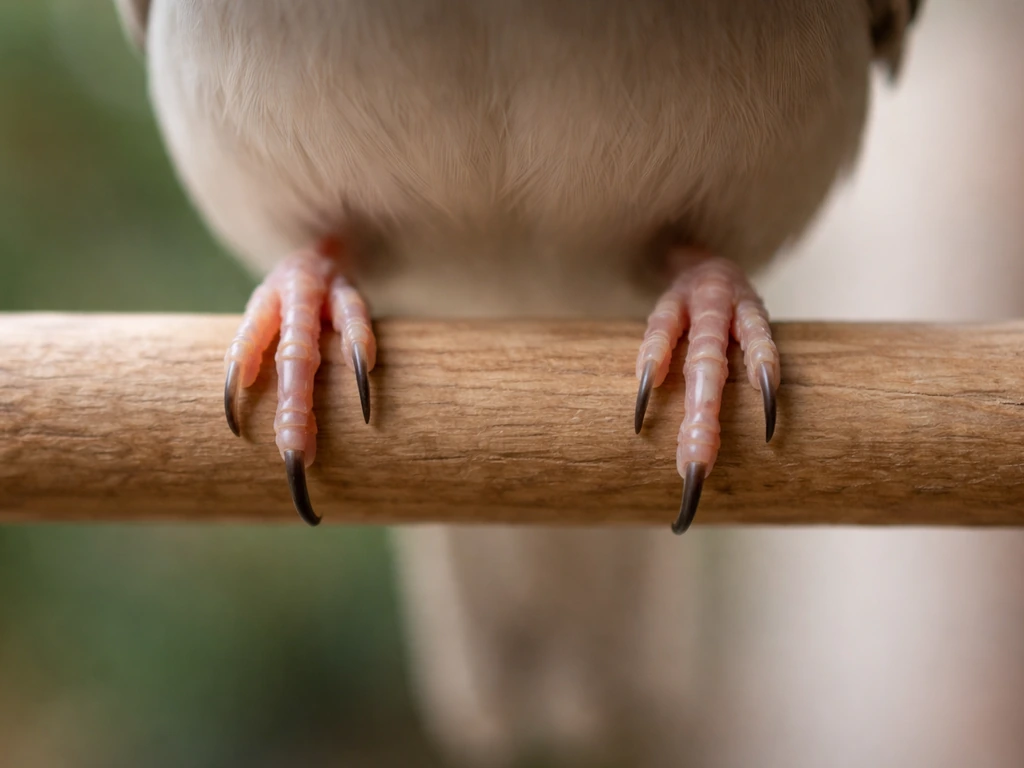
The general rule is that the bird's toes should wrap about two-thirds of the way around the perch. The RSPCA puts it a slightly different way: the bird's nails should just meet underneath when it grips. Either way, you want a snug grip, not white-knuckle tension and not a loose, flat-footed stand. For small birds like finches, canaries, and budgies, that means perch diameters in the 3/8 to 3/4 inch range.
For cockatiels, sun conures, and lories, aim for 1/2 to 7/8 inch. Larger parrots need proportionally thicker perches. The key thing most people miss is variety: if every perch in the cage is the same diameter, your bird loads the exact same pressure points on its feet every time it lands. [Over time, this causes pressure sores on the pads.
](https://nilesanimalhospital. com/files/2012/05/Pressure-Sores. pdf) Use at least two different diameters.
| Bird Size / Species | Recommended Diameter Range | Notes |
|---|---|---|
| Finch, canary | 3/8" – 1/2" | Thinner end of range; natural branch texture ideal |
| Budgie, parakeet | 3/8" – 3/4" | At least 4 inches long; upper perch should not be abrasive |
| Cockatiel, sun conure, lory | 1/2" – 7/8" | Mix two diameters; toe-wrap test is a reliable guide |
| Medium parrot (Caique, Pionus) | 3/4" – 1.25" | Natural hardwood branches work well here |
| Large parrot (African Grey, Amazon) | 1" – 1.5" | Rope perches add grip variety alongside wood |
Materials: what to use and what to avoid
Natural hardwood branches are the best all-round perch material. Untreated manzanita, apple, willow, and birch are all safe, naturally irregular in shape, and give birds varied grip angles along their length. The irregular shape is actually a benefit because it exercises different parts of the foot with every grip. Rope perches are good for adding softness and a different texture, especially for older birds or birds with arthritis. Cement or concrete perches can be useful for keeping nails trimmed naturally, but they must never be the only perch in the cage. Used daily on rough concrete alone, foot pads will develop sores and abrasions. One cement perch alongside two or three softer options is fine.
Avoid sandpaper perch covers. They were sold as nail-trimming tools for years but the abrasion causes chronic foot irritation and does not effectively trim nails. Toss them. Also avoid any pressure-treated lumber, full stop. Treated wood is preserved with chemicals including CCA (chromated copper arsenate), which contains arsenic, chromium, and copper. These compounds can leach from the wood surface and pose a real toxicity risk to birds that chew and grip the perch all day. Stick to woods you can verify are untreated.
- Safe: natural hardwood (manzanita, apple, willow, birch, dragonwood), cotton rope perches, one ceramic or cement perch as part of a mixed setup
- Use with care: acrylic or PVC perches (fine for variety but slippery if worn smooth; replace when grip is gone)
- Avoid: sandpaper/sandpaper perch covers, pressure-treated lumber (CCA or other preservatives), any painted or chemically sealed wood, cedar and redwood (natural oils can be irritating)
Where to put each perch inside the cage
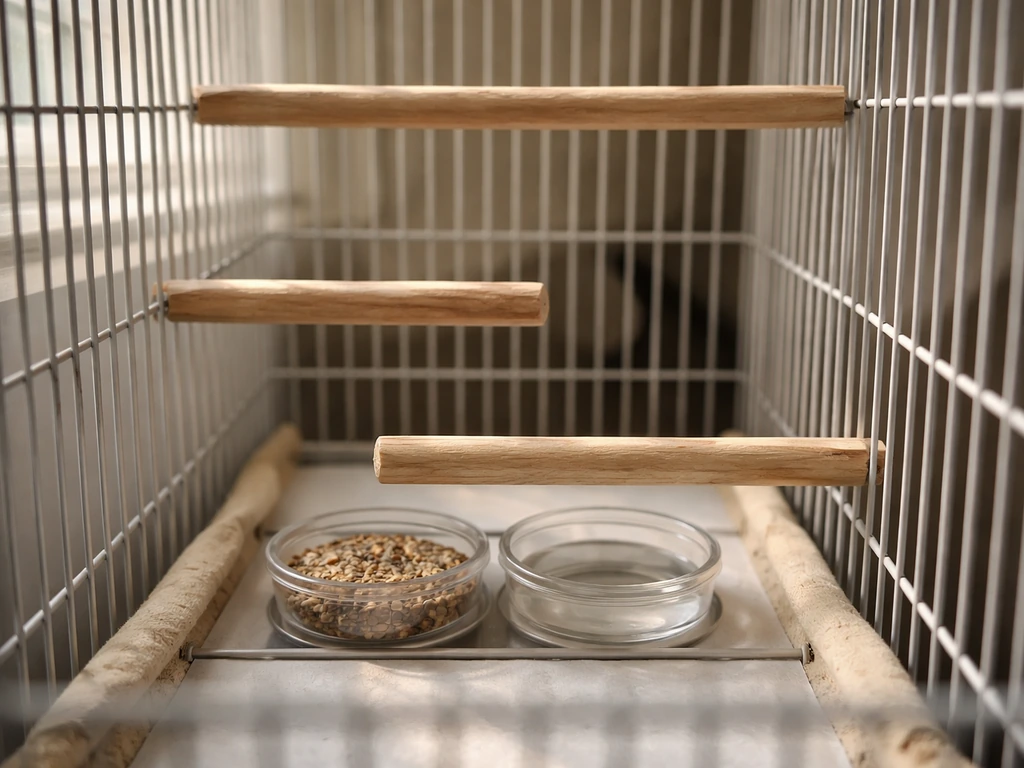
Height placement follows a simple hierarchy: the highest perch is the sleeping perch, and it should sit near the top of the cage but with enough room above it that the bird doesn't press against the cage roof. Lower perches are activity perches used during the day. Place them at one or two intermediate heights so the bird has natural stepping-stone movement without needing to fly a big distance to get around the cage.
The most critical placement rule is keeping perches out of the drop zone above food and water. Birds concentrate their droppings near their favorite perches, and any food bowl sitting directly below a resting perch will be contaminated quickly. Position bowls off to the side or near the lower third of the cage where there are no perches above them. If your cage design makes this awkward, feeder protector guards can help in a pinch, but repositioning the perch is always the cleaner fix.
Check tail clearance before you finalize any position. With the perch mounted, hold or imagine your bird sitting on it in its normal upright posture. The tail should have at least an inch or two of space before it touches the cage bars or the side wall. A tail rubbing against bars every time the bird sits gets dirty, frayed, and uncomfortable fast. This is especially worth checking in smaller cages or when mounting a perch close to a corner.
- Highest perch: near the top of the cage, used for sleeping; leave clearance above
- Mid-level perch(es): activity and play; stagger left-to-right so bird can hop between them
- No perch directly above food or water bowls
- Tail clearance: at least 1–2 inches from cage bars when bird is perched normally
- Leave open space in the lower third of the cage (floor-level birds like to forage there)
- Perches should not block wing-flapping space or create dead-end traps between bars and accessories
How to mount perches so they actually stay put
Check bar spacing and perch hardware first

Most cage perches attach using a bolt-and-wing-nut system through the cage bars, or a push-in dowel end that wedges between bars. Before you mount anything, check that the bolt or dowel end fits through your cage's bar spacing without forcing it. If bars are too close together, you'll crack the perch fitting trying to squeeze it in. If bars are too far apart, there's nothing secure to grip and the perch wobbles or pulls through. For small birds like budgies and parakeets, bar spacing is typically 1/2 inch or less, which matches standard small-bird perch hardware. If you're retrofitting a perch designed for a larger cage, the hardware may be oversized and need replacing.
Step-by-step mounting
- Hold the perch against the outside of the cage bars at the height you want and mark the two bar positions where the bolt will pass through.
- Thread the bolt end of the perch through the bar gap from outside to inside the cage.
- Inside the cage, thread the wing nut or locking nut onto the bolt and tighten by hand until snug. Do not overtighten on plastic end caps or you'll crack them.
- Give the perch a firm sideways and downward tug. It should not rotate or pull loose. If it shifts, tighten further or add a second nut.
- Check that the perch sits level or at a very slight angle. A slight forward tilt (front lower than back) helps droppings fall away from the perch surface rather than pooling on top.
- Confirm tail clearance and drop-zone placement before moving on to the next perch.
For natural branch perches that don't come with hardware, you can drill a hole through each end of the branch and use stainless steel bolts and wing nuts. Stainless steel is important here; standard zinc-coated hardware can be chewed and is potentially toxic. If you're mounting a rope perch, the spring-clip or bolt-loop attachment that comes with most commercial rope perches works well, but check that the clip itself can't be pried open by a determined beak. Replace any frayed rope perch before the unraveling threads become long enough for a bird to get a toe or nail tangled.
Adjusting the setup for different species and ages
Budgies and parakeets do well with perches in the 3/8 to 1/2 inch range and respond well to natural branch-style perches with slight irregularities. For a parakeet bird cage setup, follow these perch sizing guidelines and keep the layout comfortable for daily climbing and hopping Budgies and parakeets do well. Their cage perch should be at least 4 inches long so there's room to shuffle and turn. The upper sleeping perch especially should not be abrasive.
If you're building out a dedicated budgie or parakeet cage, a setup guide specific to those species covers additional cage layout tips that go beyond perch placement alone. If you want a complete walkthrough of your budgie's cage setup, including placement and safety details beyond perches, follow a budgie-specific guide for the full process species covers additional cage layout tips.
Conures are active and like climbing as much as perching. Give them at least one higher perch for sleeping and one or two mid-level perches they can use as launching points for climbing the bars. Conures are also heavy chewers, so natural hardwood perches will need replacing more often. A conure cage setup has its own quirks around toy placement and perch durability that are worth reading up on separately. A conure bird cage setup guide also helps you plan toy placement and durable perches for safe, comfortable climbing conure cage setup.
Older birds or birds with arthritis or foot problems need softer perch surfaces. Rope perches and foam-covered dowels are gentler on inflamed joints. If you have a bird recovering from bumblefoot (plantar ulcers), ask your vet about padded perch covers temporarily, and make sure you have softer landings at lower heights so the bird doesn't have to make big drops to reach food and water. Disabled birds often need a much lower perch setup altogether, with perches close together and near the cage floor so they can navigate safely without long falls. For a disabled bird cage setup, focus on lower, safer perch spacing and reduce fall risk around food and water.
Young fledgling birds or recently acquired birds that aren't yet confident flyers benefit from closer perch spacing, lower heights, and perches that are slightly thicker on the gripping surface for more secure landings. As the bird builds confidence, you can spread perches out and add height variety.
Troubleshooting common perch problems
| Problem | Likely Cause | Fix |
|---|---|---|
| Bird won't use a new perch | Unfamiliar texture, position, or material; birds are often cautious of new objects | Place the new perch near a perch the bird already uses; give it a few days before concluding it's rejected |
| Perch wobbles or spins | Wing nut loose or bar spacing too wide for hardware | Retighten; add a second nut; or replace with perch that fits your bar spacing |
| Food and water contaminated with droppings | Perch directly above feeders | Move the perch to the side or relocate the bowl; this is the most common placement mistake |
| Bird's feet look red, swollen, or have flat sore patches | All perches the same diameter, or too much time on abrasive surface | Add a second diameter perch; remove or reduce use of cement perch; see a vet if sores are present |
| Tail is dirty or frayed on one side | Perch mounted too close to cage bars, no tail clearance | Move perch inward or choose a shorter perch; check clearance again |
| Bird keeps sliding off perch | Perch surface worn smooth, or rope perch unraveling | Replace the perch; sand smooth acrylic perches lightly with fine-grit sandpaper to restore grip |
| Bird trapped or foot caught in bars near perch | Perch mounted too close to bar edge or bar spacing too wide | Reposition perch away from corners and bar gaps; verify bar spacing is appropriate for bird size |
One issue worth calling out specifically: birds that refuse every new perch you introduce. This is common and usually not a big problem. Birds are neophobic by nature and often treat a new object as a threat for the first few days. Try placing the new perch next to a favorite existing one so the bird encounters it during normal movement. Omlet notes that parakeets especially can be wary of perch changes but generally come around. If a bird actively avoids a perch for more than a week, check if the surface is slippery, the diameter is wrong, or the position feels unsafe (too close to a wall, too exposed, bad tail clearance).
Keeping perches clean and safe over time
Perches need two kinds of attention: regular cleaning and periodic replacement. For daily maintenance, wipe down perches your bird uses as sleeping spots, since those accumulate the most droppings overnight. A damp cloth with a bird-safe disinfectant is enough for most days. For a deeper clean, remove wooden perches and scrub them with a stiff brush under warm water. Let them dry completely before putting them back; damp wood can harbor mold and bacteria. Never use bleach on natural wood perches your bird will chew.
Rope perches need weekly inspection. Look for unraveling threads longer than about half an inch. A bird can get a toe or nail looped in a loose thread, panic, and injure itself badly trying to pull free. As a general guide, rope and natural wood perches used heavily by active chewers like conures may need replacing monthly. For birds that don't chew much, a good natural branch perch can last several months with cleaning.
Once a month, take each perch out and inspect it closely. Run your fingers along the surface to feel for splinters, sharp edges, or cracks in wooden perches. Check that bolt fittings are still tight and that end caps on plastic or acrylic perches haven't cracked from overtightening or chewing. Check the bottoms of your bird's feet at the same time. Redness or swelling on the foot pads is your early warning sign that a perch is too rough, too narrow, or being used too exclusively.
Rotation and upgrades
Rotating perch positions every few weeks gives the bird mental stimulation and prevents over-reliance on one foot posture. Swap the mid-level perch to the other side of the cage, or replace a worn natural branch with a different species of wood at a slightly different diameter. This is one of the easiest low-cost ways to enrich a cage without buying new toys. When you're ready to upgrade, consider adding a swing perch (good for balance and exercise), a corner platform perch for large birds that like to spread out, or a heated perch for older birds in cold climates. None of these should replace the core two-to-three perch layout; they add to it.
Your final perch setup checklist
Run through this before you consider the cage done. It covers every major failure point in one pass.
- At least two perches at different heights, with the highest designated as the sleeping perch
- At least two different perch diameters used in the same cage
- Diameter check: bird's toes wrap about two-thirds around the perch, or nails just meet underneath
- No perch positioned directly above food or water bowls
- Tail clearance confirmed: at least 1–2 inches from cage bars when bird sits normally
- All perches firmly mounted with no wobble or rotation
- Hardware is stainless steel or bird-safe; no zinc-coated or corroded fittings
- No pressure-treated wood, sandpaper covers, or toxic materials used
- Cement or concrete perch (if used) is one of several perch types, not the only option
- Rope perches inspected for loose threads; replaced if unraveling
- Flight path between perches is clear of toys, feeders, and dead-end gaps near bars
- Lower third of cage is open for foraging and floor movement
- Cleaning schedule set: wipe sleeping perch daily, deep clean and inspect monthly
FAQ
Can I set up perches with just one height if my cage is small?
Ideally no. A single perch forces the bird to use the same pressure points constantly, increasing the chance of sore pads. If space is truly limited, use two perches at different heights (even a small step-up) and vary the diameter or texture between them, so the feet get different contact angles.
How do I choose perch diameters if my bird keeps slipping or gripping too tightly?
If toes cannot wrap about two-thirds of the way, the bird may slip and cling with excessive force. If nails splay outward or the bird looks strained to stand, the perch may be too narrow or too abrasive. Re-measure after installation, then adjust one variable at a time by switching only the perch diameter, keeping the height and placement rules the same.
Is it okay to use dowel perches without irregularities?
It can be okay as a temporary option, but smooth dowels do not provide the same changing grip angles as natural branches. If you do use dowels, combine them with at least one natural wood branch perch and one softer-texture perch (rope or padded) so the bird has more than one foot-contact pattern.
Where should the sleeping perch go if my cage has a flat top or slanted roof?
Use the sleeping perch near the upper area but leave comfortable space above so the bird does not press against the roof. Also confirm tail clearance when perched in its normal posture, corners included, because slanted tops can shift the bird’s angle and cause side-bar rubbing even when the “tail space” looks fine at first.
How far should perches be from toys, ladders, and climbing ropes?
Keep enough empty space for normal flapping or hopping between perches without the bird brushing cage walls or knocking directly into toys. A good rule is to avoid “pinch points” where a bird can get caught between a perch and a toy, then recheck tail clearance from the side once toys are installed.
What’s the best way to prevent droppings from falling near food if I cannot move the perches?
First, reposition perches so no perch sits directly above a bowl. If the cage layout makes that impossible, place food bowls slightly off-center and use a feeder guard designed for your bar spacing. Still keep perches higher than the guard so the bird is not defecating directly onto the feeding area from its usual resting spot.
How do I know if my perch surface is too rough, even if there are no obvious sores yet?
Check for early signs beyond redness, such as rough callus buildup that looks flat or shiny, or changes in how your bird grips. If the bird repeatedly shifts feet quickly, avoids stepping onto the perch, or shows persistent side rubbing, the surface may be too narrow or abrasive even before a true sore appears.
My bird keeps landing on one perch and ignoring the others. Should I remove the unused perches?
Not immediately. Many birds test new objects cautiously and may only use the “familiar” perch first. Place the new perch next to the favorite one, make sure it is not slippery, confirm correct diameter and tail clearance, and give it about a week. If the bird consistently refuses for longer, replace the perch material or adjust position, not just the height.
Can I use heated perches, and are there placement rules I should follow?
Yes for some older birds, but treat them like any other perch: they should not be over the food and water drop zone, and you still need tail clearance. Also ensure the heated section cannot overheat when the bird presses against it for long periods, and confirm there is no exposed wiring or loose parts the bird can chew.
How often should I replace wood perches versus rope perches?
Rope perches need more frequent inspection and replacement if threads loosen. Natural branches often last longer but should be replaced sooner for heavy chewers, like conures. A practical approach is monthly full inspections (tightness, cracks, splinters), plus more frequent rope checks (weekly) for unraveling beyond about half an inch.
Are there safe alternatives if I only have a cement or concrete perch?
Use it only as a supplement, not the sole perch. Cement can promote nail wear, but it also increases abrasion on foot pads if used exclusively. Pair it with softer options (rope or natural wood) and keep cement positioned so the bird still has multiple comfortable landing spots throughout the cage.
What should I do if I mounted a perch and now it wobbles?
Do not “wait it out.” A wobbling perch can change how the bird grips (often increasing strain) and can lead to foot issues or falls. Refit the mount immediately, confirm bar spacing matches the perch hardware, and replace the hardware if the fit required forcing the fitting or if it feels loose without tension.