You can divide an existing bird cage by cutting a piece of stainless-steel wire mesh or rigid acrylic panel to match your cage's interior dimensions, then securing it to the frame with bird-safe zip ties, cage clips, or stainless-steel wire twisted at 6-to-8-inch intervals. The divider needs to sit flush against all four sides with no gap larger than the bar spacing already on your cage, no sharp edges, and enough open mesh area that airflow and visibility between sections stay normal. Done right, you get two fully functional compartments, each with its own perches, food, and water, and neither bird can reach the other.
How to Divide a Bird Cage Safely: Step-by-Step Guide

Maya Bennett
14 Jun 2026

Why people divide cages and what the divider actually needs to do
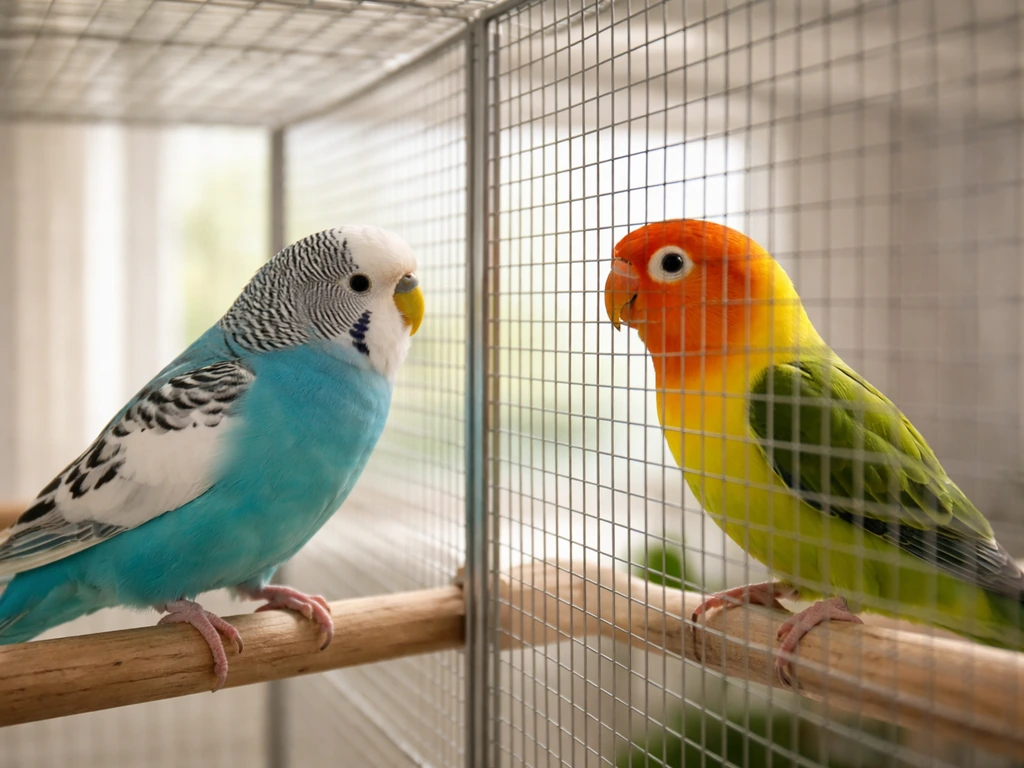
The most common reasons are temporary separation after a new bird arrives (quarantine), breaking up aggression between established birds, setting up breeding pairs with controlled contact, or rehousing a bird that needs recovery space without moving it to a completely different cage. Each of these situations requires the same core thing: a barrier that is physically secure enough that neither bird can squeeze through, get a foot caught, or chip a beak through the gaps, while still allowing normal airflow and daily maintenance on both sides.
Quarantine use deserves a specific mention because it raises the stakes. When you bring in a new bird, the divider needs to do more than just prevent physical contact. It should minimize shared airflow as much as practical in a home setting, and you should treat it as a contamination boundary. That means cleaning tools, hands, and feeders on one side before touching the other. For anything more serious, a certified avian vet should advise on housing and isolation protocols.
Whatever your reason, the divider has three non-negotiable jobs: prevent escapes and entrapment, maintain ventilation, and keep both halves fully serviceable for cleaning. If a design compromises any of those three, it needs to be rethought before the birds go in.
Measure your cage and plan the divider layout
Before you buy or cut anything, measure the interior width and height of the cage at the exact point where the divider will sit. Do not measure the outside of the cage. Interior dimensions can be an inch or more smaller than exterior ones, and a panel cut to the wrong size will either not fit or leave a dangerous gap. Note the bar spacing on the existing cage walls too, because your divider mesh opening should match or be smaller than that measurement.
Decide early whether the divider runs side to side or front to back. Before you finalize your divider layout, use these steps for how to measure a bird cage so the interior split will actually fit where it will sit. A side-to-side split gives each bird a full front-door panel, which makes feeding and cleaning much easier. A front-to-back split can work in wide walk-in aviaries but is awkward in standard pet cages because one bird ends up behind the other with no direct door access. Stick with a side-to-side split for most home cages.
Plan the position of each side's feeders and water before you finalize where the divider goes. You want at least 6 to 8 inches between the divider and any feeder hook or perch mount so birds are not constantly crowding the barrier. The bottom tray should still slide out cleanly, so check that the divider does not land on or block the tray track. If your cage has a single sliding tray that spans the full width, you may need two smaller replacement trays, one per section, or a tray liner system that can be divided.
Quick measurement checklist before you buy materials
- Interior width (left side bar to right side bar) at the divider position
- Interior height (floor to roof bar or tray lip to top) at the divider position
- Bar spacing on the existing cage walls
- Depth of the bottom tray and whether it slides freely with a panel installed above it
- Location of existing door panels, perch holes, and feeder ports that will be on each side after the split
- Whether there is a horizontal cross-bar in the cage frame you can use as an anchor point for the divider
Safe divider materials and what to avoid
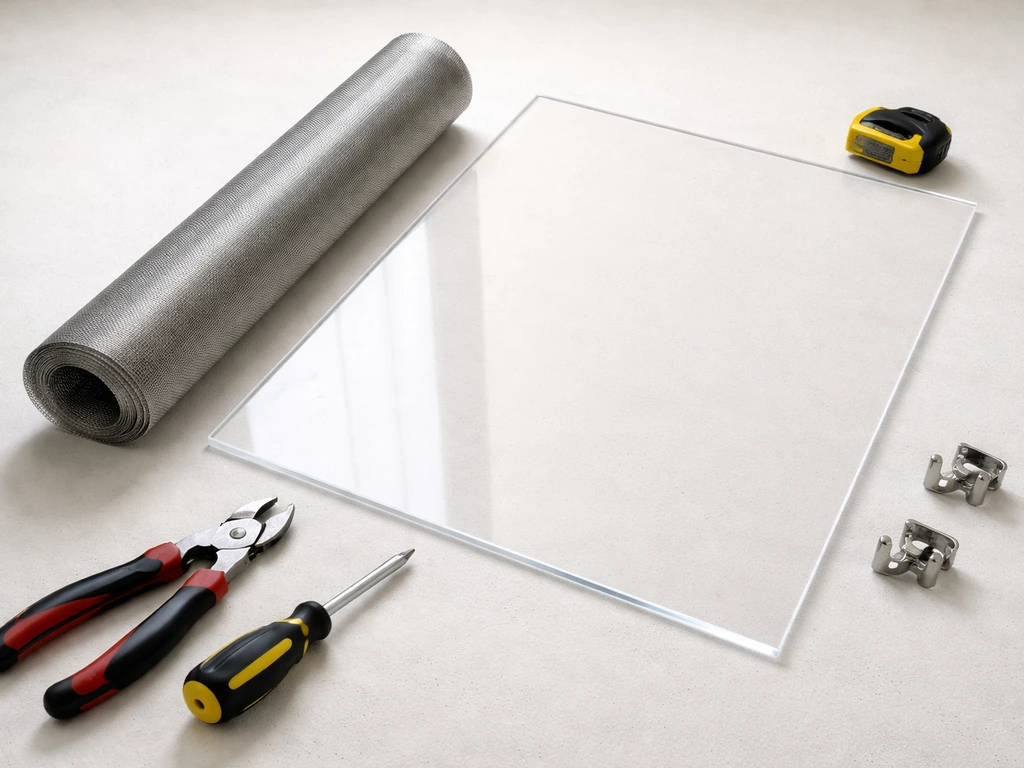
The safest material for a DIY cage divider is 304 stainless-steel wire mesh with a weld or knit construction. KnitMesh’s animal and bird enclosure mesh technical data specifies 304 stainless steel as the standard material for this type of cage divider mesh baseline. It does not rust, it cannot leach zinc or other toxins, and birds can grip it without risk of poisoning. Standard pet-safe mesh openings for small parrots and cockatiels are around 0.5 by 1 inch. For finches and canaries, go tighter: 0.5 by 0.5 inch is safer because small heads can get through surprisingly large gaps.
Rigid acrylic or polycarbonate sheet is the other practical option. A 3-to-4mm thick clear panel gives you full visual separation, which can be useful for gradually introducing birds or for true quarantine where you want minimal shared air. Drill a grid of 0.25-inch holes in a regular pattern across the panel to maintain airflow. Without ventilation holes, acrylic creates a dead-air pocket that is bad for both compartments.
Avoid galvanized steel wire mesh. Birds chew cage surfaces, and galvanized coatings contain zinc that can cause zinc toxicosis. Even painted galvanized mesh is risky because birds will strip the paint. Similarly, do not use hardware cloth with sharp cut edges left exposed. If you do use it as a last resort, fold all cut edges back on themselves and file them smooth, or cap them with rubber edge trim. Wood panels are not suitable as dividers for chewing species like cockatiels or small parrots because the wood will be destroyed and potentially ingested.
| Material | Safety | Airflow | Visibility | Best for | Avoid if |
|---|---|---|---|---|---|
| 304 stainless-steel mesh | Excellent, no toxic coating | Excellent | Partial | Most species, long-term use | You need full visual separation |
| Clear acrylic/polycarbonate (drilled) | Good if no sharp edges | Good with drilled holes | Full | Quarantine, introducing birds | You skip drilling ventilation holes |
| Galvanized steel mesh | Poor, zinc risk | Excellent | Partial | Not recommended | Always, for birds that chew |
| Painted wire mesh | Poor, paint strips | Excellent | Partial | Not recommended | Birds with heavy chewing habits |
| Solid wood panel | Poor for chewers | None without cuts | None | Not recommended | Parrots, cockatiels, parakeets |
Step-by-step: install a removable divider securely
A removable divider is almost always better than a permanent one. It lets you clean both sides independently, reconfigure the cage later, and remove it if birds settle together. Here is how to install one that stays firmly in place without damaging the cage frame.
- Cut your mesh or acrylic panel to the interior dimensions you measured, subtracting about 2mm on each side so it fits without forcing. For mesh, use tin snips or an angle grinder with a cutting disc. For acrylic, score and snap for thinner sheets or use a jigsaw with a fine-tooth blade.
- File or sand all cut edges smooth. Run your finger along every edge before handling the panel near birds. For mesh, fold cut wire ends back with needle-nose pliers so no wire point is exposed.
- If you are using acrylic, drill your ventilation holes now. A grid pattern with 0.25-inch holes spaced about 1.5 inches apart across the full panel surface gives good airflow without weakening the sheet.
- Position the panel inside the cage at your planned divider location. It should rest against the vertical cage bars on both sides and contact the top and bottom of the cage interior.
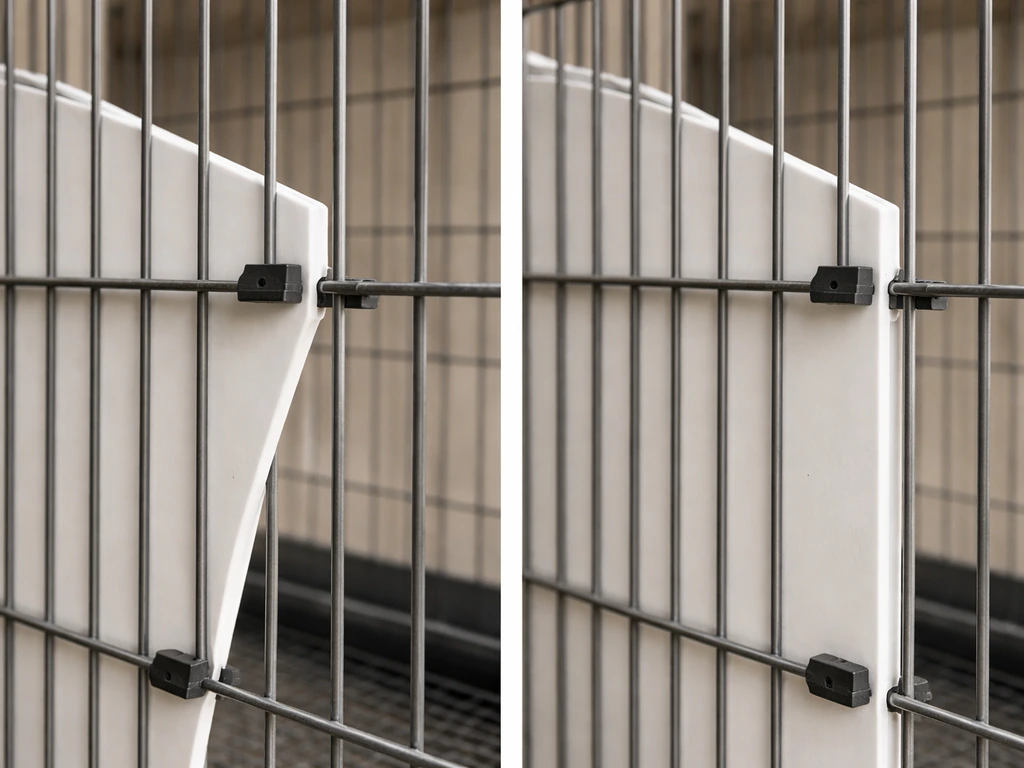
- Attach the panel to the cage bars using stainless-steel zip ties or small cage clips. Start at the four corners, then add attachment points every 6 to 8 inches along all four edges. Pull each tie firmly but do not overtighten to the point of bending the cage bars.
- Test the divider by pressing it firmly with your hand from both sides. There should be no flex, no shift, and no gap you can get a finger under at the edges.
- Trim all zip tie tails flush with the clip head using side cutters so there are no protruding points inside the cage.
- Do a final gap check along every edge. Run a pencil around the perimeter. If it passes through anywhere, that gap needs to be closed with an extra tie or a strip of folded mesh wired into place.
To make the divider truly removable, use cage clips (also called C-clips or J-clips) on the top and bottom edges instead of zip ties. These can be opened with pliers in seconds and reattached just as fast. Zip ties on the side edges hold the panel laterally while the clips on the top and bottom let you lift it out when needed.
Setting up perches, feeders, and water on both sides
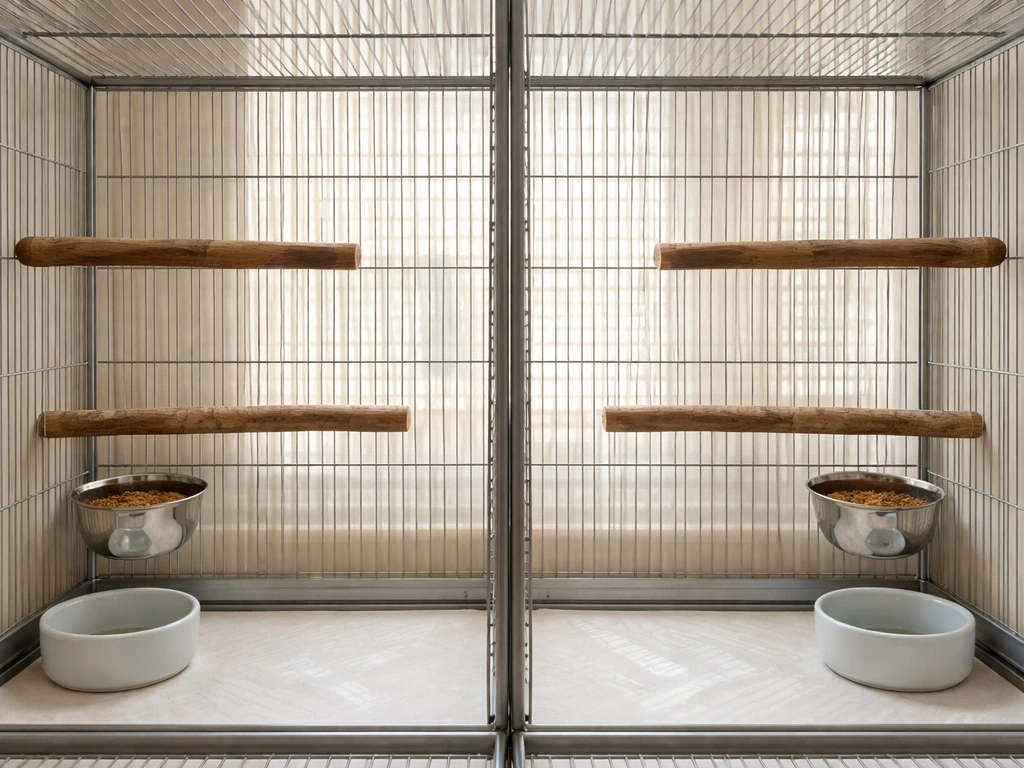
Each side of the divided cage needs its own complete setup. Do not assume one side can borrow resources from the other through the divider mesh. Birds near a shared feeder will fight through the barrier and can injure toes or beaks trying to reach food on the other side.
For cockatiels and small parrots, plan at least two perches per section: one at mid-height where the bird will spend most of its time, and one higher as a roosting perch. Keep perches at least 2 to 3 inches away from the divider so the bird's tail does not contact it when turning. Place food dishes on the opposite wall from the divider so feeding time does not become a stress point near the barrier.
Petco's cockatiel guidance recommends separate dishes for dry food, fresh food, and water, especially when multiple birds share a space. Apply that thinking here too. In each divided section, use at least two dishes: one for dry food or pellets, one for water. If you have space, a third for fresh food keeps wet food from contaminating the dry mix. Hook-on stainless-steel cups that clip to the bars work well because they are easy to remove for cleaning without disturbing the divider.
For finches and canaries, position perches so they are not directly opposite each other on either side of the divider. Birds perched right at the mesh will interact constantly, which can be stressful. Angle the perches so each bird's natural resting position faces into its own section rather than toward the divider.
Cleaning, covers, and placement after dividing
Divided cages need more frequent spot-cleaning because waste from one bird can land near the divider and affect both sections. Plan to spot-clean visible droppings on bars, the divider surface itself, and nearby perches daily. The full clean cycle (wipe bars, scrub tray, rinse and dry) should still happen about once a week for most species. The divider adds one extra step: clean both faces of the panel each time, because droppings and food debris collect on the mesh or acrylic just like they do on cage bars.
If your cage uses a single bottom tray that now spans both sections, you have two options. First, slide the tray out from one side, clean it, and replace it, checking that the divider sits cleanly above the tray edge. Second, cut a piece of heavy-duty cage liner paper to fill each half independently, so you can replace one side's liner without pulling the whole tray. Either approach works as long as the tray slides freely and the divider does not bow down into it.
Cage covers after dividing need to be thought through. If you use a single cover for the whole cage at night, it still works fine as long as it drapes over the full cage and both sections get dark at the same time. If you want to put one bird to sleep earlier, you will need two separate covers sized to each half, or a cover with a dividing seam. Avoid tucking cover material into the cage interior where birds can chew it.
Placement of the divided cage in the room matters more now because you have two birds in the same footprint. Both sections need the same ambient temperature and light exposure. Do not place the cage so that a heat vent, window draft, or direct sunlight hits only one side. That creates an uneven environment that stresses the bird on the uncomfortable side. If the cage is near a wall, rotate it occasionally so both sections get equal room-side exposure.
Safety checklist and troubleshooting common problems
Run through this checklist before you introduce any birds to the divided cage. Do not skip it the first time, because problems with dividers are much easier to fix before birds are inside.
- No gap along any edge of the divider larger than the existing bar spacing on the cage walls
- All cut wire ends folded back or capped, no exposed points anywhere on the divider surface
- All zip tie tails trimmed flush, no protruding ends inside either section
- Divider does not flex or shift when pressed firmly from either side
- Bottom tray slides freely in and out without catching on the divider
- Each section has its own food dish and water cup, neither mounted directly against the divider
- Perches on both sides positioned at least 2 to 3 inches from the divider mesh
- Ventilation holes present if using acrylic, and airflow feels equal in both sections
- Both section doors open and close freely with the divider installed
- Cage exterior handles, latches, and stand hardware not stressed or shifted by the divider's weight
Troubleshooting the most common problems
Bird getting a toe or beak caught in the mesh: the mesh opening is too large for your species. Replace it with a tighter mesh and recheck the gap size against the bird's head width. As a rule, the mesh opening should not allow the bird to get its head through even partially.
Divider sagging in the middle: you need more attachment points. Add zip ties or clips every 4 inches along the top edge, and consider adding a horizontal support wire running across the mid-height of the panel, attached to the cage bars on both sides. This is especially important for taller cages where a large mesh panel has nothing to support its center.
Poor airflow on one side: this usually happens with acrylic panels that either lack ventilation holes or have holes that are too small and too few. The minimum is a 0.25-inch hole grid at 1.5-inch spacing across the full panel. If you already have holes and airflow still feels stagnant, add a small clip-on USB fan aimed at the cage exterior to improve circulation in the room.
Difficulty cleaning around the divider: the most common cause is mounting the divider too close to the tray or to a feeder hook. Re-anchor it so there is at least a 1-inch clearance above the tray floor and enough space to swing a dish hook open on each side. If the panel is genuinely in the way during deep cleans, use the removable clip system described above so you can lift it out, clean the full cage interior, and reinstall it in under two minutes.
Bird squeezing around the edge of the divider: there is a gap between the panel edge and the cage bars. This usually means the panel was cut a little too small. Thread short lengths of stainless-steel wire through the panel mesh and around the nearest cage bar to close the gap, or add a narrow strip of matching mesh wired along the gap edge. Check all four edges, not just the one where you spotted the problem.
One bird constantly harassing the other through the mesh: this is a behavioral issue, not a structural one, but the fix is partly physical. Move both birds' perches as far from the divider as possible so neither bird can station itself at the barrier all day. Adding visual cover, like a hanging toy or a small piece of natural cork bark mounted on each side near the divider, breaks the sightline and reduces fixation. If the harassment continues after rearranging the interior, a solid acrylic divider with drilled holes provides full visual separation while maintaining airflow.
If you find yourself wanting to build a more permanent or custom divider rather than the removable approach described here, the related topic of how to make a bird cage divider goes deeper into framing, panel construction, and finishing options. If you are also trying to add something like a nesting box, you will want to use the same cage-safe attachment principles so it cannot shift, chew through, or create sharp gaps how to make a bird cage divider. And if your goal is actually to expand capacity by joining two separate cages rather than splitting one, the topic of how to connect two bird cages together covers that workflow instead.
FAQ
What mesh size should I choose if my birds are different sizes?
Use the smallest species you are housing to set the gap rule. If you are dividing for a mix (for example, cockatiel with a smaller bird), set the mesh opening to the smaller bird's safe threshold and verify the birds cannot fit any part of the head through, even partially. For acrylic, confirm the drilled holes are matched to the mesh-equivalent safety and that there is no corner where the panel edge creates a widening gap.
Can I use other materials like painted wire or coated panels instead of stainless steel and acrylic?
Avoid divider materials that can degrade under chewing or cleaning chemicals. Stick to 304 stainless steel or properly drilled acrylic, and do not rely on painted surfaces or unknown coatings. When cleaning, use bird-safe soap and rinse thoroughly, because residue can attract chewing or make acrylic look cloudy, reducing the effectiveness of a quarantine-style barrier.
How do I confirm the divider is securely installed before the birds go in?
Make sure the divider cannot move when you tug a dish or slide the tray. A practical test is to press gently on the divider at the middle and at each corner after installation, then try to wiggle it by pulling on the top edge near the clips or tie points. If you see any flex that changes alignment, add attachment points before adding birds.
Can I still use hook-on feeders if I divide the cage?
Yes, but only if both compartments can be accessed and cleaned without reaching over the divider. If you have to stretch through the gap or lift the divider out of the way to reach a dish, that creates stress and increases the chance of birds contacting edges. For routine feeding, set dish hooks so they swing open fully with the divider in place on the same side.
Will divided cages require different daily feeding routines than a single cage?
Plan for two separate feeding and water routines, even if the birds are calmer than expected. Birds often learn to time contact, so if you refill one side earlier or more often, the other bird may escalate. Use staggered, consistent schedules and confirm each compartment has at least one roosting spot not directly facing the divider.
Should I install the divider while the birds are already in the cage, or move them first?
For most homes, do not add the divider to a cage that already has fighting in progress unless you can do it quickly and safely without creating sharp gaps. A sudden barrier can reduce aggression, but it can also increase panic if the divider blocks direct access to perches. Add perches first when possible, then install the divider, and monitor the first 24 hours closely for toe pinches and persistent fixation.
What’s the safest way to handle quarantine with a divider in the home?
Treat quarantine differently from routine separation. Use separate cleaning tools and handle one side completely (hands, gloves, feeders) before touching the other, and consider placing the divider on the same side of the cage tray each time so you do not cross-contaminate during tray handling. If symptoms appear or you suspect serious illness, follow an avian vet plan rather than relying on physical separation alone.
How often should I remove and deep-clean the divider, not just the cage bars and tray?
Remove the divider for deep cleaning whenever droppings, food debris, or film build up on the divider faces. In practical terms, plan on cleaning both faces every full cage clean cycle and spot-cleaning daily. If you cannot access both sides properly due to clearance, reconfigure the divider placement or switch to the clip-based removable design.
How can I tell if airflow through the divider is actually adequate?
No, because poor airflow can linger even when the panel is intact. If you are using acrylic, ensure it has a consistent hole pattern and adequate spacing, then check airflow subjectively and during cleaning for condensation or stagnant odors on one side. If you have one bird that is noticeably more lethargic or there is odor buildup, improve airflow by upgrading panel ventilation or using an external fan aimed to circulate room air.
What should I do immediately if a bird gets a toe or beak caught near the divider?
If a bird can get a toe caught or a beak chipped, treat it as a sizing or edge problem immediately, do not wait. First, inspect the four edges for gaps, then compare the divider opening to the bird’s head width. Second, confirm the cut edges are smooth and not exposed, and tighten or re-anchor the panel so it stays flush and does not bow into the gap.
Can I use a divider in a taller or wider cage without sagging or losing safety?
Yes, but you must size and support it for the heaviest expected loading. Do not rely on zip ties alone if the panel is tall or wide enough to sag. Add evenly spaced attachment points (for example every 4 inches along the top) and, if needed, add a mid-height support wire secured to cage bars so the panel stays flat and maintains the designed gap safety.
What layout changes help if one bird keeps harassing the other through the mesh?
Place perches and toys so birds cannot anchor themselves at the barrier for long periods. If harassment continues, increase distance from the divider, add visual breaks on each side (not across the opening), and ensure each bird has at least one high and one mid perch located on its own side. If escalation continues despite layout changes, use a more visually isolating divider with drilled airflow holes.
How should I cover a divided cage at night so both birds get equal dark time?
Use the species-appropriate coverage you already use for the cage, but make sure the entire divided area gets equal darkness and airflow. If one bird is near a seam or uncovered edge, it may experience different light schedules. For earlier bedtime, use two covers or a cover with a dividing seam, and keep fabric from tucking into the interior where it can be chewed.
Does placement near a window or heat vent matter more after dividing the cage?
Rotate the cage so no single bird gets exposed to direct sun or a draft on only one side. Also avoid placing the cage so the heat vent or window airflow hits the divider, because one compartment can become warmer and stress the bird on that side. If you notice panting, tucked posture, or unusual sleep patterns, adjust room placement before changing the divider.
Can I use a divider as a step toward eventually reuniting the birds?
Most improvements are better made by changing the divider setup than by trying to train behavior through the barrier. If you want to join birds later, do it by gradually reducing physical separation rather than removing the barrier abruptly. Keep perches and resources aligned and close enough for normal interaction only when you can supervise closely and revert quickly if aggression returns.