To measure a bird cage, you need three overall dimensions (width, depth, and height of the interior), the door opening size, and the bar spacing. Bar spacing is the most safety-critical number: measure the open gap between bars using a ruler or calipers, then verify it against your bird's species. For small birds like budgies and cockatiels, you need 1/2 inch or less. For conures and caiques, 3/4 inch is the ceiling. Get that number wrong and your bird can get its head stuck or slip out entirely.
How to Measure a Bird Cage Size and Bar Spacing

Maya Bennett
20 May 2026
Everything you need to measure (the full checklist)
Before you grab a tape measure, know what you're actually trying to capture. There are more measurements on a cage than most people realize, and skipping one often causes problems later, whether you're ordering a cover, planning a cage connection, or verifying safety before a bird moves in.
- Interior width: the usable space inside, measured wall to wall (not frame to frame)
- Interior depth: front to back, inside measurement only
- Interior height: floor to ceiling of the cage interior, not the stand or base
- Exterior width, depth, and height: needed for placement planning, cover ordering, and fitting the cage into a space
- Door opening width and height: critical if you're attaching accessories like a nesting box or running a perch through the door
- Bar spacing: the open gap between bars, measured accurately across multiple spots
- Bar diameter: less critical for safety but useful if you're replacing bars or ordering hardware
- Bottom tray or grate dimensions: needed if you're replacing the tray or adding a liner
If you're planning any modifications, like connecting two cages or adding a divider, you'll also want the panel dimensions for each side. Those projects have their own measurement needs, but starting with this checklist gives you a complete picture of the cage before you do anything else.
How to measure cage dimensions accurately
Inside vs. outside: which one to use

This is where most people go wrong first. Measuring the outside frame of a cage gives you the footprint for placement, but it tells you nothing about the space your bird actually lives in. The frame, welds, and any base trim can easily eat up an inch or more on each side. Always measure the interior for bird-use decisions and the exterior for room placement and cover sizing. Write both sets down and label them clearly so you don't mix them up later.
Step-by-step: measuring width, depth, and height
- Open the cage door fully so it's out of the way.
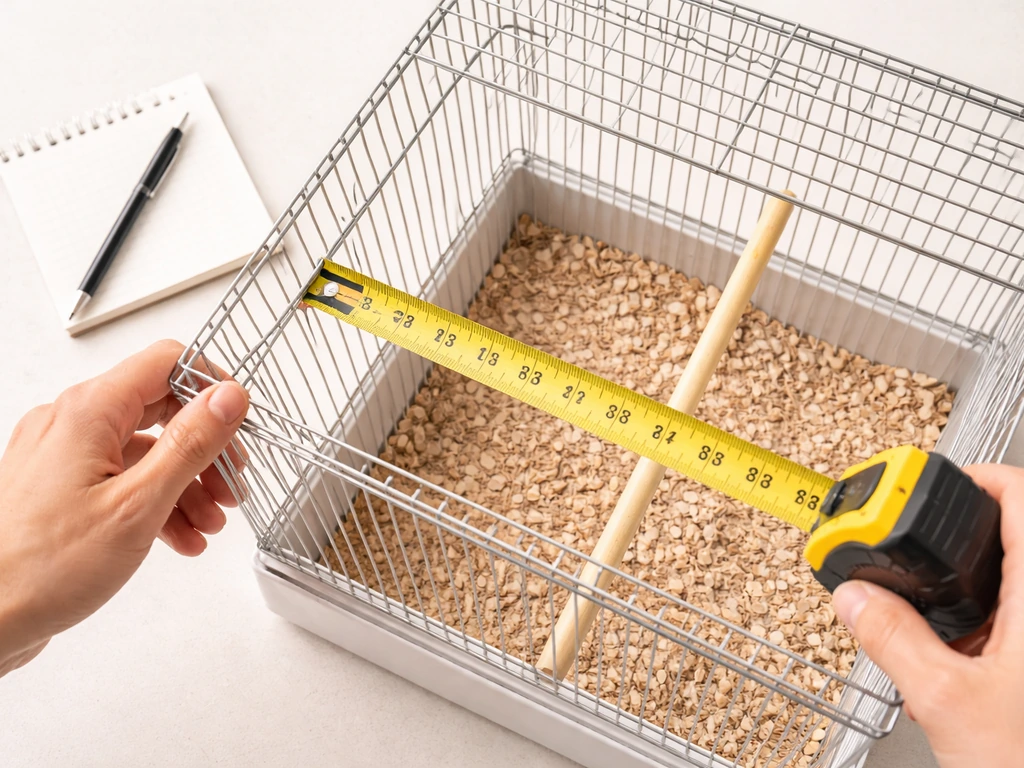
- Run a tape measure from the interior wall of one side to the interior wall of the opposite side for width. Hold the tape parallel to the floor and don't let it sag.
- Repeat the same process front to back for depth. If the cage has a lip or ledge on the inside, measure to the usable floor space, not the edge of the lip.
- For height, run the tape from the interior floor (or grate surface if your bird will stand on it) straight up to the interior ceiling. Ignore any dome or decorative cap above the cage.
- Now do all three measurements again on the outside of the frame and label them separately.
- Measure the door opening: width at the widest point and height from the bottom hinge to the top of the opening.
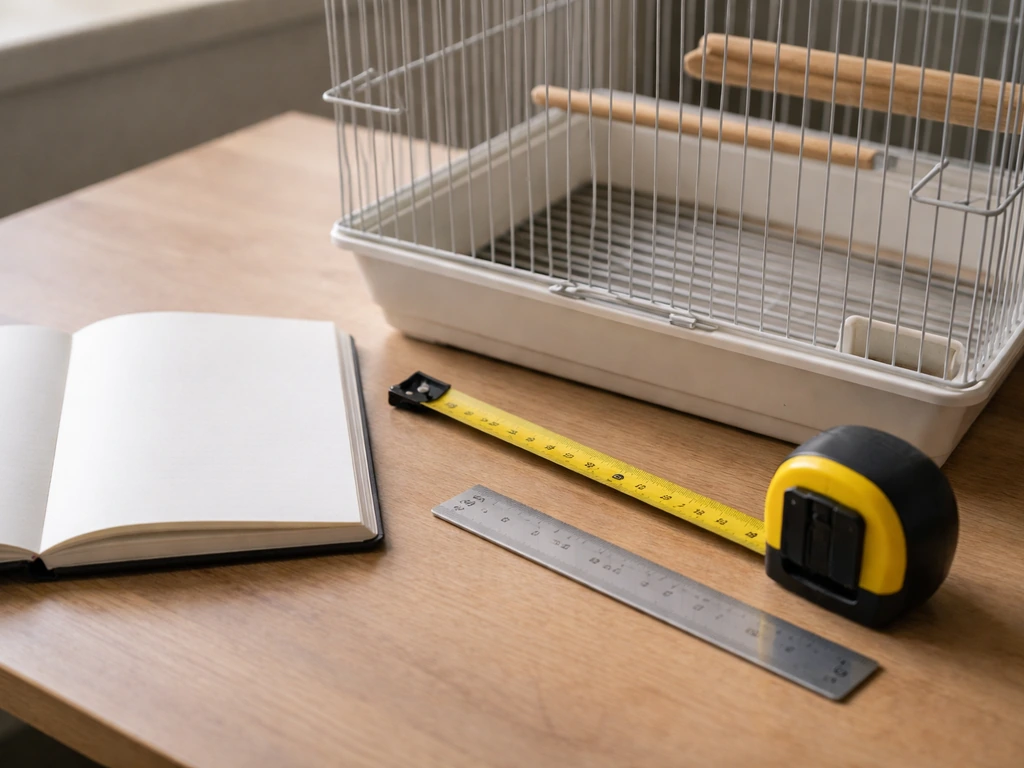
Use a rigid tape measure rather than a cloth one. Cloth tapes sag and give inconsistent readings on a cage, especially for depth measurements where you're reaching inside. A 12-foot metal tape is the right tool here.
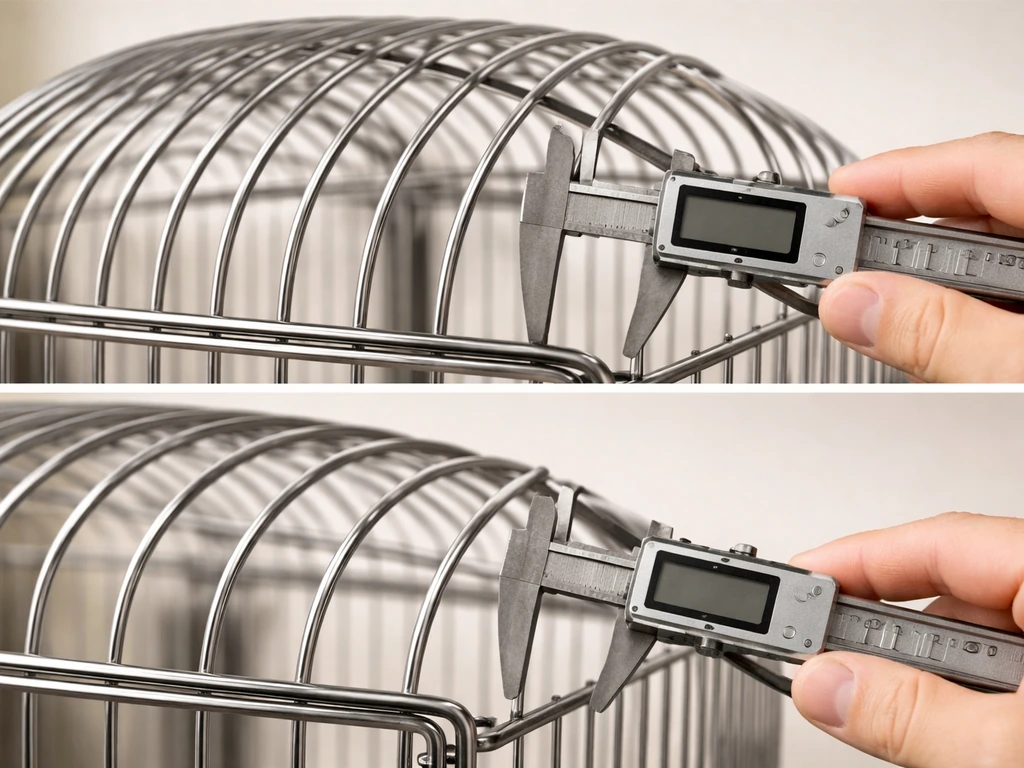
How to measure bar spacing step by step

Bar spacing is the single most safety-critical measurement on any cage, and it's frequently overlooked or misunderstood. The Pet Portal bird equipment guide stresses that bar spacing is the single most critical safety specification and notes that it is frequently ignored, which underscores why you should verify the actual gap yourself. There are two ways it gets reported: as the open gap between bars, or as center-to-center (from the middle of one bar to the middle of the next). Manufacturers like Prevue and Hagen's HARI line typically use center-to-center in their specs. For safety purposes, you need to know the actual open gap, because that's what your bird's head can potentially fit through. Always measure both if you're comparing a cage to its listed specs.
- Pick a flat section of the cage, ideally the largest panel (usually a side panel).
- Place a metal ruler or set of calipers flat against the bars so the edge of the tool is flush with the outside face of one bar.
- Measure from the outside edge of one bar to the outside edge of the next bar. That gives you the open gap, which is the number that matters for safety.
- To also get the center-to-center measurement (useful for comparing to manufacturer specs), measure from the center of one bar to the center of the next. This equals the open gap plus one bar diameter.
- Record both numbers.
- Now repeat this in at least three more spots: the opposite side panel, the top, and near a door or access panel. Spacing is not always uniform across a cage, and corner welds or door frames sometimes have wider gaps than the main panels.
- If you want to be precise, use digital calipers. They're inexpensive, available at any hardware store, and far more accurate than eyeballing a ruler inside a cage.
One real-world example of why the definition matters: a Vision II Model M02 cage lists wire spacing as 'half inch' in its product description, but the actual measured gap between wires is 7/16 inch. The listed spec is center-to-center; the gap is smaller. That distinction matters if you're trying to confirm whether the cage is safe for a particular bird.
Measuring tricky cages: curved frames, angled bars, and uneven spacing
Standard rectangular cages are straightforward, but a lot of ornamental, dome-topped, or vintage cages throw curveballs. Here's how to handle the common problem areas.
Curved or angled bars
On cages with curved bars (common in dome-top and Victorian-style designs), the spacing changes as you move from the widest point of the curve toward the frame. Measure the spacing at the narrowest point and the widest point and record both. The widest gap is the safety-relevant one, because that's where your bird could potentially push its head through. Don't assume the spacing listed by a manufacturer accounts for the widest point on a curve.
Non-uniform or irregular spacing
Some budget cages have welding inconsistencies that create gaps slightly larger than the intended spacing. Check every panel individually rather than assuming the whole cage matches one spec. Pay special attention to the area around doors, hinges, and tray slots, where the frame design sometimes creates a wider-than-normal opening. A bird that can't fit through the main bars can still get a head caught in an oversized tray gap.
Overall dimensions on odd shapes
For a cage with a hexagonal, octagonal, or irregular footprint, measure the widest point across the interior (diameter, if roughly circular) and then measure the depth of each face panel if you need to attach anything to a specific side. For height on a stepped or tiered cage, measure each distinct section separately. If you're planning to divide a cage or add a nesting box to the side, those individual panel measurements matter more than the overall cage width.
Choosing the right bar spacing for your bird
The rule is simple: the bar spacing needs to be small enough that your bird cannot push its head through. If the head can get through, the body may follow, or worse, the bird gets stuck. Here's what the guidance from veterinary and shelter sources says by species group.
| Bird Type | Maximum Safe Bar Spacing | Notes |
|---|---|---|
| Budgerigar (budgie) | 1/2 inch (12.7 mm) | Some sources recommend no more than 7/16" actual gap |
| Cockatiel | 1/2 inch (12.7 mm) | Cockatiels and smaller species share this threshold |
| Lovebird | 1/2 inch (12.7 mm) | Small but strong; confirm spacing at door and tray areas too |
| Parrotlet | 1/2 inch (12.7 mm) | Very small birds; err toward tighter spacing |
| Diamond dove | 1/2 inch (12.7 mm) | No more than 1/2" per Best Friends housing guidance |
| Conure | 3/4 inch (19 mm) | Some sources list 5/8" to 3/4" as the acceptable range |
| Caique | 3/4 inch (19 mm) | Same range as conures |
| Poicephalus spp. | 3/4 inch (19 mm) | Senegal, Meyer's, etc. |
| Miniature macaw | 3/4 inch (19 mm) | Hahn's and similar small macaws |
| Large parrots (Amazon, African Grey, full-size Macaw) | 1 inch (25.4 mm) | Larger birds need wider bars for mental stimulation and grip |
Keep in mind that these are maximums, not targets. Tighter spacing is always safer as long as the bird can still grip the bars comfortably and the cage provides enough ventilation. Also factor in your individual bird's behavior: a very active or 'rowdy' bird that pushes against the bars regularly may need a more conservatively spaced cage than a calmer bird of the same species.
Common measurement mistakes (and how to catch them)
These are the errors I see most often, and almost all of them are easy to avoid once you know what to look for.
- Measuring outside instead of inside: The exterior dimensions can be 1-2 inches larger than the interior on each side. Always label which measurement you're taking.
- Confusing gap spacing with center-to-center spacing: A cage listed as '1/2 inch bar spacing' by a manufacturer may mean center-to-center, which makes the actual gap smaller than 1/2 inch. Measure the actual open gap yourself to be sure.
- Only measuring one section of the cage: Spacing varies across panels, especially near doors and tray openings. Measure at least four spots.
- Not accounting for bar thickness: When comparing a cage to a spec sheet, remember that center-to-center equals the gap plus one full bar diameter. Ignoring bar thickness leads to incorrect comparisons.
- Measuring height to the decorative top: The dome or ornamental cap above many cages adds height that the bird can't use. Measure to the functional interior ceiling.
- Forgetting the tray gap: The slot where the waste tray slides in and out often has a gap of 1/2 inch or more at each end. For small birds, this is an escape or entrapment risk. Measure and note it.
- Trusting product listings without verifying: Manufacturer specs and retailer listings aren't always consistent. One cage's online listing showed '1/2 inch' spacing while the actual wire gap was 7/16 inch. Measure the physical cage if you have it, and compare to specs if you're buying online.
Quick double-check before you finalize
- Confirm you have both interior and exterior measurements written down and clearly labeled.
- Check that your bar spacing measurement reflects the open gap, not center-to-center.
- Re-measure bar spacing on at least one additional panel to verify consistency.
- Check every door, access panel, and tray gap for wider-than-expected openings.
- Physically test: can you fit a pencil or similar object through the gap? If you can fit something the size of your bird's head through any opening, that area needs to be addressed before the bird goes in.
What to do with your measurements now
Once you have all your numbers, here's how to put them to use.
Ordering a cage or replacement parts
When buying a cage online, compare the interior dimensions from the product listing against your minimum requirements for the species. Use your bar spacing research to confirm the listed spacing is appropriate. If the listing only shows center-to-center specs, subtract the bar diameter (often around 3 to 3.5 mm for standard wire) to estimate the actual gap. If you're ordering replacement bars or custom components, bring both your gap measurement and your center-to-center measurement so suppliers can match their stock to your cage.
Planning modifications and add-ons
Your door opening measurements determine what accessories can fit through or attach to the cage. If you're adding a nesting box, the door dimensions tell you whether the box entrance can be positioned flush with the opening. If you're thinking about connecting two cages, the side panel dimensions for both cages need to be compatible. And if you're planning to divide a cage into sections, note that divider systems can leave a gap of up to 1 inch between the panel and the door slide, which may not be appropriate for very small birds. When you plan a divider, measure the panel dimensions and check that the bar spacing in the new section still keeps your bird safe divide a cage into sections.
Ordering a cage cover
Use your exterior dimensions for cover sizing, not interior. Add about 2 inches to each dimension to get a cover that drapes properly and allows airflow. If the cage has a dome top, measure from the base of the dome to the floor as well and check that the cover's listed height accounts for the full exterior profile.
Placement and setup
Use your exterior footprint dimensions to plan the cage's spot in the room. Leave at least 2 to 3 inches of clearance on all sides for air circulation and cleaning access. Oregon Humane’s budgie care sheet also emphasizes cage and environment setup guidance as part of safe bird housing considerations. If the cage will sit on a stand, add the stand height to your interior height measurement to confirm the total height works for the space and doesn't put the cage too close to a ceiling vent or window.
Final safety checklist before your bird moves in
- Bar spacing confirmed at or below the maximum safe threshold for your species
- All door, tray, and panel gaps checked individually, not just the main bars
- Interior dimensions meet minimum space requirements for the species
- No gaps wider than bar spacing detected near hinges or frame welds
- Tray slot verified as too narrow for the bird to exit or get stuck
- Cover sizing confirmed against exterior dimensions if applicable
- Placement location confirmed with adequate clearance on all sides
FAQ
What’s the best way to measure the interior width, depth, and height if the cage has trim, welds, or a raised base?
Measure to the clear wire surface your bird can actually access, not to the outermost metal frame. If there is a raised base or tray lip inside, measure interior height from the floor-level surface the bird can stand on to the highest usable wire, then measure width and depth at that same floor reference line to keep the numbers consistent.
Should I measure bar spacing at the tray level, the center of the cage, or both?
Measure at the widest gap along the cage in general, but also re-check near doors, hinge zones, and any area where a tray slide leaves an opening. If the cage tapers or has decorative geometry, take readings at multiple vertical positions, because gaps can change with the frame design.
When a manufacturer lists wire spacing as “1/2 inch,” do I always need to subtract the bar diameter to estimate the open gap?
Not always. Subtracting can help only if the listing is explicitly center-to-center and you know the wire diameter. If the listing is ambiguous or uses “open gap,” do not subtract. When in doubt, measure the open gap directly or measure a bar-to-bar cross point with calipers and record both the gap and the center spacing.
How do I measure the gap accurately if two wires are not perfectly parallel or the cage bars are slightly angled?
Use calipers or a rigid ruler and measure the smallest clear distance between the adjacent bars where a head would first contact. If the bars curve or angle, take several readings across that section and use the maximum open gap as your safety value.
Do I need to measure the door opening differently than the main interior dimensions?
Yes. Door openings can create a larger “effective gap” locally, and many accessories must pass through the door. Measure the clear opening height and width at the narrowest points, then also measure the recess or lip around the opening so you know what will actually fit without snagging.
How can I tell if a cage is unsafe even when the listed bar spacing seems acceptable?
Look for construction inconsistencies that create oversized spots, especially around doors, hinges, tray slots, and divider tracks. Measure every panel individually at the critical narrowest and widest points, not just one representative section.
If I’m dividing a cage, how do I make sure the new section stays safe?
Check three things: the divider panel bar spacing relative to the bird’s head size, any gap left between the divider and the door slide, and the spacing created at the edges where the divider meets the frame. Measure the gap at the divider-door interface because the largest gap is usually the safety concern, not the center area.
What measurements should I save for replacement covers, since the article says to use exterior dimensions?
Keep both interior and exterior dimensions labeled clearly. For covers, use exterior width, depth, and total exterior height, then add the extra allowance (about 2 inches per dimension) for drape and airflow. For dome tops, include the height from the base of the dome to the floor, since some covers specify height differently than flat-top cages.
How much clearance should I leave around a cage, and do I also need to account for the tray pull-out?
Use clearance on all sides for airflow and cleaning access, typically 2 to 3 inches. If the tray pulls out or the door swings outward, add clearance in the direction of movement so you can fully open the tray and doors without compressing the cover or scraping against nearby surfaces.
If my bird is very active, what measurement mistake matters most?
The most important mistake is relying on an average or a single measurement. Active birds test weak points, so verify the maximum open gap you find across curved panels, near doors, and around tray mechanisms. If you can only measure once, measure at the widest potential gap area.