The fastest fix is switching to a feeder with a deep cup or hopper design, mounting it at perch height, and adding a mesh seed catcher or tray guard around the outside of the cage base. Those three changes alone will cut most seed spillage by at least half. The rest is about placement, hardware, and a cleaning routine that keeps things from getting out of hand.
How to Keep Bird Seed in the Cage Without Spills

Maya Bennett
30 Apr 2026
Why seed keeps escaping the cage

Birds are messy eaters by design. In the wild, tossing seed to the ground is normal foraging behavior, and your bird does not know it is ruining your floor. But there are also setup problems that make spillage worse than it needs to be, and those you can fix today.
- Feeder cups that are too shallow: the bird scoops its bill in and flings seed over the rim with almost every bite
- Feeder mounted too high or too low: birds have to reach awkwardly and knock food out trying to get a grip
- Bar spacing that is too wide relative to the feeder opening: small birds can stick their heads through and dump the cup while foraging
- No seed guard or tray: debris exits through the cage bars or the open base gap with nothing to catch it
- Loose or wobbly feeder mounts: a cup that swings every time the bird lands on it spills constantly
- Wrong feeder type for the food: pellets roll out of flat trays; large seeds escape narrow tube openings; millet sprays left loose drop crumbs everywhere
- Overfilling: cups loaded to the brim give birds a launch pad for tossing
Once you identify which of these is your main problem, the fix is usually straightforward. Most people have two or three happening at once, so work through the sections below in order.
Choose the right feeder for your bird and food type
Not every feeder works for every bird or every food. Using the wrong one is the single most common reason seed ends up on the floor instead of in your bird's crop.
| Feeder type | Best for | Food types | Mess control rating |
|---|---|---|---|
| Deep cup / crock | Small to medium birds: budgies, cockatiels, lovebirds | Seed mix, pellets, chopped food | Good: depth reduces tossing |
| Hopper / tube feeder | Finches, canaries, small parakeets | Small seeds, millet | Very good: gravity-feeds small amounts at a time |
| Covered / domed cup | Parrotlets, budgies, small conures | Seed, pellets | Excellent: lid stops overhead flinging |
| Clip-on foraging cup | Medium parrots: conures, caiques, Senegals | Pellets, seeds, small treats | Good when clipped at correct height |
| Flat tray / platform | Large parrots: macaws, large cockatoos, Amazons | Large seeds, nuts, mixed food | Fair: needs a raised lip of at least 1 inch |
| Mesh seed catcher (external) | Any cage size | Catches debris from all feeder types | Excellent as a secondary containment layer |
For pellets specifically, a deep crock or covered cup is your best choice. Pellets are denser than seed and roll easily, so a flat tray or shallow cup turns into a pellet catapult the moment your bird starts eating. One Reddit parrot owner who removed their seed guards found they had to vacuum pellet crumbs three times a day, which tells you exactly what happens when containment layers disappear.
For materials, stick to stainless steel or food-grade hard plastic. Avoid anything with zinc-coated metal parts or cheap thin plastic that cracks and flakes, both of which can leach toxins into food. Stainless steel crocks are the safest long-term bet and are easy to scrub.
Install and place the feeder correctly
Correct placement does more work than almost any product you can buy. A great feeder mounted in the wrong spot will still make a mess.
Height and position
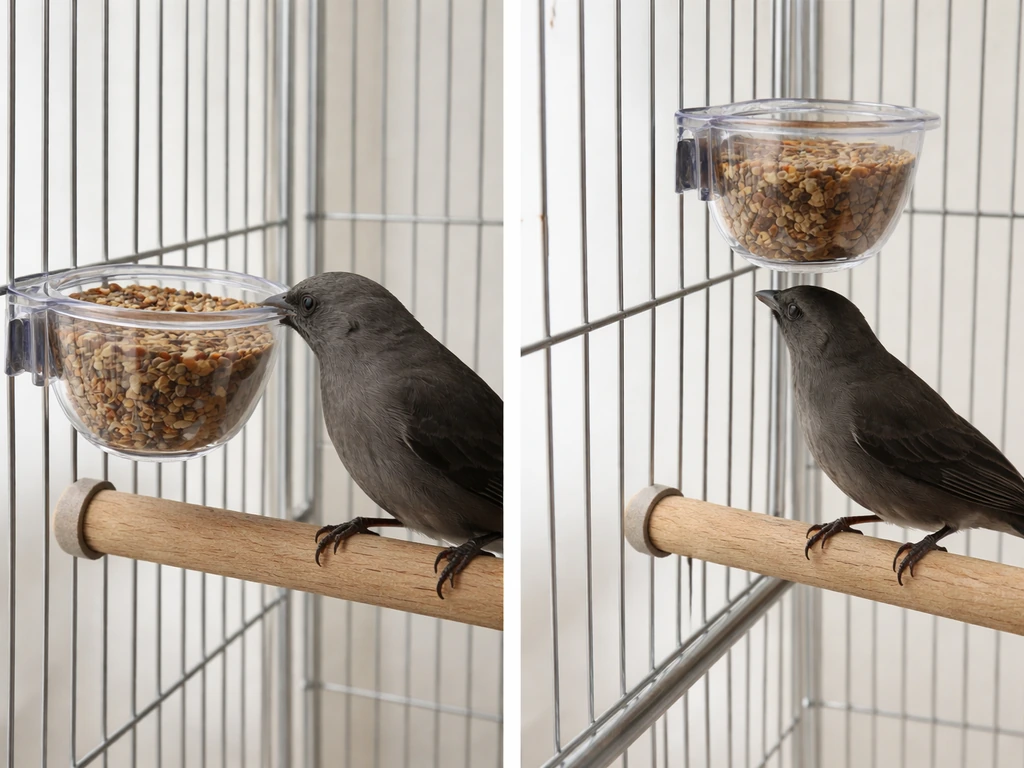
- Mount the feeder at perch height or just slightly below so your bird can eat without reaching up or crouching down; awkward postures mean sloppy eating
- Position the cup so the bird's feet land on a stable perch before it starts eating, not on the feeder rim itself
- Keep the feeder away from the cage wall opposite the door so the bird approaches from one consistent angle rather than circling and bumping the cup
- In a multi-bird cage, mount feeders on opposite sides to reduce competition jostling that sends seed flying
- Fill cups no more than two-thirds full; the empty top third acts as a buffer that contains scatter from bill sweeping
Attaching the feeder securely
Clip-on cups usually come with a single wire hook. That hook loosens over time, especially with active birds. Thread the hook through a bar, then squeeze the end with needle-nose pliers so it cannot slide back out. For hanging feeders inside a large cage, use a closed S-hook (squeezed shut at both ends) rather than an open one. Avoid zip ties for anything inside the cage: they degrade with heat, humidity, and the UV from cage lighting, and a broken tie that falls into the food dish is a hazard. After you install any new feeder, watch your bird interact with it for the first 48 hours. You will see immediately if the mount wobbles, if the cup spins when the bird lands, or if the height is wrong.
Stop the mess: liners, guards, trays, and catch methods
Even with the best feeder placement, some seed and debris will escape. A practical way to do this is to add a seed guard or mesh seed catcher around the cage base and feed cup area. Layering containment methods is the most effective approach, and you do not have to spend much to do it.
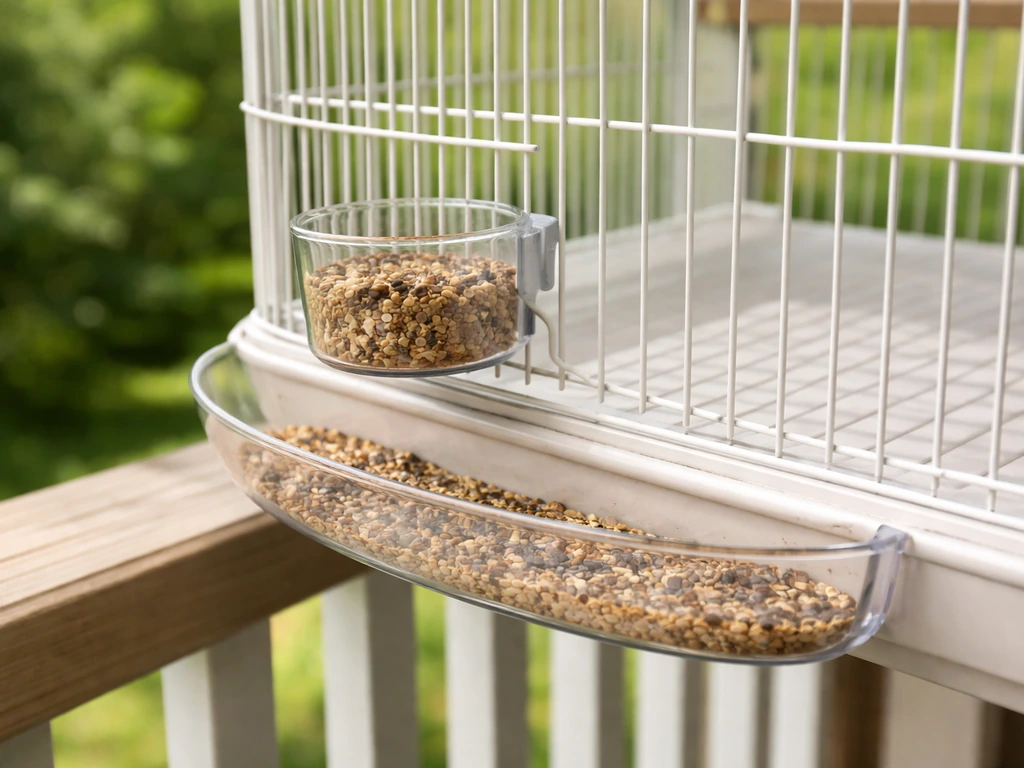
Seed catchers and skirt guards
A mesh seed catcher, like Prevue's #820W, wraps around the outside of the cage base and rises above the food-cup line. It physically blocks debris from shooting through the bars and onto the floor. Hand wash it with mild soap and let it dry completely before putting it back. Similar fabric skirt guards work the same way and are often DIY-friendly: a strip of breathable mesh fabric sewn into a channel that slides over the cage base bars.
Cage liners and tray inserts
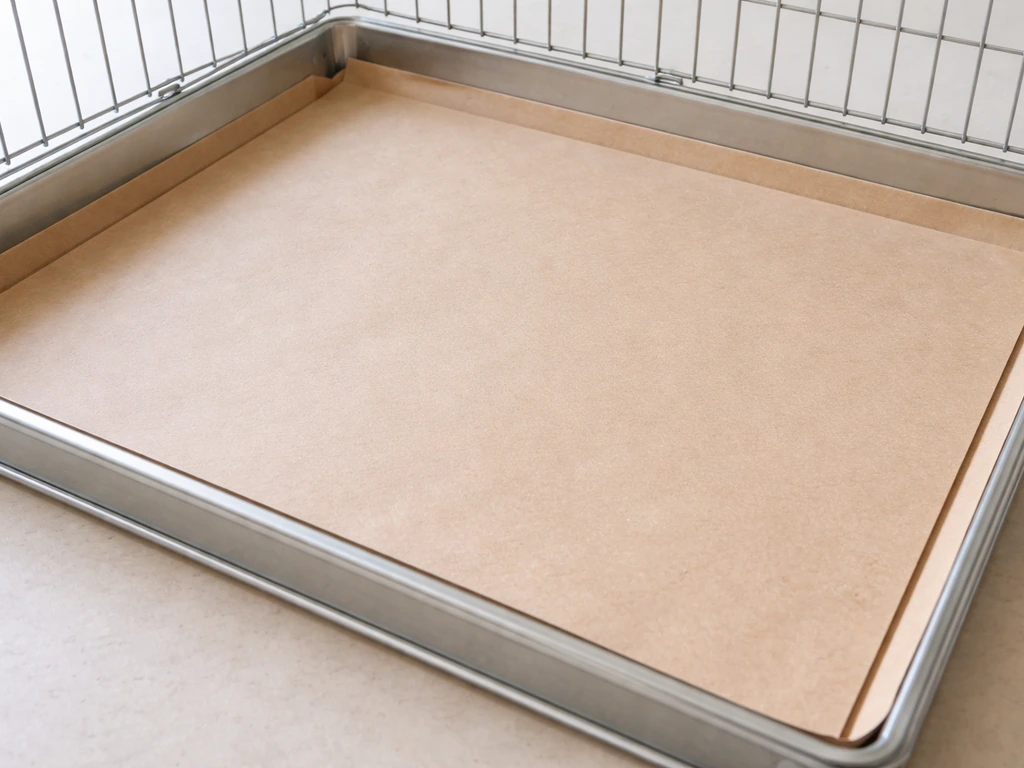
The cage tray liner catches everything that makes it past the seed guard. Use unbleached paper or commercial cage liner sheets cut to fit the tray exactly. A snug-fitting liner keeps your bird from pushing it aside and getting under it. Changing liners regularly (the frequency depends on how messy your specific bird is) keeps debris from building up and attracting pests, which connects directly to hygiene, covered in the next section.
Tray covers and hopper baffles
If your cage uses an open seed tray at the bottom, add a raised lip insert or a grate extender above it. A grate with bar spacing that matches your bird species (roughly 1/4 to 3/8 inch for finches and canaries, around 1/2 inch for budgies and cockatiels) lets debris fall through to the tray while keeping the bird away from its own droppings and discarded shells.
Secure the feeder against knocking over

A feeder that tips or spins defeats every other measure you put in place. Here is how to lock things down.
Check your bar spacing first
Bar spacing determines whether a feeder can be clipped, threaded, or hooked securely. Mismatched spacing also lets smaller birds squeeze through gaps to reach feeders from the outside, causing chaos. Use this as a quick reference:
| Bird species | Recommended bar spacing | Feeder clip compatibility |
|---|---|---|
| Finch, canary | 1/4 to 3/8 inch | Narrow clip-on or tube feeder only |
| Budgerigar, lovebird, parrotlet | ~1/2 inch | Standard clip-on cup or hopper |
| Cockatiel, small conure | ~1/2 inch | Standard clip-on cup or covered crock |
| Large conure, African grey, Amazon | 3/4 to 1 inch | Heavy-duty clip or bolt-on crock |
| Macaw, large cockatoo | ~1.5 inches | Bolt-on stainless crock, no clip-ons |
Mount hardware and stabilization
- Use two attachment points instead of one wherever the feeder design allows: two hooks or clips prevent rotation
- For large parrots, use bolt-on stainless steel crocks with a wing nut on the outside of the cage bar; these cannot be pushed off by a determined macaw or cockatoo
- Add a small secondary perch directly below the feeder so the bird stabilizes itself before eating rather than gripping the cup edge
- If a clip-on cup wobbles, wrap the cage bar at the clip point with a small square of rubber grip tape before re-clipping: it fills the gap and stops rotation
- Check all connection points every two weeks; birds work at hardware constantly and hooks do loosen
Pest and hygiene control when seed spills
Spilled seed is an open invitation for ants, flies, and rodents. If you are wondering how to keep bird cage from making mess, start by preventing spilled seed from piling up around the base. Even if you live in a clean space, a seed accumulation under or around the cage will eventually attract something. Staying ahead of this is easier than dealing with an infestation.
Daily and weekly cleanup
- Remove and discard uneaten seed and food from cups daily: wet or softened seed molds fast and can make your bird sick
- Sweep or vacuum the area around the cage base every day, especially if you have a heavy tosser; shell debris attracts pests faster than whole seeds
- Change the cage liner at least every other day for active seed eaters, daily if the tray collects wet droppings alongside shell debris
- Wipe down feeder cups with a damp cloth daily and do a full wash with hot water and non-toxic soap at least every two to three days
Monthly deep clean
VCA recommends blank" rel="noopener noreferrer">scrubbing the full cage with non-toxic disinfectant soap and hot water at least one to two times per month. Pull the trays, seed catchers, and all hardware out for that clean. Important: blank" rel="noopener noreferrer">avoid disinfectants that contain bleach or vinegar near your bird, as both can release fumes that are harmful to avian respiratory systems. Let everything dry completely before putting your bird back in, and make sure the room is ventilated while you clean. A simple cleaning routine and layered containment methods are the fastest way to keep a bird cage from smelling. When you clean the cage, move your bird into a separate holding spot first so it is safe while you wash the tray and liners cleaning.
For pest control, place an ant moat or double-sided sticky barrier on the cage stand legs rather than spraying pesticides anywhere near the cage. Never use pest strips or aerosol sprays in the same room as your bird.
Quick troubleshooting and when to replace your setup
If you have worked through the steps above and still have major spillage, run through this checklist before buying anything new.
| Problem | Likely cause | Fix |
|---|---|---|
| Seed all over the cage floor despite a guard | Guard does not rise above the feeder cup line | Switch to a taller seed catcher or raise the feeder mount higher |
| Bird dumps the cup completely | Cup is not locked, or bird is bored and foraging destructively | Use a bolt-on crock with a locking lid; add foraging toys to redirect behavior |
| Pellets everywhere even in a covered cup | Cup opening is too wide for the pellet size | Match pellet size to cup opening, or switch to a smaller-opening hopper |
| Seed escaping through cage bars | Bar spacing is wider than seed diameter | Add an external mesh seed catcher; look at a cage with tighter bar spacing |
| Feeder swings and tips on every visit | Single attachment point or worn clip | Add a second clip point or replace the clip; use rubber grip tape as a spacer |
| Mold appearing in the cup quickly | Wet food or fruit left in seed cup, or humidity buildup | Use separate cups for wet foods; clean daily; improve cage ventilation |
| Ants reaching the food | Cage stand touching a wall or debris trail on the floor | Add ant barriers to stand legs; clear debris daily from the surrounding area |
When to replace the feeder or rethink the cage setup
Replace the feeder itself if the plastic is cracked, the metal shows rust or flaking zinc coating, or the clip mechanism no longer holds firmly even after adjustment. A broken feeder is a hygiene and safety problem, not just an inconvenience. Consider rethinking the whole cage setup if your bird has outgrown it: bar spacing that made sense for a young bird may let an adult reach through and scatter food freely. Cage design mismatches also make it very hard to attach appropriate feeder guards, which ties back to the mess control problems covered earlier in this article.
Getting seed containment right often opens up the related challenge of keeping general cage mess under control, including feathers, liner debris, and droppings. Once your feeder setup is solid, tackling those other mess sources becomes a lot more manageable.
FAQ
How can I keep bird seed contained when I change feeders or bird species?
Yes. Put the feeder and seed guard in place before you switch food, then watch for 48 hours. If seed still lands outside the guard, the cup is usually too low (bird pushes it) or too high (seed bounces off the perch), so adjust mount height in small steps rather than changing multiple things at once.
What cleaning products should I use on feeders and seed catchers to prevent more seed mess?
Avoid deep washing solutions right before using the cage. Wash feeders, liners, and mesh catchers with mild, bird-safe soap, then rinse well and dry completely. Any leftover detergent residue can make seed feel slippery, causing more rolling and more spillage.
Is one seed guard enough, or do I need layered containment?
For seed, start with a snug tray liner, then a wrap-around mesh catcher that rises above the cup line. If you only use one layer, you will get “leak paths” where debris shoots through gaps. Layering is what stops scatter more reliably than any single guard.
My bird still throws seed around the feeder, even with a guard. What should I check first?
If your cage has bar-top or corner bars near the feeder, check clearance so the feeder cannot twist when the bird grabs it. Common fix, reposition the feeder slightly so the bird lands on the center of the cup, and ensure the guard’s top edge overlaps the area where the bird throws debris.
How often should I change cage tray liners to reduce mess and pests?
Replace liners on a schedule based on buildup, not by calendar. A simple rule is to change when you see caking, sticky residue, or a noticeable dust layer, because that buildup holds moisture and increases odor and pests. Keep the liner snug, so your bird cannot shove it under the grate.
Pellets still end up all over the cage. How do I stop pellet crumbs from escaping?
If pellets crumble, they will behave like seed dust and escape even with a guard. Use a deeper crock or covered cup designed to contain pellets, and consider reducing the daily portion size to what your bird finishes quickly, then refill. Less leftover means less debris.
How do I stop seed from spilling when my bird can reach the feeder from different angles?
If your bird can reach the feeder from the outside, it is usually a bar-spacing or mount issue, not just a feeder design problem. Add a containment guard that blocks reach routes, and consider an internal feeder style that cannot be grabbed and pulled.
What should I do if my feeder tips or spins even after installation?
If the feeder spins, either the mount is loose or the bird’s weight is shifting it. Re-secure the clip by rechecking the hook/attachment points, and confirm the feeder is centered under the perch the bird uses most. If the feeder wall is cracked or warped, replace it rather than tightening further.
Will improving containment also help with what ends up under and around the cage, not just inside?
Not necessarily. If the floor under your cage is creating static or catching bounces, use a liner or non-slip mat under the cage base, then keep a regular sweep around the perimeter. You want to prevent seed from accumulating where it can attract insects even if a little escapes.
When should I replace the feeder or rethink my cage setup instead of buying more guards?
If you have persistent spillage, the feeder itself may be compromised, especially if plastic is cracked, metal is rusting, or any clip mechanism no longer locks tightly. Also verify that your cage’s bar spacing matches the feeder’s secure method, because mismatches create gaps that defeat guards.