Assembling a Zeny bird cage takes most people between 30 and 60 minutes, and the process follows a consistent order: unbox and inspect, build the frame, attach the bars and panels, fit the doors and latches, drop in the tray, then do a firm safety check before your bird goes anywhere near it. The instructions that ship with Zeny cages are functional but brief, so this walkthrough fills in the gaps, flags the spots where things go wrong, and gets you to a fully secure, bird-ready cage as quickly as possible.
Zeny Bird Cage Assembly Instructions: Step by Step Setup

Maya Bennett
15 May 2026
Before you start: tools, space, and parts check
Before you touch a single panel, clear a large flat area, a table or clean floor section works fine. You need enough room to lay all the parts out next to each other without stacking them, because spotting a bent bar or a missing bolt is much easier when everything is visible at once.
Zeny cages are designed to assemble without specialized tools, but having a few things on hand makes the job faster and safer. Most models come with a small wrench or hardware key. If yours is missing one, a standard adjustable wrench or pliers will cover you.
- Adjustable wrench or the included hardware key
- Needle-nose pliers (for tightening stubborn connector rings or C-clips)
- Rubber mallet or a cloth-padded hammer (for seating panels that resist snapping together)
- A flat, stable surface with at least two feet of clearance on each side
- A clean cloth or paper towels to wipe down parts before assembly
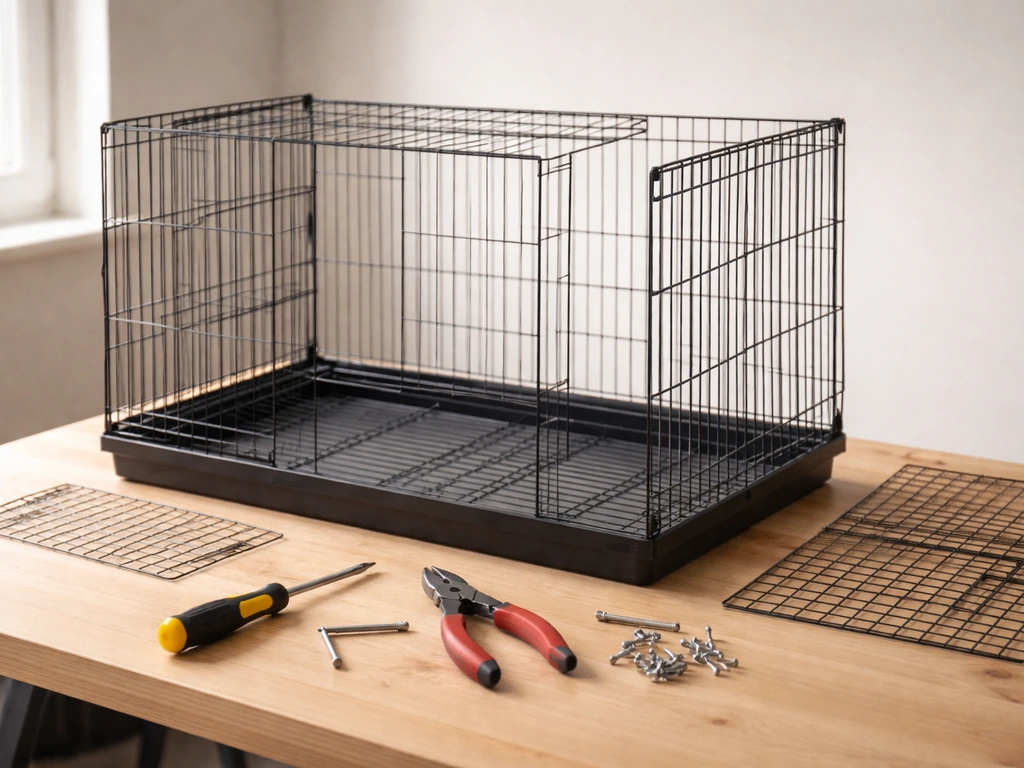
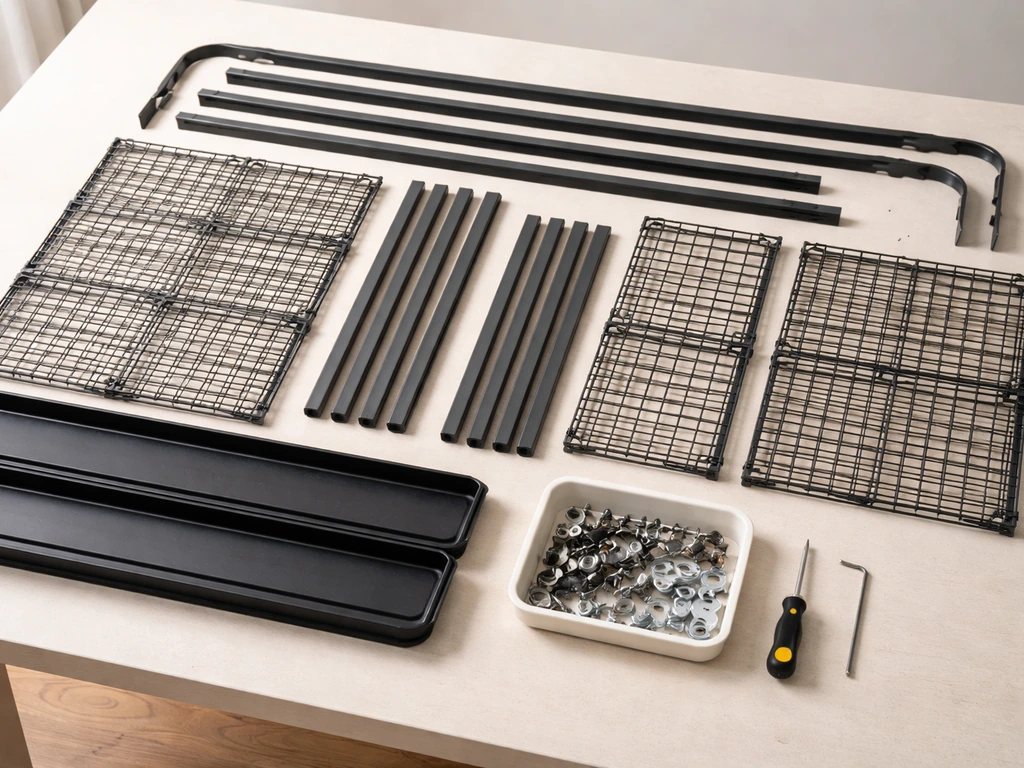
Once you have your workspace ready, remove everything from the box and lay it out. blank" rel="noopener noreferrer">The Zeny manual specifically calls out this inspection step, and it matters: check the frame sections, wire panels, door frames, tray, perches, food and water bowls, any seed catcher skirt, and all the small hardware (bolts, wing nuts, clips, and any casters or stand legs). Count parts against the included parts list. blank" rel="noopener noreferrer">If anything is bent, cracked, or missing, stop here and contact Zeny support before assembling. Trying to work around a damaged panel or a missing connector creates problems that are much harder to fix mid-build.
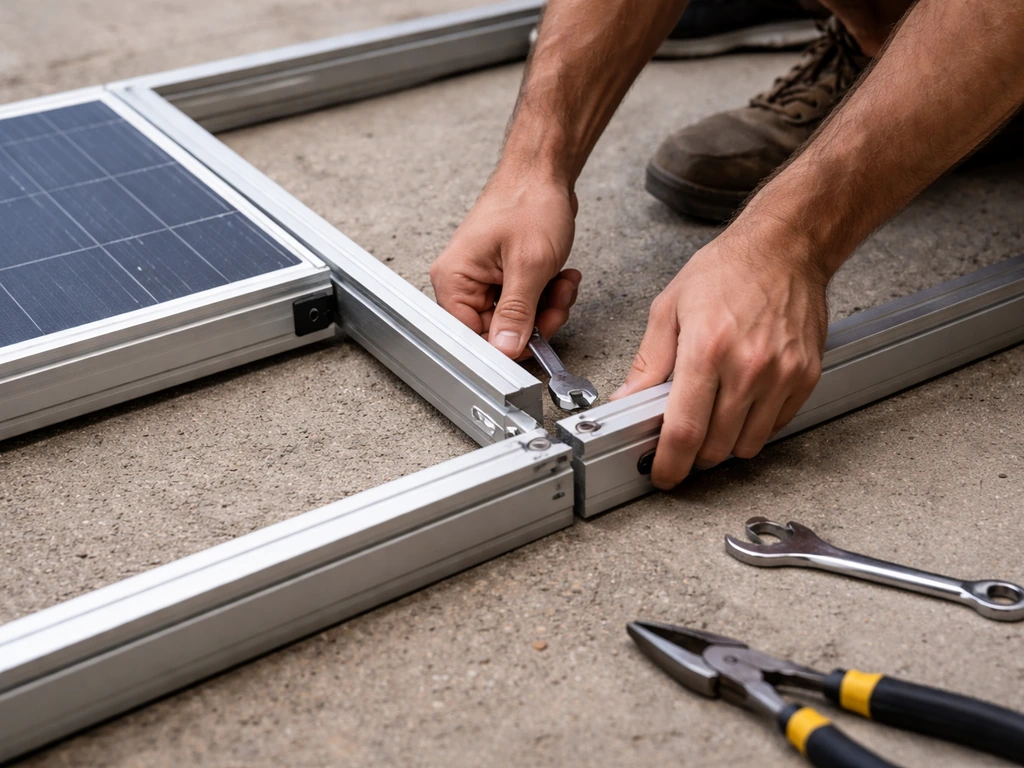
Step-by-step assembly: frame, bars, and base
The assembly sequence Zeny uses across its cage lineup is consistent: frame first, then panels, then everything else. Following this order prevents the frustrating situation where you have to partially disassemble the cage to access a connection point you skipped.
- Identify the base tray and the bottom frame section. On most Zeny models, the base frame sits on top of the tray or clips into a tray receiver. Set the tray aside for now and start with the bottom frame ring or floor grid.
- Connect the vertical corner posts or side frame pieces to the bottom frame. These usually snap or bolt together. Hand-tighten any bolts at this stage rather than fully torquing them down, because you may need minor adjustments as the frame comes together.
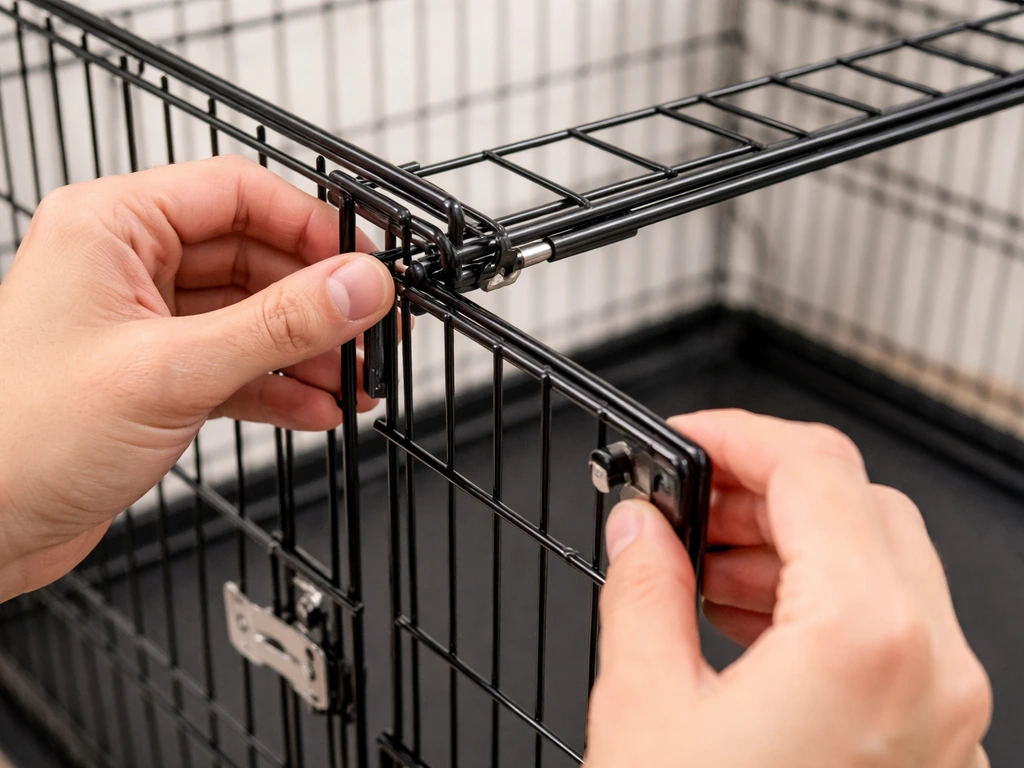
- Attach the wire panel sections one side at a time. Panels typically clip into the corner posts using C-rings, spring clips, or bolt-through holes depending on the Zeny model you have. Work around the cage in order rather than jumping between sides.
- Once all four (or six, for hexagonal models) panels are attached, connect the top frame ring the same way you did the bottom. This locks the panels in place and gives the structure its rigidity.
- Go back and fully tighten all bolts and connectors now that the frame is square. Check each corner post by trying to wiggle it. There should be no play.
- If your cage came with a stand and casters, attach the stand legs to the base frame using the provided hardware, then press the casters into the leg sockets. Always lock the casters before placing the cage in its final spot.
- Slide the bottom tray into its channel from the front or back as indicated on your specific model. It should move smoothly and sit flush.
A quick note on wire spacing: once the panels are on, run your fingers along every seam where panels meet the frame. Any gap wider than the intended bar spacing is a flag. Small birds like finches and canaries can squeeze through surprisingly tight spaces, and a misaligned panel is the most common cause of escape or injury.
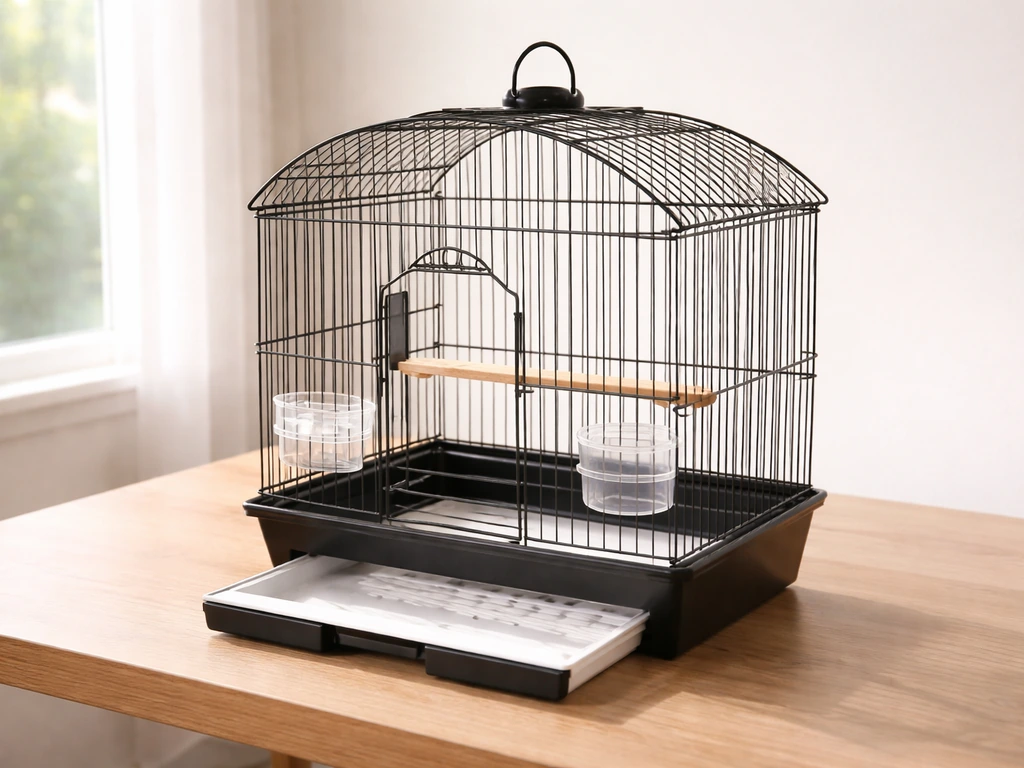
Doors, latches, trays, and accessories setup
Zeny cages typically include one large access door, sometimes a smaller secondary door, and in larger models a dedicated feeder door that lets you swap bowls without opening the main access. Each door hinges into a pre-formed opening in the wire panel, usually with two hinge pins at the top and bottom of the door frame.
- Seat the top hinge pin first, angling the door up into the opening, then press the bottom pin into its socket. The door should swing freely and sit flush with the panel when closed.
- Attach the latch mechanism. Most Zeny latches are spring-loaded slide bolts or barrel bolts that clip or screw to the door frame. Test the latch several times before moving on: it should close positively, resist being pushed open from the inside, and release cleanly when you operate it.
- If your cage has a seed catcher skirt, attach it around the outside of the lower cage section. These typically use tension clips or hooks that snap onto the exterior bars.
- Install the pull-out tray in its slot and confirm it moves in and out without catching. If it sticks, check for bent tray walls or debris in the channel.
- Clip food and water bowl hangers to the designated bar locations inside the cage. Position them away from perches directly above to avoid contamination.
- Install perches in the pre-drilled end holes or clip-on positions. Use the variety that came with the cage for now, and plan to add natural wood perches of different diameters once the bird settles in.
The Zeny manual is explicit about door security: always make sure locks are functioning properly before a bird is inside. I'd add to that, test every door latch with deliberate force, not just a light push. Parrots and even smaller birds will work a latch repeatedly until they find a weak point. If the latch feels loose or doesn't spring back firmly, tighten the mounting screws or consider adding a secondary clip.
Stability and safety checks before introducing a bird
This is the step most people skip because the cage looks done and they're ready to move it into place. If you're assembling a mcage bird cage instead of a Zeny model, follow the mcage bird cage assembly instructions for the correct order and fit checks. Do not skip it. A five-minute safety check here prevents injuries that are very hard to reverse.
- Tip test: push the top of the cage firmly in each direction. It should not wobble on a flat surface. If it rocks, check that all stand legs are fully seated and tighten any base connections.
- Sharp edge check: run a bare hand slowly along every external seam, cut wire end, and door frame edge. Zeny cages are powder-coated from the factory, but wire cut points occasionally have rough spots. File down anything that snags your skin.
- Bar spacing verification: for small birds, confirm that no gap between bars is wider than the spaces in the original panel design. Bent bars should be corrected before use.
- Door latch test: close every door and attempt to open it using the same pressure a curious bird would apply from the inside. A firm push with two fingers should not release the latch.
- Tray fit: confirm the pull-out tray is fully seated and does not have gaps around its edges that a bird could get a toe or beak into.
- Hardware inspection: look for any bolts or wing nuts that are not fully tightened. Loose hardware can work free over time and become an ingestion hazard.
- Entrance size check: the Zeny manual specifically calls out verifying that the door opening is sized appropriately for your bird so entry and exit won't cause injury.
Troubleshooting common assembly problems
Even with a straightforward cage design, a few things come up consistently. Here's how to handle the most common ones.
Panels won't fully seat or align
This almost always means you over-tightened one connection before the rest of the frame was square. Loosen all bolts by half a turn, re-square the base frame by pressing down on opposite corners, then re-tighten in a star pattern (opposite corners alternately) rather than going around in a circle.
Door doesn't hang straight or swings open on its own
Check whether both hinge pins are fully seated. A partially seated top pin lets the door lean outward. If the pins are seated but the door still swings, the opening in the panel may be slightly out of square from a misaligned frame, so revisit the frame alignment step above.
Latch won't catch or feels loose
The latch mounting screws may not be fully tightened, or the strike point on the door frame is misaligned. Loosen the latch, close the door, then press the latch into position and retighten while it's in the closed position. This naturally aligns the catch to the strike.
Tray sticks or won't slide out
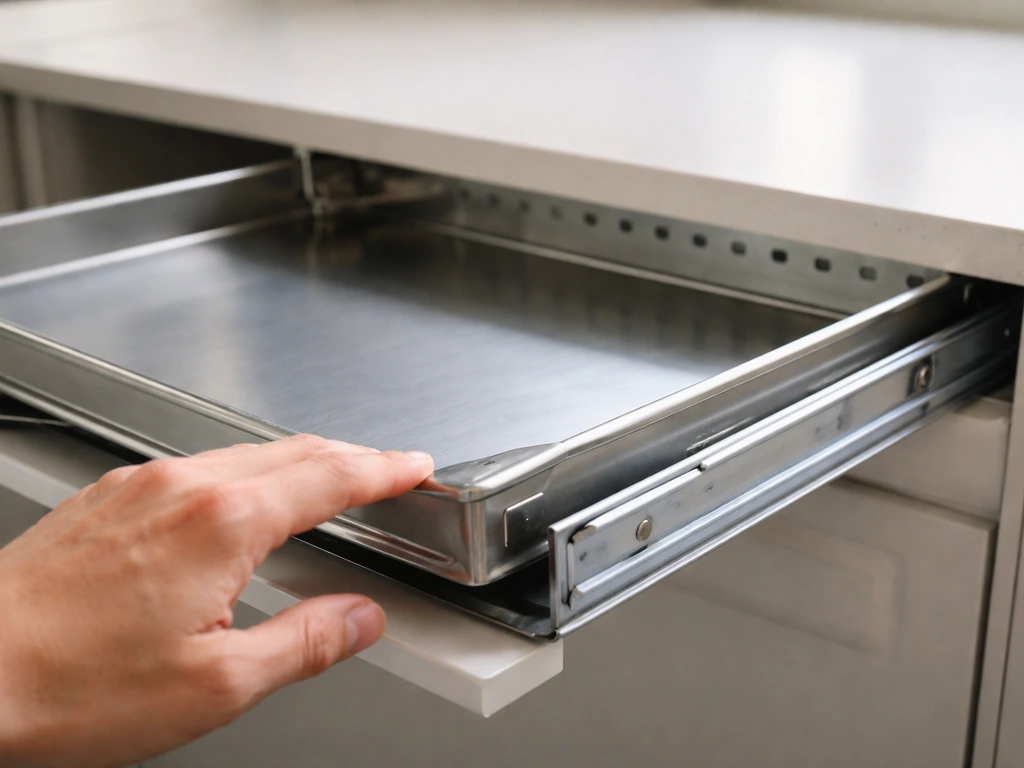
A bowed tray is the usual culprit. Set the tray on a flat surface and press down gently on any raised corners to flatten it. Also check the tray channel rails for any inward-bent sections of the frame that may be pinching the tray walls.
Missing parts
If you're missing hardware after a full parts check, don't improvise with random bolts from a hardware store unless you can exactly match the diameter and thread pitch. Mismatched hardware can strip out connection points or leave gaps. Contact Zeny directly with your model number (printed on the box or the frame label) for replacement parts. Most ship within a few business days.
Placement, airflow, and seasonal protection tips
Where you put the cage matters as much as how you built it. The Zeny manual covers the core rules: flat and stable surface, away from direct sunlight, away from drafts, and in a well-ventilated spot with good air circulation and adequate natural light. Here's what each of those means in practice.
- Flat surface: avoid placing the cage on carpet without a hard board underneath. Carpet compresses unevenly under load and casters can sink, creating a tilt that stresses the frame over time.
- Sunlight: a spot that gets morning light is fine and beneficial, but a cage sitting in direct afternoon sun through a window will overheat quickly. Aim for bright indirect light rather than direct sun.
- Drafts: keep the cage away from air conditioning vents, exterior doors, and open windows in cold weather. A cage near a window that gets opened in winter is a serious temperature-stress risk for birds.
- Airflow: good ventilation means fresh air circulates without cold drafts. A cage in a corner with walls on two sides limits airflow. Position the cage so at least two sides are open to the room.
- Seasonal covers: in winter or in rooms that cool significantly at night, a breathable cage cover (not airtight plastic) helps maintain stable temperatures. A heavy cotton or fleece drape works fine, and it also signals lights-out to your bird.
- Pest prevention basics: place the cage away from walls where insects or rodents could enter, and inspect the tray area regularly. Seed and droppings in the tray invite pests quickly if not cleaned every one to two days.
Customization for comfort and mess control
Once the cage passes safety checks and is in its permanent spot, the real setup begins. The stock configuration that comes out of the box is a starting point, not a finished habitat. A few targeted additions make a significant difference in both bird welfare and your daily maintenance.
Perches and enrichment
Replace at least one of the included plastic dowel perches with a natural wood perch of variable diameter, like a manzanita or dragonwood branch. Different diameters exercise the foot muscles and reduce the risk of pressure sores. Position perches at different heights but ensure the bird can turn around on each one without hitting the cage walls or getting droppings in the food and water bowls below.
Mess control and liners
Cut several layers of cage liner paper (unscented paper towels or purpose-cut cage paper) to fit the tray exactly. Stacking five or six sheets means daily cleanup is as simple as peeling off the top layer. Avoid scented or printed newspaper inks, which can be toxic. The seed catcher skirt that mounts around the cage exterior catches most of the husk and debris that birds kick out through the bars, which dramatically reduces floor cleanup time.
Feeder and water placement
Mount food bowls at a mid-height position the bird can reach easily from a perch. Keep water bowls away from perches and the main roosting area to reduce contamination from droppings. If you have a bird that dunks food in its water, a second small water cup positioned further away from the feeding station helps keep the drinking water clean longer.
Bird-safe decorative ideas
Rope toys, foraging boxes, and hanging wood or acrylic puzzles are all good additions as long as they're sized to your species and free from zinc or lead hardware (stainless steel or nickel-plated clips only). Rotate toys every one to two weeks to maintain interest. Avoid anything with loose loops large enough to catch a leg or neck, very small bells with removable clappers, or any toy coated in paint that flakes. When in doubt, check whether the toy is labeled safe for the specific bird size you have.
With the cage assembled, safety-checked, placed correctly, and outfitted for your bird's species and size, you're genuinely done. The assembly itself is the quickest part of this whole process. If you've worked through other brand setups before, the process here is comparable to what you'd find with Yaheetech or MCage assemblies, with the same general frame-first logic. The difference between a cage that lasts years and one that becomes a problem is almost always in the post-assembly check and the daily maintenance habits you build from day one. If you also need help dating your Hendryx bird cage, make sure you identify the exact model and any production markings before trying to assign an age how to date hendryx bird cage.
FAQ
What should I do if a panel doesn’t line up with the frame while assembling my zeny bird cage?
Stop and re-check the frame squareness first. If the base is even slightly out of square, hinge pins and latch hardware often won’t align. Loosen bolts by a small amount, adjust opposite corners, then tighten in an alternating pattern before you attach the panel fully.
How do I tell if wire spacing is actually safe once the panels are installed?
Don’t rely only on visual gaps. Run a ruler edge or your finger along each seam where panels meet the frame, and look for any bowing that creates a wider opening near the door hinges. For very small birds, pay extra attention to the door area because misalignment is most common there.
My door closes, but it doesn’t feel “snappy” when the latch springs back. Is that a sign the cage is unsafe?
Yes, treat it as unsafe until corrected. Tighten the latch mounting screws first, then retest after the door is fully closed. If it still feels loose, inspect the strike alignment and consider adding the recommended secondary clip if your specific model includes that option.
Can I assemble the cage without the included hardware, like using whatever bolts I have on hand?
Avoid it unless the replacement matches the exact thread pitch and bolt diameter. Mismatched hardware can strip connection points or leave micro-gaps around frames and doors. Use Zeny replacement parts tied to your exact model number if any hardware is missing.
What’s the quickest way to verify hinge pins are seated correctly?
With the door open, gently wiggle the top and bottom hinge sections by hand. You should feel no play if both pins are fully seated. If the top pin is only partially inserted, the door may lean outward even when the latch appears to engage.
The tray doesn’t slide smoothly after assembly. Could I have assembled something wrong earlier?
Often it’s frame alignment or a bowed tray. Place the tray on a flat surface and flatten any raised corners, then check the tray channel rails for inward-bent sections caused by over-tightening before the frame was square.
How tight should I make the bolts during zeny bird cage assembly?
Tighten firmly, but don’t fully torque everything after the first connection. The safest approach is to assemble loose first, square the frame, then tighten gradually in a star pattern. Over-tightening early is a common cause of door misalignment and tray issues.
Do I need to attach perches and bowls during the assembly steps, or can I do it after the cage is moved into place?
You can add them after the cage is standing, but don’t skip the safety check of doors and tray before moving. If you install everything early, keep your setup area stable and avoid re-moving the cage while components are loose, especially the door hardware and feeder door fittings.
Where should I place the cage to reduce escape risk related to drafts or sunlight?
Choose a flat, stable spot away from direct sun and strong drafts, but also avoid areas with frequent vibrations (doorways, HVAC blow paths). Even small temperature-driven panel movement can worsen a marginal door seal over time, so stabilize the location once you find a good spot.
Are there any toy materials or additions I should avoid with a Zeny cage?
Yes. Avoid toys and attachments with zinc or lead-containing hardware. Also check for paint that can flake, loose loops that could catch a leg or neck, and small bells with removable clappers. If a toy isn’t labeled safe for your bird size, use caution or choose a different option.
Next Article
MCage Bird Cage Assembly Instructions: Step by Step
Step-by-step MCage bird cage assembly from parts check to door fit, stability and safety checks plus quick troubleshooti