Assembling an MCage bird cage is a straightforward process once you know the sequence: build the stand and base first, connect the main frame panels, install doors with their latches oriented correctly, slide in the grate and tray, then run a full hardware and stability check before your bird goes anywhere near it. Most MCage models go together without specialized tools, and the whole build typically takes 30 to 60 minutes if you lay everything out before you start.
MCage Bird Cage Assembly Instructions: Step by Step

Maya Bennett
5 May 2026
These instructions cover the three most commonly referenced MCage models: the 64-inch Extra Large Corner Flight Cage (Model 10023), the 64-inch Extra Large Flight Cage (Model 12115), and the Extra Large Heavy Duty Stacker Breeding/Aviary Rolling Cage (Model 11028). For the Mcage Extra Large Heavy Duty Stacker Breeding/Aviary Rolling Cage (Model 11028), consult the dedicated user manual available for this exact model. The assembly logic is nearly identical across all three. Where steps differ by model, I call it out directly. If you have a different MCage model, the core sequence still applies.
What you need before you start

MCage markets its cages as 'no tools, no hassle' builds, and that is mostly true for the panel connections. That said, having a few basics on hand saves you from stopping mid-build to dig through a junk drawer.
- Phillips-head screwdriver (most MCage hardware is Phillips; some models include a small wrench)
- Adjustable wrench or pliers (for tightening nuts and bolts on breeder/rolling models)
- Rubber mallet or a folded cloth and a regular hammer (for seating panels and inserting casters)
- A clean, flat surface with enough room to spread out all panels at once (a garage floor or cleared living room works well)
- A second person, especially for large flight cages and the Model 11028 stacker — the manuals specifically recommend two-person assembly for those builds
Before you touch a single panel, clear the assembly area of small children and other pets. Packaging materials and small hardware pieces (bolts, washers, lock pins) are choking hazards. Keep the box flaps and zip ties in a trash bag as you go so nothing gets lost underfoot.
Space requirements
The 64-inch models need roughly a 6 x 6 foot clear floor zone for assembly. The stacker cage (Model 11028) is bulkier, so plan for at least 6 x 8 feet. You will be rotating panels and flipping the base, so walls and furniture in the way slow things down significantly.
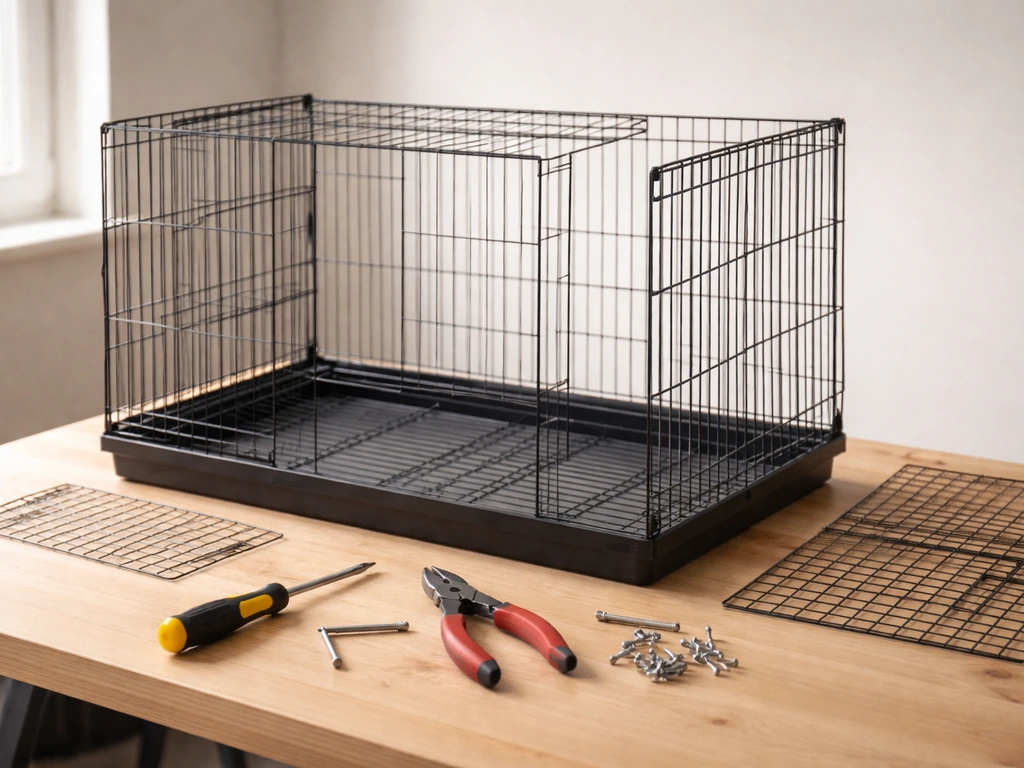
Unpack and identify every MCage component
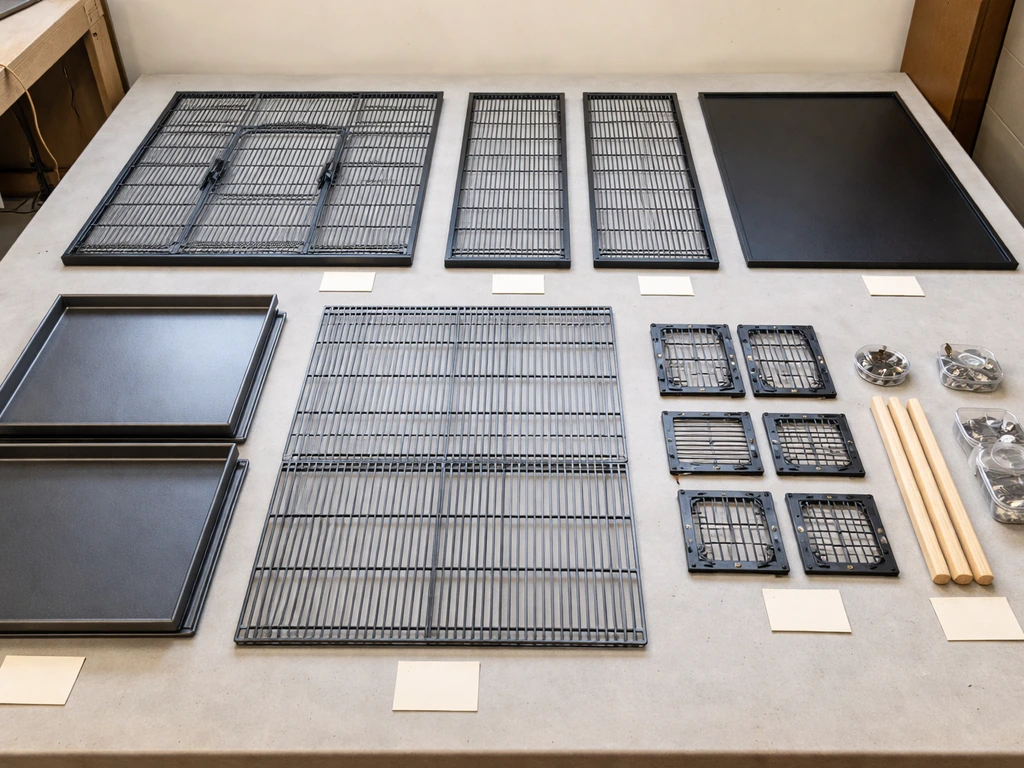
Do not skip this step. Laying out every part before assembly is what saves you from discovering a missing bolt at the worst possible moment. Unpack everything, keep it organized by category, and cross-check against your model's package contents list.
Model 10023 (Corner Flight Cage) parts
- Front panel
- Side panels (x2)
- Back corner panel
- Top panel
- Bottom frame/base
- Slide-out metal grates
- Slide-out plastic trays
- Seed skirt panels
- Wooden perches
- Stainless steel feeder cups
- Castors/wheels
- Assembly hardware (screws, nuts, washers)
Model 12115 (64-inch Flight Cage) parts
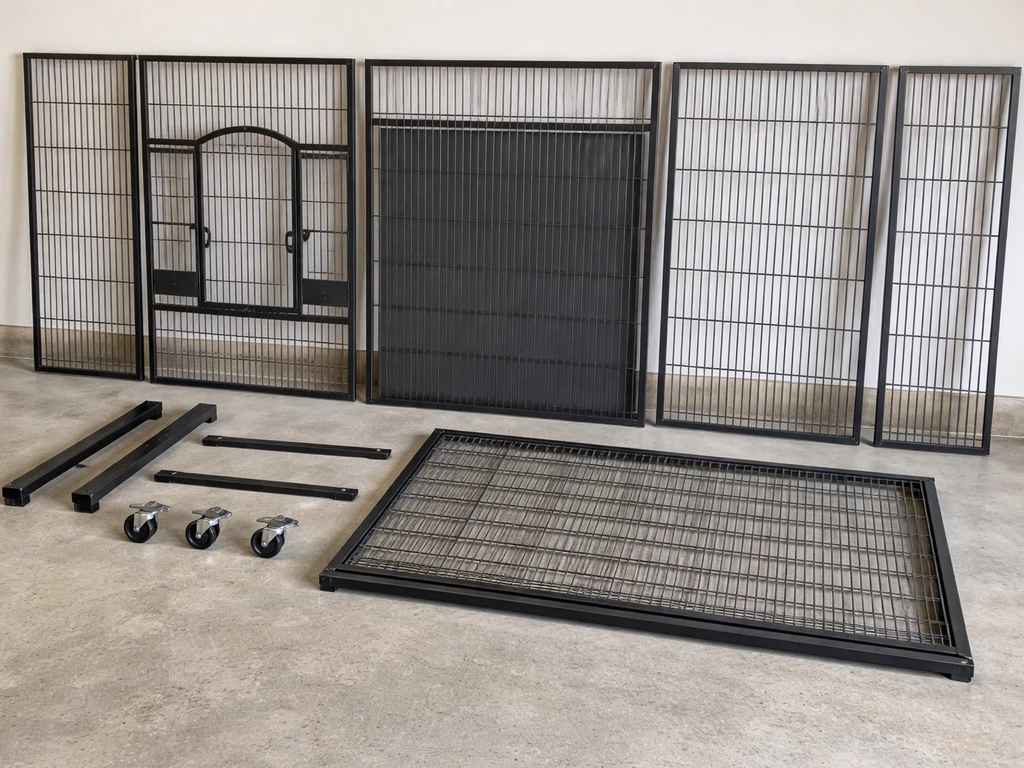
- Wrought iron cage panels: front, back, two sides, top, bottom
- Rolling stand components (legs and crossbars)
- Wheels including two lockable wheels
- Pull-out metal grate
- Heavy-duty plastic tray
- Feeder cups
- Wooden stand perches
- Assembly hardware
Model 11028 (Stacker/Breeder Rolling Cage) parts
- Main cage panels (front, back, sides)
- Main swing-out doors with safety locks
- Side breeding/feeding doors with latches
- Slide-out metal trays and grates (one per stacking level)
- Feeder cups (count varies by door count)
- Wooden stand perch(es)
- Base frame with caster mount sockets
- Casters/wheels
- Connecting hardware (screws, nuts, washers)
Once everything is out of the box, sort parts into three groups: structural panels, hardware/fasteners, and accessories (perches, cups, trays). If anything looks bent, cracked, or has a sharp wire end sticking out, set it aside and contact MCage customer service before you proceed. Bent bars and sharp edges are real injury risks for birds and for you.
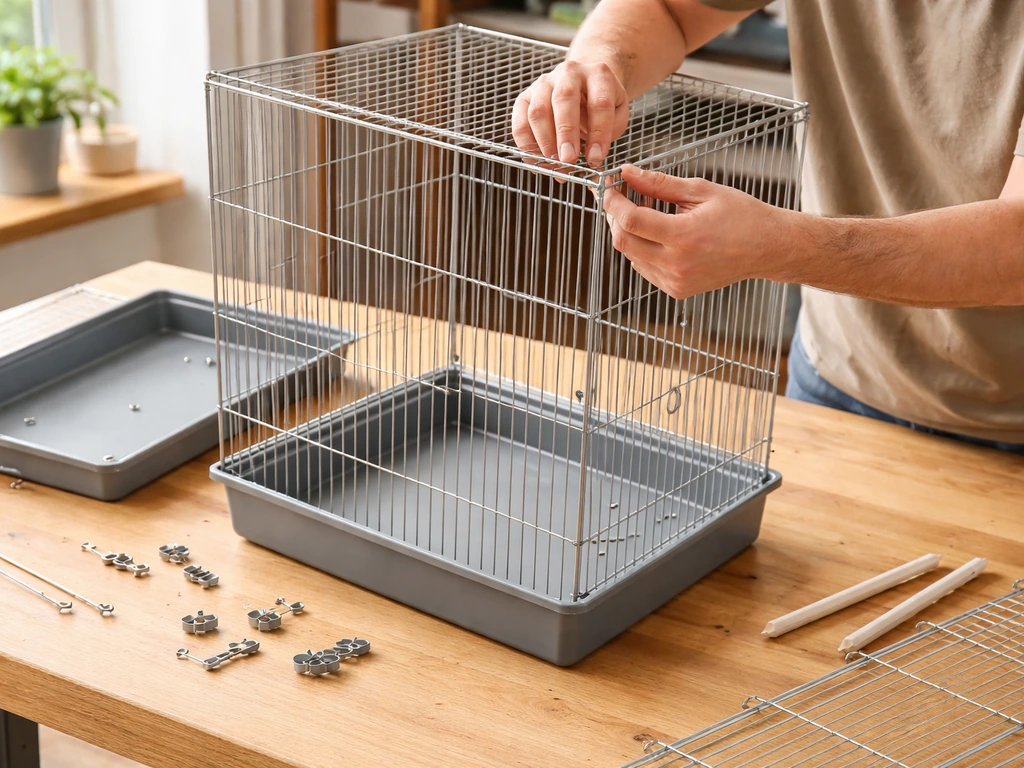
Step-by-step frame and base assembly
The golden rule here: loosely fit every component first, then go back and tighten everything once the full structure is connected. Tightening as you go causes parts to bind and misalign, which is the number-one reason assemblies end up crooked or wobbly.
Step 1: Assemble the rolling stand (Models 12115 and 11028)
- Identify the stand legs and crossbars. Check that the crossbar lips/flanges are oriented correctly per your diagram before connecting — flipping them the wrong way is a common mistake.
- Attach the four legs to the crossbars loosely so the frame is still adjustable.
- Install the wheels onto the stand legs. Position the two lockable wheels at the front of the stand. The lockable wheels need to face front so you can engage them easily once the cage is in its permanent spot.
- Place the storage shelf (if included) onto the designated shelf rails.
- Once all stand parts are fitted and the frame is square, tighten all connections firmly.
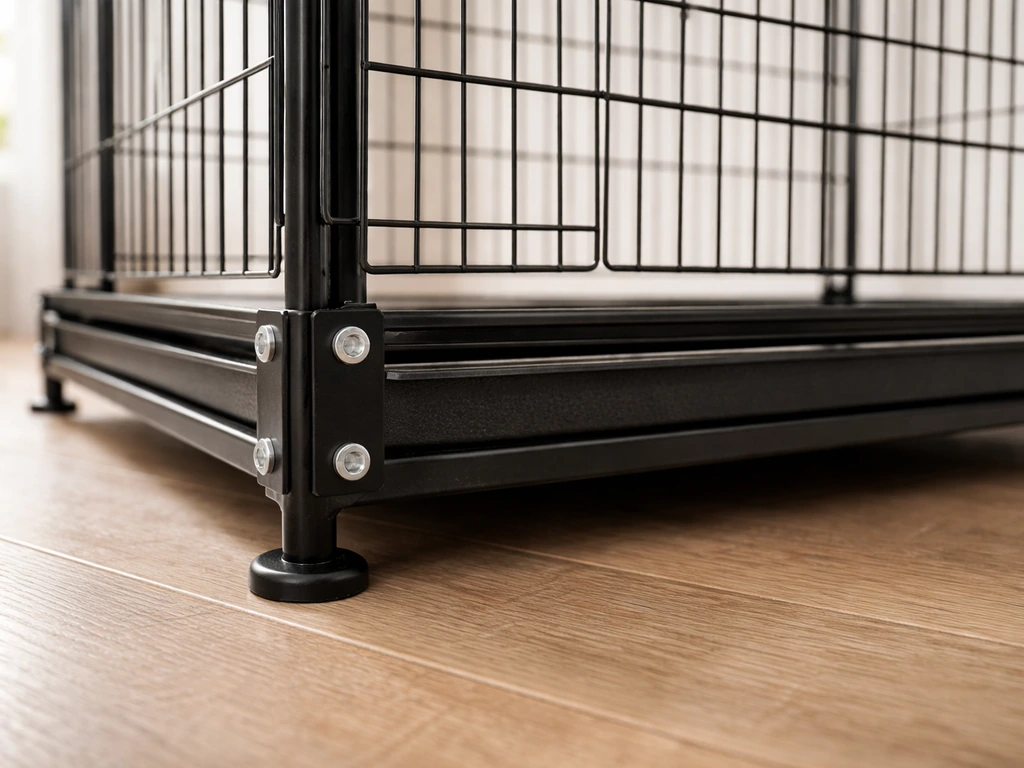
Step 2: Attach casters to base frame (Model 11028 and Model 10023)
On the stacker and corner flight models, casters insert directly into sockets on the bottom base frame rather than a separate stand. Press each caster into its socket firmly. A rubber mallet (or a cloth-covered hammer) helps seat stubborn casters fully. Make sure all four casters click or lock into their sockets before you set the base upright.
Step 3: Assemble the main cage frame
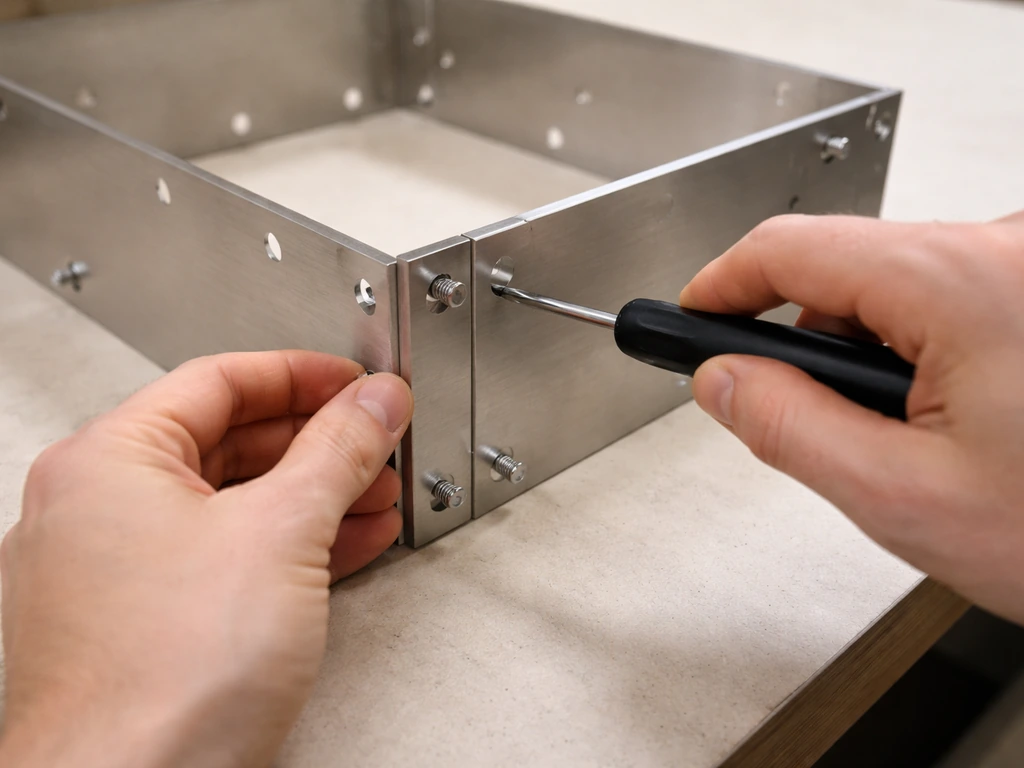
- Connect the two side panels to the front panel first. Insert all connecting bolts/screws loosely.
- Attach the back panel (or back corner panel on Model 10023) to complete the four-wall frame.
- Once all four walls are loosely connected and the frame is standing square, attach the bottom panel to the base of the frame assembly.
- Attach the top panel last.
- Go around every connection point and tighten all fasteners fully. On the 11028, you will also be attaching the grate/tray support rails to the inside of the lower frame at this stage — slide those into their slots before fully tightening the surrounding screws.
On Model 11028, the lower cage section is assembled first as a complete unit before any stacking sections are added. If you are building a multi-level stacker, fully assemble and hardware-check each section before stacking and connecting the next.
Step 4: Mount the cage onto the stand
With the stand upright and the cage frame fully assembled, lower the cage body onto the stand frame. This is the step where a second person really earns their keep on the tall 64-inch models. Confirm the cage sits fully and evenly on all four stand contact points before you move on.
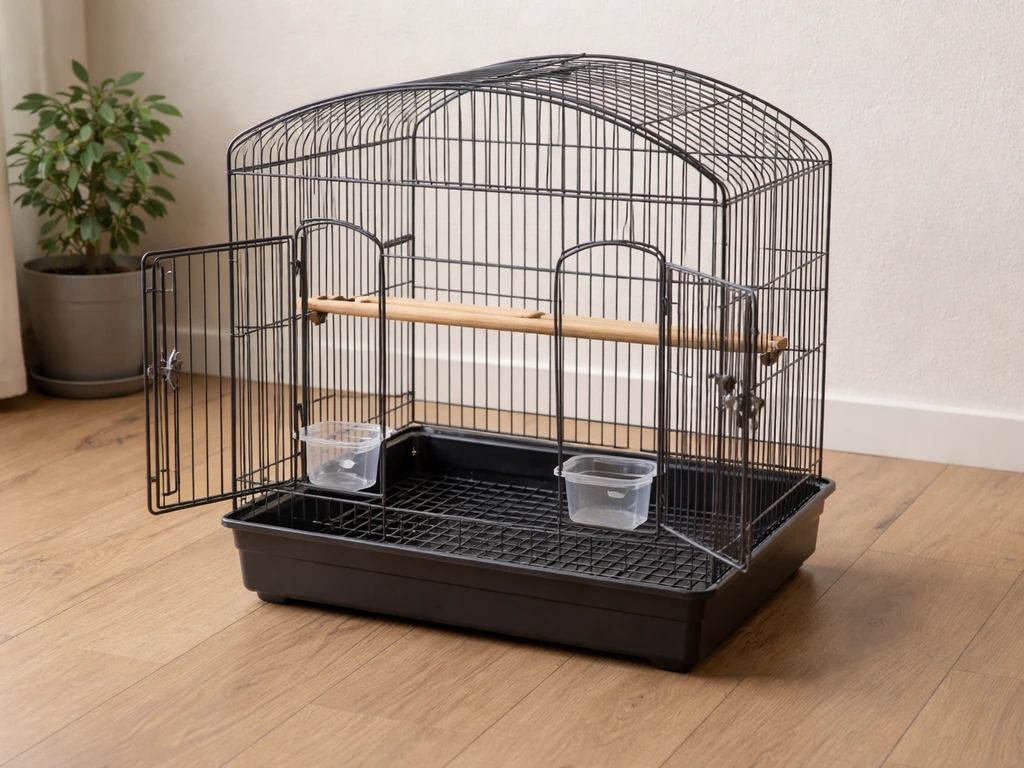
Installing doors, locks, and internal features safely
Installing the main front door (Model 12115)
Hang the large front door onto the cage frame using the hinge pins provided. Once hung, test that the door swings open and closed smoothly through its full range of motion. Then engage the metal safety lock and verify it catches cleanly. If the lock feels stiff or the door pops open under light pressure, do not leave it for later. Fix alignment now, before accessories go in.
Installing breeding and side doors (Models 11028 and 12115)
Side breeding/nest doors and smaller feeding doors are installed after the main door. On Model 11028, the manual is explicit about latch orientation: the latches on main swing-out doors must face the middle of the cage. The Model 11028 instruction manual page documents the latch orientation for main swing-out doors, noting that the latches should face the middle of the cage latches on main swing-out doors must face the middle of the cage.. If a latch faces outward, the door can be pushed open from the inside by a determined parrot. Take an extra 30 seconds to confirm this before moving on. Attach each door, test the swing, and engage the latch fully.
Sliding in the grate and tray
Once doors are installed, slide the pull-out metal grate into its rails above the tray slot. Then slide the heavy-duty plastic tray into the lowest slot beneath the grate. Both should move smoothly without forcing. If either one sticks at this stage, pull it back out, check the rails for misalignment, and re-seat. Do not force a stuck tray, bent rail edges can create sharp points that cut you during future cleaning.
Feeder cups and perches
Clip feeder cups into their designated door or wall mount positions. Hang or insert wooden perches through the designated bar slots. MCage perches typically clip or bolt between bar pairs, make sure each perch is secure enough that it does not rotate or drop when a bird lands on it. If a perch wobbles, tighten its connection point or add a rubber washer behind the mounting bolt.
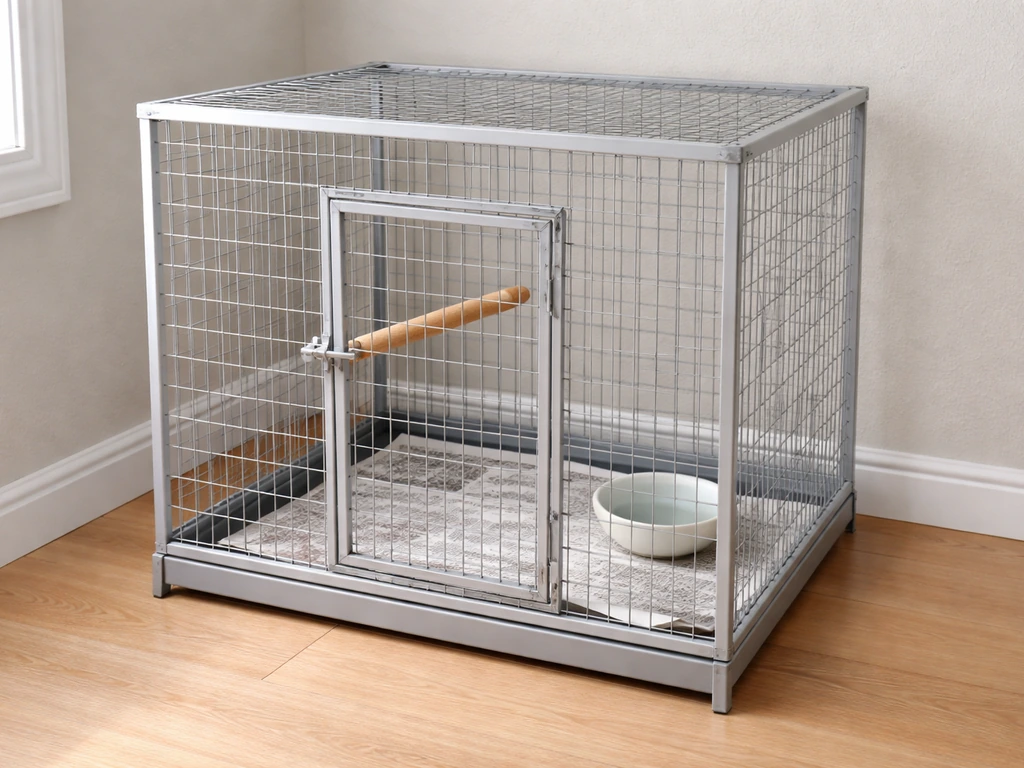
Stability, alignment, and hardware safety checks
Never put a bird in the cage until you have run through this checklist. A five-minute inspection here prevents escape attempts, injuries, and damaged hardware down the road. After the cage is assembled, follow the bird cage assembly instructions checklist to confirm alignment, fit, and safe hardware before introducing your bird.
- Push the cage firmly side to side and front to back. It should not rock or shift. If it does, check all stand connections and tighten any loose bolts.
- Engage the lockable wheels and confirm the cage stays put when pushed.
- Run your fingers slowly along every bar, panel edge, and weld point. Feel for sharp wire ends, rough welds, or bent bars that jut inward. File or tape-wrap any sharp spot before the bird goes in.
- Open and close every door. Each one should swing freely, latch firmly, and stay latched when you give the door a firm push from the outside.
- Engage and disengage every safety lock. Locks should click into place without needing to force them.
- Pull the grate and tray out fully, then re-insert them. Both should slide without catching.
- Tug each perch. Zero rotation, zero drop.
- Confirm feeder cups are seated and will not tip if a bird grabs the rim.
On the Model 11028, the official manual calls this the 'Final Inspection' and treats it as a mandatory assembly step, not optional. I'd extend that attitude to every MCage build regardless of model.
Troubleshooting common assembly problems
| Problem | Likely cause | Fix |
|---|---|---|
| Cage feels wobbly or rocks side to side | Stand connections or cage-to-stand joints not fully tightened | Go through every bolt and nut in the stand and base, tighten fully; engage lockable wheels |
| Panels won't line up / bars look crooked | Parts tightened before full assembly was complete | Loosen all fasteners, re-align panels by hand, then tighten in sequence starting from the base |
| Door won't close or latch won't catch | Panel misalignment causing hinge to bind, or debris in latch channel | Check that all surrounding panels are properly aligned and fully tightened; clear debris from latch |
| Door latch faces wrong direction | Door installed backwards or upside down | Rehang the door so the latch faces the interior/middle of the cage (critical on Model 11028 main doors) |
| Tray or grate sticks or won't slide | Rail misalignment, debris, or bent tray lip | Remove tray/grate, clear debris, check rails are parallel and unobstructed, re-insert straight |
| Caster won't seat fully into socket | Socket needs more force or caster is wrong orientation | Use a rubber mallet; check caster stem orientation before striking |
| Missing hardware or wrong parts | Packing error | Check all foam/paper wrapping before assuming parts are missing; contact MCage support with model number |
The most common overall failure mode across MCage builds is tightening screws too early. If you are fighting the assembly at any point, the fastest fix is to loosen everything back to hand-tight, re-align, and tighten again in sequence from the bottom up.
Final setup: cleaning, placement, and welfare-safe accessories
Clean the cage before your bird moves in
New cages come with manufacturing residue, metal dust, and packaging chemicals on the bars. Before your bird goes in, wipe down every bar and panel with a damp cloth and a bird-safe cleaner (plain diluted white vinegar works well, just rinse thoroughly). Pull out the grate and tray, wash them with mild soap and warm water, rinse fully, and dry completely before reinserting. Wet trays grow mold fast, so 'completely dry' is not optional. Avoid any aerosol cleaners, bleach, or heavy chemical products near MCage enclosures.
Placement considerations
Position the cage on a stable, level floor or surface. The MCage manuals for both Model 12115 and Model 10023 are clear: keep it away from direct sunlight, cold drafts, heating vents, and air conditioning output. A spot at roughly human shoulder height in a room where your bird can see and hear household activity is the welfare-appropriate choice for most species. Once you have found the right spot, engage the lockable wheels and leave them locked.
Accessories and customization
MCage flight cages have good interior clearance for adding a second perch, rope toys, or foraging holders. Keep every addition bird-safe: untreated natural wood, stainless steel, or food-grade acrylic only. Avoid zinc-heavy hardware, galvanized wire attachments, and anything with small clips that could trap a toe. Add accessories one at a time over the first week so your bird can adjust without feeling overwhelmed by a cluttered new space.
Quick final checklist before introducing your bird
- All screws, nuts, and bolts are fully tightened
- All doors latch firmly and safety locks engage
- No sharp edges, bent bars, or loose wire ends
- Tray and grate are clean, dry, and seated correctly
- Feeder cups are filled and secure
- Cage is on a level surface, lockable wheels engaged
- Placement avoids direct sunlight, drafts, and extreme temperatures
- Assembly area cleaned up — no small hardware pieces or plastic packaging left accessible to pets or children
Once this list is clear, your MCage build is done and ready. If you are also trying to figure out the right way to date a Hendryx bird cage, you can follow a similar checklist approach focused on identification and matching parts. If you are setting up cages from other brands alongside or comparing assembly approaches, the process for similarly sized models from Yaheetech and Zeny follows a very comparable panel-first, hardware-second workflow, so experience with one transfers well. If you are specifically assembling a Zeny bird cage, follow these same panel-first, hardware-second steps to keep the build aligned and stable. If you want more specific Yaheetech bird cage assembly instructions, follow the model sequence and do the final hardware and stability check before placing your bird Yaheetech and Zeny. The non-negotiables are always the same regardless of brand: no sharp edges, no loose latches, and no skipping the final hardware check.
FAQ
What should I do if a panel connection feels stiff or won’t line up during mcage bird cage assembly instructions?
Stop tightening. Loosen back to hand-tight, re-seat the panel so the corners sit flush, then tighten in order (start with the bottom and work upward). If it still resists, check for a swapped fastener (washer in the wrong spot can add thickness) and confirm you installed the correct frame side for your model.
How can I confirm the doors are aligned correctly before adding the grate, tray, and accessories?
Test the door swing while the cage is still empty. Close the latch fully and try to open it with light, outward hand pressure. If there is any gap at the latch edge or the door rubs the frame, correct alignment now (hinge pin seating and latch catch position) because accessories can limit access later.
Why won’t my pull-out tray slide smoothly even after re-seating it?
First inspect the rails along their full length, look for a bent lip, and verify both rails are at the same height. Then check that the grate is seated fully in its rails, since a slightly mis-seated grate can misalign the tray path. Dry-run the tray with the grate in place before tightening any nearby screws.
Can I assemble the cage outdoors or on a carpeted floor?
Avoid both if possible. Outdoor wind can blow away small hardware, and carpet can shift during caster seating and base flipping, leading to a crooked frame. Use a clear, level hard surface, and keep a parts organizer so bolts and lock pins do not scatter.
What if I find bent wire, sharp ends, or broken bars after unpacking?
Do not continue the build. Set aside the damaged piece, remove any sharp fragments from the area, and contact customer service with a photo of the specific bar or panel. Continuing risks both bird injury and inaccurate fit that can cause doors and latches to fail.
How do I clean manufacturing residue safely if I do not have bird-safe cleaner on hand?
You can use plain diluted white vinegar for bars and panels, then rinse thoroughly with clean water. Do not rely on wipes alone, moisture and residue can remain in corners. For the grate and tray, wash with mild soap and warm water, rinse well, and dry completely before reinserting to prevent mold.
Is it okay to leave the wheels unlocked while my bird is in the cage?
No. Wheels can roll when a door is opened or when the cage is bumped. After you position the cage, lock all casters, then do a quick stability test by gently pushing the cage from multiple directions to confirm it does not shift.
What is the safest way to add toys and extra perches during the first week?
Add one at a time and verify each item is secure before leaving the bird unsupervised. Focus on bird-safe materials and avoid hardware with small clips or toe-trap gaps. If a perch rotates or a toy swings loosely, tighten or swap it before the bird interacts with it.
How do I handle latches that feel stiff or catch inconsistently after assembly?
Re-check door alignment and hinge pin seating first, then fully engage the latch several times to see if it smooths out. If it remains stiff, do not force it. A bent latch catch, misaligned door, or incorrect latch orientation is usually the cause, especially on models with side doors.
My cage wobbles slightly once it is upright. What should I check first?
Most wobble comes from panel misalignment caused by tightening too early or uneven base seating. Loosen to hand-tight, confirm the base is level on the floor, re-seat casters (if applicable), then tighten in sequence from bottom up. Also verify that all four stand contact points are actually bearing weight, not just the frame edge.