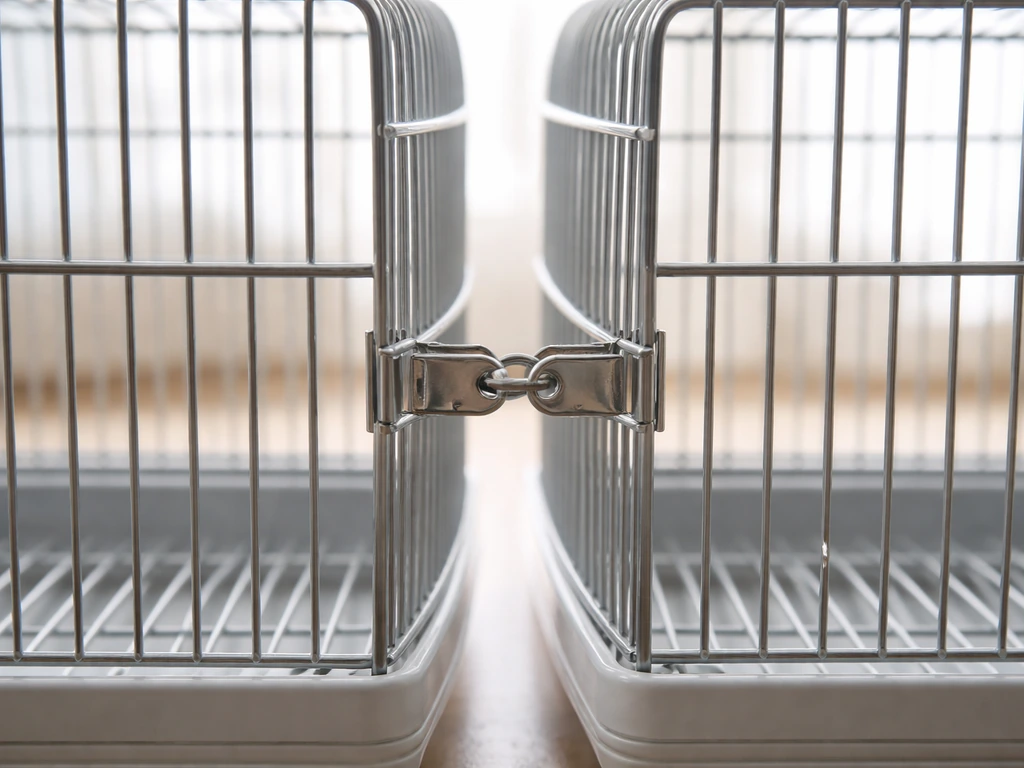
You can attach most nesting boxes to a bird cage using one of four methods: cage clips or clamps, zip ties (trimmed flush), wire ties, or a stand-off bracket screwed into a wooden frame. If you're dividing a larger aviary into separate sections, use a bird-safe bird cage divider and secure it so each area stays stable and easy to clean. Which one you use depends on your cage's bar material, spacing, and whether the box mounts inside or outside the bars. Get the method right and the box will stay rock-solid, stay cleanable, and stay safe for your bird.
How to Attach a Nesting Box to a Bird Cage Safely

Maya Bennett
6 May 2026
Pick the right nesting box for your bird and cage
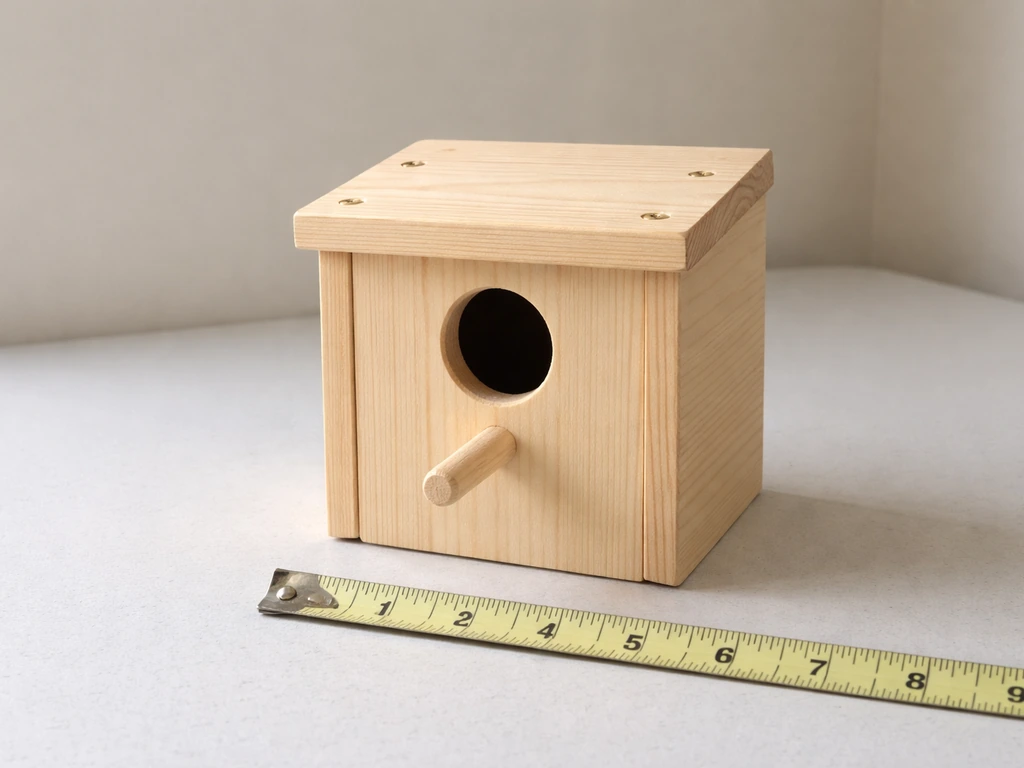
Before you touch a single clip or zip tie, make sure the box actually fits your species. A box that's too large gives the female nowhere to feel secure. Too small and she won't use it, or worse, she'll get stuck. The entry hole diameter is the most critical measurement because it determines who gets in and who doesn't. If you want the box itself to fit correctly, measure the cage and the entry opening first, then compare those numbers to the nesting box specs how to measure a bird cage.
| Species | Floor Size (approx.) | Box Depth | Entry Hole Diameter |
|---|---|---|---|
| Budgerigar | 6–8 in wide × 6–7 in deep | 9 in tall | 1.5–2 in (4–5 cm) |
| Cockatiel | 8–10 in wide × 8–10 in deep | 10–12 in tall | ~2 in (5 cm) |
| Finch/Canary | 4–6 in wide × 4–6 in deep | 6–8 in tall | 1–1.25 in (2.5–3 cm) |
| Lovebird | 6–7 in wide × 6–7 in deep | 8–10 in tall | ~1.75 in (4.5 cm) |
Beyond dimensions, check the construction. Boxes should be made from untreated, unfinished wood. Certain wood oils and finishes are toxic to birds, so avoid anything pressure-treated, painted, or sealed with varnish. Safe wood choices include kiln-dried pine, untreated plywood, and natural hardwoods like maple or apple. Cedar and cherry are generally flagged as unsafe due to aromatic compounds and natural oils. The interior walls should be slightly rough (not sanded smooth) so the female can grip and move around easily. Most importantly, the box needs a hinged side panel or a removable roof so you can open it for monitoring and cleaning. If the box you're looking at has no access panel, skip it.
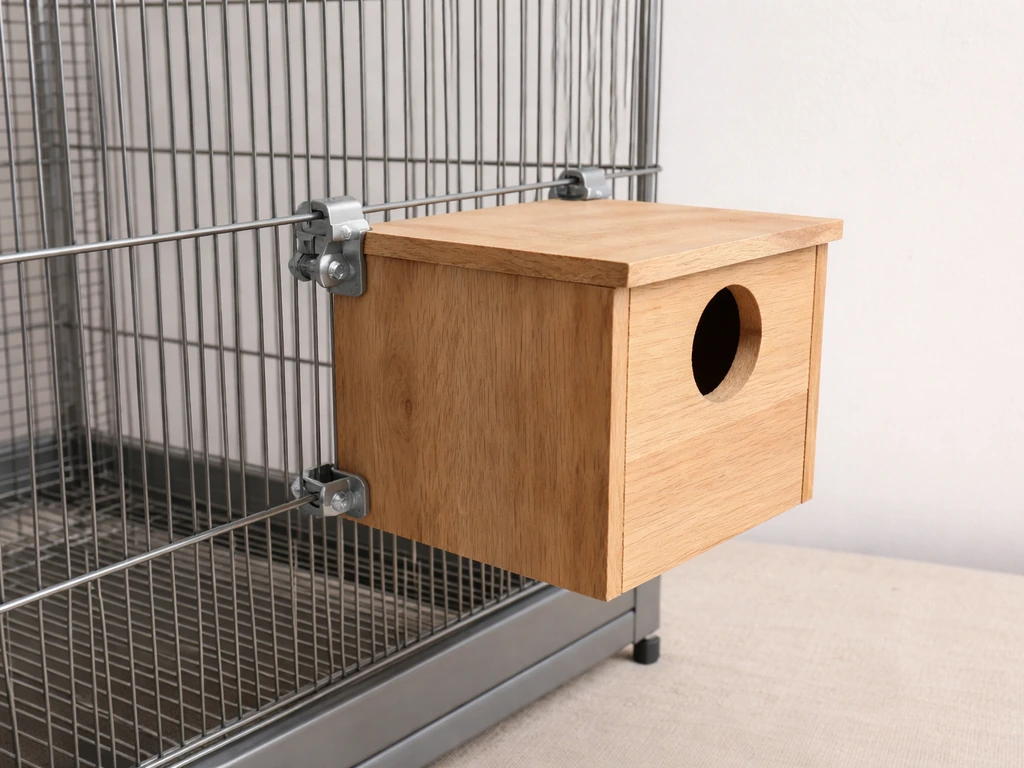
For the cage fit: measure the cage door opening before you buy. The box needs to either pass through the main cage door for interior mounting, or sit flush outside the bars for exterior mounting. Most commercial nest boxes are designed for exterior bar-mount, which is easier to clean and doesn't eat up floor space. Interior mounting works better in very large aviaries or when the cage bars are too widely spaced to support an exterior mount safely.
Placement rules: where it should sit and what to avoid
Height matters a lot. Birds feel safest nesting high, so place the box in the upper third of the cage. The entry hole should face inward toward the cage (for exterior-mounted boxes) so the bird can land on a nearby perch and hop in. If there's no perch close to the entry hole, add a short 4–6 inch perch stub directly below the hole at about a 1–2 inch clearance. Do not attach a long exterior landing perch on an indoor cage setup because it creates an unnecessary foothold for cage-bar climbing that can put stress on the mounting hardware.
Keep the box away from food and water dishes. Nesting material, feathers, and droppings will fall from the entry hole. If the water dish is directly below, you'll be changing it constantly and risking contamination. Aim for at least 12 inches of horizontal separation from the nearest dish. Also avoid placing the box directly under a ventilation fan, open window, or air conditioning vent. Drafts stress breeding birds and can chill eggs and chicks. Finally, position the box so the access panel (hinged side or roof) faces outward and can swing fully open without hitting the cage wall or cover.
- Mount in the upper third of the cage
- Entry hole faces inward (toward perch access), not toward a wall
- At least 12 inches away from food and water
- Access panel must open fully without obstruction
- No direct drafts from fans, vents, or windows
- Leave at least 1–2 inches of clearance around the box for airflow
Attachment methods by cage style
There's no single right method. Your cage's bar material, bar spacing, and frame construction will determine what works. Here's how to match the method to your setup.
Cage clips and clamps
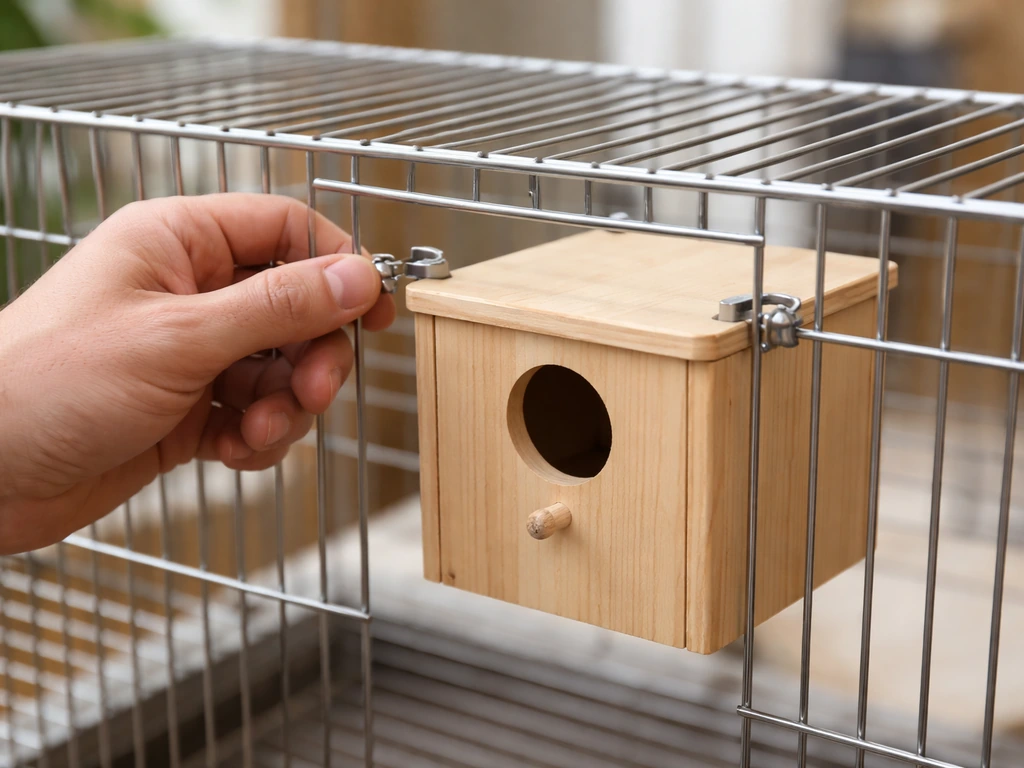
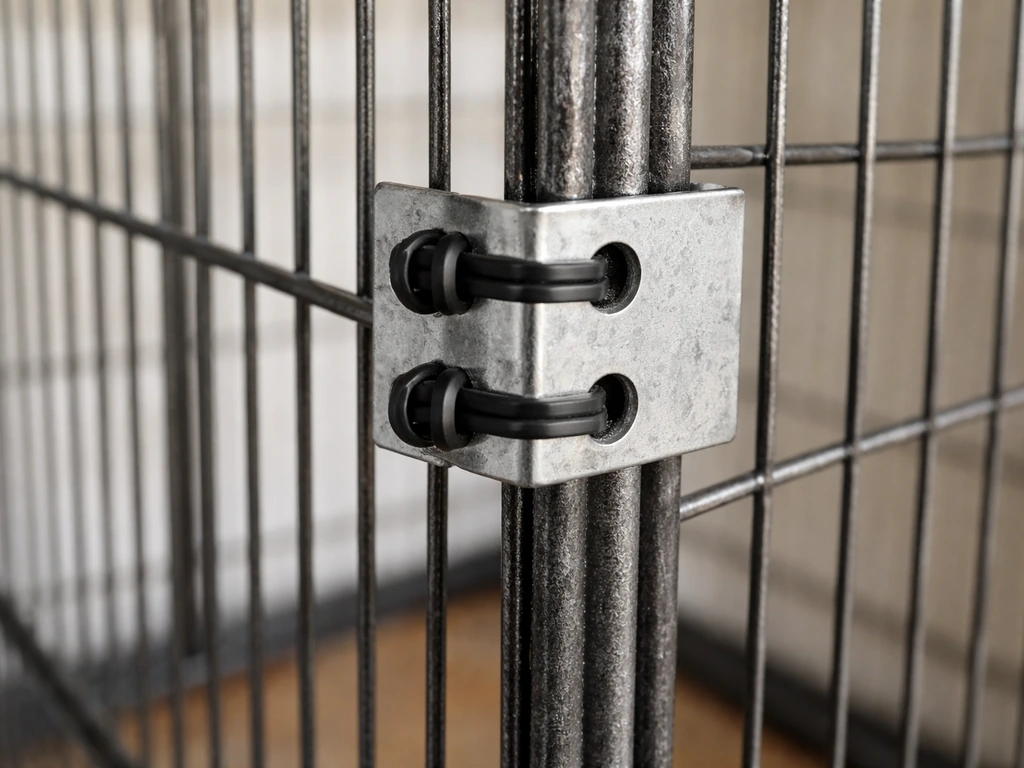
This is the best option for most standard metal-bar cages with horizontal or vertical bars spaced 0.5–1 inch apart. Cage clips (sometimes called J-clips or hog-ring clips) loop through the box's pre-drilled mounting holes and then around a cage bar. You crimp them tight with pliers. They're strong, removable, and leave no sharp protrusion if installed correctly. Use stainless steel or nickel-plated clips only. Avoid any clip with a split-ring or dog-clip design because a bird can get its beak or toe caught in the gap. After crimping, run your finger over every clip to confirm there are no sharp edges or tails sticking out.
Zip ties
Zip ties work well as a secondary support or when you need quick, adjustable positioning. Thread them through the mounting holes in the box bracket and around one or two cage bars, pull them snug, and then trim the tail flush with a wire cutter. This last step is critical: a long zip tie tail can snag a toe or a wing feather. Cut it so there's less than 1/8 inch of tail remaining. Use only UV-stabilized nylon zip ties rated for outdoor use as they resist breaking down over time. Avoid using zip ties as the sole attachment point on heavy boxes because the plastic can fatigue and snap under repeated bird movement and vibration.
Wire ties
Galvanized or stainless steel wire (16–18 gauge) threaded through the box bracket and twisted tight around the bar is a classic method that's very secure. Twist the wire 3–4 times, then fold the twisted end flat against the bar using needle-nose pliers. The folded tail should point away from any area where the bird will perch or walk. Never leave a wire end sticking out at a right angle. Galvanized wire is fine for exterior-mount boxes. If the box is positioned where the bird chews near the attachment point, use stainless steel instead.
Brackets for wooden or PVC-framed cages
If your cage has a wooden or PVC frame (common in large aviary setups), you can screw a small L-bracket or Z-bracket directly into the frame to create a shelf ledge the box rests on, then secure the front of the box with a clip or wire tie to the bars. Use stainless steel or nickel-plated hardware only. Pre-drill pilot holes to prevent wood splitting. Make sure the screw length doesn't protrude into the interior of the cage frame where a bird could contact a screw tip.
Hanging systems for wire aviaries
For open-mesh aviaries, some boxes come with a hook-and-bracket hanging system. A metal Z-hook on the back of the box hangs over the top wire of an opening. This works but adds the most wobble. If using this method, add a lower zip tie or wire tie at the bottom of the box to stop forward swing. Test by pushing the box firmly from below, from the side, and from the front. It should not shift more than a few millimeters.
Step-by-step install walkthrough and measurements
Before you start, gather everything you need so you're not hunting for tools mid-install.
- Nesting box with mounting bracket or pre-drilled holes
- J-clips or hog-ring clips (stainless steel) + crimping pliers, OR
- 16–18 gauge stainless/galvanized wire + needle-nose pliers, OR
- UV-rated zip ties + wire cutters
- Tape measure or ruler
- Felt-tip marker or tape to mark bar positions
- Small flashlight for checking inside the box and bar gaps
- Measure and mark your mount point. With the cage empty of the bird, measure from the cage floor to the upper-third height and mark the target bar with a piece of tape. For a cage that's 24 inches tall, that's roughly 16–18 inches up.
- Hold the box in position against the outside of the bars at your marked height. Check that the entry hole aligns with a gap between bars wide enough for your bird. The entry hole should not be partially blocked by a bar. If it is, shift the box up or down one bar spacing.
- Check the access panel clearance. Swing or slide open the hinged side or roof. Confirm it clears the cage cover, wall, or surrounding furniture by at least 3 inches.
- Mark the two attachment points on the bars (upper and lower clip or tie locations). For a standard-size budgie or cockatiel box, the upper attachment should be within 1 inch of the top of the box's back bracket, and the lower attachment within 1 inch of the bottom.
- Attach upper clip/wire/zip tie first. Secure it snug but test that the box can still be adjusted slightly if needed before locking in. Crimping clips: use 2–3 firm squeezes with pliers until the clip is tight. Wire ties: 3–4 full twists, fold tail flat. Zip ties: pull to rated tension, trim tail to less than 1/8 inch.
- Attach lower clip/wire/zip tie. Now the box is fixed at two points. It should not pivot or rotate.
- If the box is heavy (cockatiel-size or larger), add a third attachment point at the midpoint of the back bracket.
- Push-test the box. Apply firm pressure from below (upward), from the front (inward), and from each side. There should be no movement beyond a 1–2 mm flex. If it wobbles, add another attachment point or re-crimp the existing ones.
- Open the access panel and look inside with a flashlight. Check for any clip tail, wire end, or zip tie tail that has poked through into the interior. Remove or cover any protrusion.
- Place a small amount of nesting material inside (untreated wood shavings or hay) to a depth of about 1 inch. Do not pack it tight.
Safety checks for stability, airflow, and non-toxic materials
Run through this checklist before you put your bird back in the cage. These aren't optional. A nesting box that falls or has a toxic finish can cause serious injury or death.
- Stability check: push the box from all four directions and from below. It should not shift or rotate.
- Sharp-edge check: run your bare finger over every clip, wire fold, and zip tie tail. If you feel a sharp point, it needs to be filed down, bent flat, or covered with a small piece of thick heat-shrink tubing.
- Interior clearance: no hardware protrudes inside the box cavity where the bird will sit or nest.
- Entry hole clearance: the hole is not partially blocked by a bar. There is at least 1 inch of clear space around the hole perimeter.
- Airflow: there is a visible gap (1–2 inches minimum) between the back/sides of the box and the cage bars. This prevents moisture buildup and keeps air circulating. Some boxes have small ventilation holes drilled near the top; if yours doesn't, drill 3–4 holes of 1/4 inch diameter near the top sides.
- Material check: wood is untreated and unfinished. No paint, varnish, or sealant is present inside or on the entry hole edges. Hardware is stainless or nickel-plated (no zinc die-cast clips that can flake).
- Rope and fiber check: if you've used any rope or fiber to help secure the box, remove it. Synthetic rope fibers are easily chewed, can be swallowed, and can wrap around toes. Use only metal clips, wire, or nylon zip ties.
- Access panel function: the hinged side or roof opens fully without catching on bars or cage structure, and re-latches securely.
Cleaning, access, and mess control after the box is mounted
Nesting boxes get messy fast. Droppings, shed feathers, food scraps, and nesting material pile up, and if you don't have a system for dealing with it, you'll end up with a hygiene problem that affects the whole cage. The good news is that a well-mounted box with a proper access panel makes this manageable.
During an active breeding cycle, spot-check the box every 2–3 days by opening the access panel and looking inside. You're checking for dead chicks, excessive droppings, or soaked nesting material. Scoop out any wet or heavily soiled material with a small spoon or gloved hand and replace it with fresh dry shavings. Do this gently and quickly to minimize disturbance. After each brood fledges, remove the box from the cage entirely, take out all old nesting material, and clean the interior with hot water and a stiff brush. Then scald the interior with boiling water to kill parasites and mites, and let it air dry completely before reinstalling. Do not use soap or chemical cleaners inside the box cavity. Outside surfaces can be wiped with a bird-safe disinfectant, but rinse and dry thoroughly before reuse.
For mess control around the box entry hole, place a small removable tray or sheet of paper on the cage shelf or floor directly below the hole. Feathers and nesting material will fall there and are easy to remove. If your cage doesn't have a shelf, a shallow plastic tray zip-tied to the bars at the box's floor level works well. Keep food and water dishes on the opposite side of the cage from the box, and check them daily during the nesting period since flying nesting debris can contaminate water quickly.
Bar cleanup around the mount points is also worth doing weekly. Droppings cement themselves to bars and clip hardware over time. A damp cloth or soft-bristle brush during your regular cage clean will keep the attachment points visible so you can spot any wear on your clips or wire before it becomes a problem.
Troubleshooting common install issues and when to adjust or remove
The box wobbles or swings when the bird enters and exits
This almost always means you only have one effective attachment point, or your clips haven't been crimped tight enough. Add a second attachment point at the opposite end of the back bracket, and re-crimp the existing hardware. If wobble continues, your cage bars may be too widely spaced for the bracket length. In that case, use a piece of 1/4-inch-thick plywood as a backing plate cut to span 3–4 bars, clip the box to the plywood, and clip the plywood to the bars at 4 corners.
The access door hits the cage or won't open fully
Shift the box along the bar run until the hinged panel has full clearance. If the cage cover is blocking the door, raise the box 2–3 inches lower or temporarily remove the cover section near the box during cleaning. If neither works, you may need a box with a top-opening panel instead of a side panel for your specific cage geometry.
The entry hole is partially blocked by a bar
Move the box up or down until the hole aligns with a full bar gap. Never try to bend or cut cage bars to make room. If you need to divide a bird cage to create separate zones, plan the barrier so each nesting area still has safe spacing and a properly aligned entry hole how to divide a bird cage. If no position gives a clean opening alignment, the box's entry hole position isn't compatible with your bar spacing. Try a different box with the hole placed higher or lower on its front face, or a box with a recessed tube entrance which you can angle to clear a bar.
Nesting material keeps spilling out of the entry hole
This is normal to a degree, but excessive spill usually means the concave floor insert (the bowl-shaped depression meant to hold eggs in place) is either absent or too shallow. A simple fix is to use slightly coarser nesting material like larger wood shavings that don't filter through the hole easily. Alternatively, add a small internal ledge just below the entry hole by gluing a thin strip of untreated wood across the floor 1 inch back from the hole.
The bird chews the attachment hardware
Birds will chew almost anything near a nesting area. If your bird is going after clip hardware or zip ties near the entry hole, reposition those attachment points to the back of the box bracket, away from the front face. Stainless steel wire is the most chew-resistant option. Avoid zinc-coated or painted clips in chew zones because flaking can cause heavy metal toxicity.
When to remove the box entirely
Remove the nesting box outside of breeding season if you're not actively trying to breed your birds. A permanently mounted box can trigger hormonal breeding behavior year-round, which is taxing on the female and can lead to chronic egg laying and associated health complications. Outside of breeding season, take the box down, clean it thoroughly, and store it. Reinstall it at the start of the next breeding cycle, which for most cage birds in temperate indoor environments is late winter to early spring when daylight hours are increasing.
If you're setting up more complex cage modifications alongside the nesting box, like dividing a large aviary to separate breeding pairs or connecting cages for more space during the off-season, those structural changes should be handled before you mount the nesting box so you're not redoing attachment work after a cage layout change. If you need to combine two cages, make sure the link point is secure and properly aligned so the bars and openings do not leave gaps a bird could slip through connecting cages.
FAQ
Can I attach a nesting box to any bird cage, or are some cages unsuitable?
Yes, but only if you can mount the box without stressing the cage structure. Before installing, check that the bar-to-bar spacing matches the box’s mounting holes or bracket width, and test stability by pushing the box firmly from all sides while you are still holding it. If the cage twists or the bars flex, switch to an exterior mount with clips and a second attachment point, or use a bracket that spreads load to a wooden/PVC frame member.
What if my cage forces me to mount the nest box inside the bars?
If you need interior mounting and the box cannot sit flush outside the bars, pick a box with a hinged side or removable roof so you can access it without reaching through the bars. Also keep the entry hole facing inward and ensure there is a safe perch option near the hole (either an existing perch or a short 4–6 inch perch stub). Avoid any setup where the bird must climb on the attachment hardware to reach the hole.
Can I use a nesting box that has been painted or sealed?
Do not. Even small amounts of paint, varnish, or other sealants can be harmful, especially once they warm up in the cage. Stick to untreated, unfinished wood and avoid pressure-treated materials. If you already bought a box that appears sealed, replace it or have the seller confirm it is bird-safe and unsealed on all interior surfaces, not just the outside.
Is it okay to place the nesting box on the side of the cage instead of the back?
You can, but it changes the rules for safety and cleaning. Make sure the box can be opened fully without hitting the cage wall or cover, then confirm the access panel still faces outward. For mess control, use a tray or paper beneath the entry hole and keep food and water dishes on the opposite side. Also verify that airflow from drafts does not blow directly into the opening, since interior placement can still expose chicks to chilling.
How do I confirm the clips or wire ties are truly safe after installation?
Use crimping that leaves no sharp tail ends, then do a “toe-and-beak sweep” check with a gloved fingertip and slow visual inspection along every clip or wire fold. If a bird can snag a toe on any protrusion, reposition the attachment point slightly toward the back of the bracket or switch to a different hardware style (for example, stainless wire instead of clips in chew-prone areas).
Do zip ties loosen over time, and what should I check after a week?
Yes. Check stability during the first few days, especially with zip ties. Look for gradual loosening from vibration, and re-tighten if needed, but do not over-tension plastic ties to the point where they deform the bracket holes. For heavy boxes, ensure clips or wire provide the primary hold, with zip ties only as secondary support.
What should I do if the entry hole doesn’t align with the bar gap?
If the entry hole does not line up with a clean bar opening, do not alter the cage bars. Instead, move the box up or down along the bar run until the bird has an unobstructed path through the opening. If no height works, choose a box with a different hole height, or one with a recessed tube entrance that can angle around the bars.
My box is spilling lots of nesting material through the hole. What’s the fix?
A common cause is that debris filters through or the egg-holding recess does not guide material properly. Use nesting material sized so it does not sift easily, and consider adding a small internal ledge just behind and slightly back from the hole (using untreated wood only) so spent material stays contained. If you still see excessive spill, reassess whether the box floor insert is present, correct, and level.
What if my bird starts chewing the attachment hardware near the nesting hole?
If your bird chews the front of the box near the entry hole, reposition the attachment hardware to the back of the bracket so the bird cannot work on it from the doorway side. Use stainless steel wire or a chew-resistant attachment method in chew zones, and avoid zinc-coated or painted hardware where flaking could pose a metal exposure risk.
Should I leave the nesting box on the cage all year?
Remove the box outside breeding season, unless you are actively managing breeding. A permanently mounted box can promote year-round breeding behavior, increasing stress on the female and potentially leading to chronic egg laying. Store the box clean and dry, then reinstall at the start of the next breeding cycle.
Next Article
How to Connect Two Bird Cages Together Safely
Step-by-step guide to securely link two bird cages with safe connectors, proper alignment, airflow, feeding access, and