
Ants in a bird cage are not just annoying, they are a genuine health risk to your bird. Species like fire ants can sting en masse and kill small or young birds, while Pharaoh ants carry bacteria directly onto food and water. The safest way to deal with a bird cage ant problem is to remove the bird immediately, clean all food debris, manually clear the ants, then block their return using physical barriers like ant moats, leg wraps, or raised stands, without ever spraying an insecticide near your bird.
Bird Cage Ant Problem: Safe DIY Fixes, Prevention & Care

Maya Bennett
10 Aug 2026
Quick overview and safety-first checklist
Before you do anything else, run through this checklist. Birds are far more sensitive to chemical exposures than mammals, and rushing straight to a spray can does more damage than the ants themselves. Work through these steps in order.
- Move your bird to a separate, secure room and close the door before you begin any treatment near the cage.
- Do not spray any household insecticide, aerosol, or scented repellent anywhere in the room — even 'natural' sprays like pyrethrin can be lethal to birds through inhalation.
- Remove all food, water dishes, and loose seed from the cage right now.
- Photograph the ant trails before wiping anything — this helps you trace entry points later.
- Check for fire ants specifically: if the ants are reddish-orange and actively swarming, treat this as an emergency and skip straight to the veterinary contact steps below.
- Gather gloves, a vacuum, soapy water, and clean cloths before starting hands-on removal.
- Ventilate the room naturally (open windows, no fans blowing toward the cage) before and after cleaning.
- After resolving the immediate problem, plan a physical ant-proofing fix — moat, leg barrier, or stand — within 24 hours to prevent reinvasion.
Why ants in bird cages are a real danger
Most ant species that enter homes are drawn to the exact things a bird cage provides: sweet fruit, seed, nectar, grease from pellets, and standing water. That combination makes the cage a prime foraging target. But the risks go well beyond a stolen grape.
Fire ants (Solenopsis invicta and relatives) are the most acute threat. They sting in coordinated groups, inject venom that causes local tissue necrosis, and have been documented killing nestling birds and injuring poultry in documented cases. Even a relatively small number of stings on a bird can cause systemic reactions. If you are in the southeastern U.S. or any warm region where fire ants are established and you see reddish, aggressive ants near your cage, treat the situation as an emergency.
Pharaoh ants (Monomorium pharaonis) are a different kind of problem. They are tiny, pale yellow-orange ants that infest buildings year-round and have been repeatedly documented in hospital settings carrying bacteria. When they walk across your bird's food dish or water bowl, they can mechanically transfer pathogens. A bird with any open wound, bite site, or compromised immune system is at heightened risk from this kind of contamination.
Even the more common odorous house ants and Argentine ants, which are not venomous, cause problems through persistent harassment. A bird that cannot eat or drink without being bitten around the beak will become stressed, stop eating, and decline quickly. Watch for these warning signs of ant exposure or envenomation in your bird and contact a vet immediately if you see any of them.
- Open-mouth breathing or tail-bobbing (acute respiratory distress)
- Visible swelling of the face, head, or crop area
- Sudden lethargy, loss of balance, or collapse
- Refusal to eat or drink
- Regurgitation or vomiting
- Puncture wounds, skin lesions, or crusty areas on the feet and legs
- Agitation, feather-ruffling, or unusually frantic movement on perches
If your bird shows any of those signs, move it away from the cage, keep it warm, and call an avian vet or the ASPCA Animal Poison Control hotline right away. Do not wait to see if it improves on its own.
Identifying the ants and their invasion signs
Knowing which ant you are dealing with changes how you respond. Pharaoh ants, for example, should never be treated with contact spray insecticides, their colonies 'bud' when stressed, splitting into multiple satellite colonies and making the infestation much worse. The four most common indoor species you will encounter near a bird cage in the U.S. are listed below.
| Species | Appearance | Nest Sites | Attracted To | Special Risk |
|---|---|---|---|---|
| Odorous house ant (Tapinoma sessile) | Brown-black, 1/16–1/8 in, smells like rotten coconut when crushed | Wall voids, potted plants, mulch near foundation | Sweets, sugars, spilled seed, fruit | Very widespread; high foraging numbers |
| Argentine ant (Linepithema humile) | Light to dark brown, 1/16 in, trails of thousands | Moist soil, under stones, near water | Sweets, fruit nectar, bird water dishes | Massive trail volume; hard to block completely |
| Pavement ant (Tetramorium spp.) | Brown-black, 1/16–1/8 in, two spines on thorax | Soil under slabs, baseboard cracks, utility runs | Greasy/protein foods, seed mixes, nuts | Uses building cracks and utility runs as highways |
| Pharaoh ant (Monomorium pharaonis) | Pale yellow-orange, tiny at 1/16 in | Wall voids, insulation, behind appliances — strictly indoors | Sweets, grease, proteins, water | Carries bacteria; colonies bud under pesticide pressure |
| Fire ant (Solenopsis invicta) | Reddish-orange, 1/8–1/4 in, aggressive and swarming | Outdoor soil mounds; can enter through gaps | Protein, fats, any food source | URGENT: venomous stings, can kill birds |
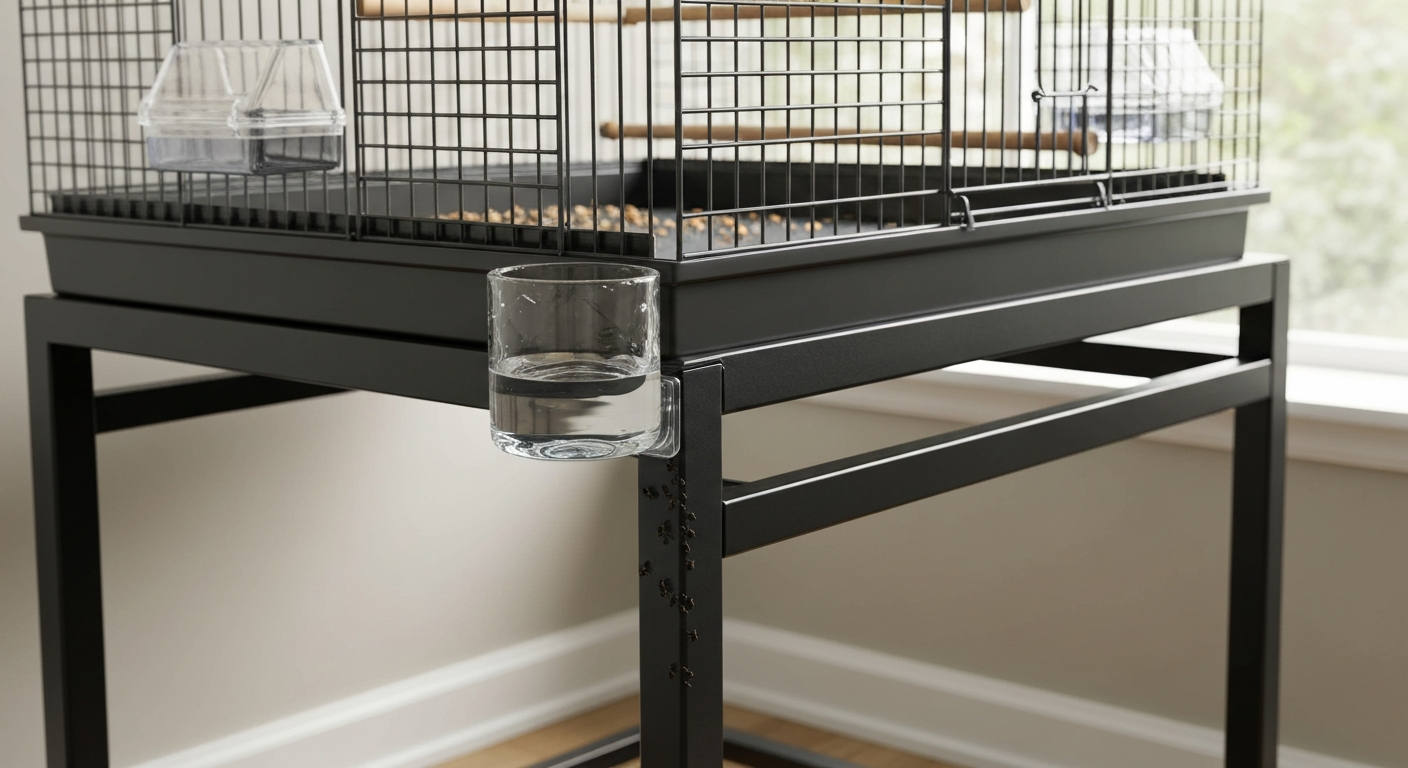
Beyond species ID, look for these physical signs of an ant invasion around your cage: a visible moving trail on the cage stand, legs, or wall; small debris piles of seed husks or dead ants accumulating under the cage; ants clustered around the water dish rim; and in the case of pavement ants, a fine grit or sand deposit near cage legs that rest on concrete or tile floors.
Finding entry points and following the trails
The best time to track ants is at night or in low light. Grab a flashlight and hold it at a low angle, almost parallel to the floor or wall surface. This side-lighting makes trails visible as a faint sheen or moving line that you can miss in normal overhead light. Follow the trail backward, away from the cage, toward the wall or floor. You are looking for the crack, gap, or conduit that they are using to enter.
Common entry points near cage setups include baseboard gaps, expansion joints in tile or concrete, gaps around water pipes or electrical conduit, window sill cracks, and the edges of door frames. If the cage is near a wall or touching a surface, ants may be walking directly from wall to cage without ever touching the floor.
Take photos of every trail and entry point you find before sealing or cleaning anything. Number the photos on your phone and sketch a quick map of the room showing where the trails run. This is useful if the problem returns or if you need to describe the situation to a pest professional. For pavement ants specifically, check the perimeter of the room at night, they tend to use baseboards, utility runs, and foundation cracks as organized highways.
If you cannot see a clear trail, try a non-toxic tracking method: lay a thin strip of talc or chalk powder across suspected paths near cage legs or along baseboards. Check it after a few hours, ant traffic will leave a disturbed line through the powder, pointing you toward the active route.
Immediate safe removal steps to take right now
These steps are in order of priority. UC IPM / Pest Notes, General ant control and sanitation guidance recommends removing or covering the bird, removing food and water and cleaning spills, manually removing visible ants with gloves or a vacuum, and using soapy‑water drowning traps and sealed bait stations placed away from birds UC IPM / Pest Notes — General ant control and sanitation guidance. Do them in sequence, not simultaneously.
- Remove your bird first. Place it in a travel cage or a secure box in a different room with the door closed. Do not bring it back until the cage area is clear and dry.
- Pull all food and water dishes out of the cage. Discard any food that ants have been in contact with. Do not try to salvage it — the contamination risk is not worth it.
- Use a handheld vacuum (not a blower) to remove visible ants from the cage exterior, stand legs, and surrounding floor area. Keep the nozzle a few inches away from cage wires so you do not suck up small cage accessories. Empty the vacuum bag or canister outside immediately afterward.
- Wipe down the cage exterior and stand with a cloth dampened in warm soapy water (plain dish soap, not antibacterial spray or anything scented). Ants leave pheromone trails that recruit more foragers — breaking that chemical trail is critical.
- Fill a bucket with soapy water and submerge or drown any ants remaining on removable cage parts. Let them soak for 2–3 minutes before rinsing.
- Seal any confirmed entry points you identified with silicone caulk, weatherstrip foam, or steel wool packed into gaps. These are temporary fixes until your longer-term proofing project is done.
- Place sealed commercial ant bait stations (not open granular bait) along active trails away from the cage, at least 3 feet from where your bird will be. For Pharaoh ants especially, baiting is the only recommended approach — do not spray.
- Do not return your bird to the cage until the cage is dry, the ants are cleared, and there is no chemical smell in the room.
Photo-based walkthroughs: what to photograph and when
I always recommend treating your ant removal and proofing process like a documented project. Taking photos at each stage gives you a reference if the problem comes back, helps you show a vet or exterminator exactly what you found, and lets you track whether your fixes are working. Here is what to capture and when.
During the inspection phase
- Wide shot of the cage in its location, showing the stand, legs, and surrounding floor and wall
- Close-up of any active ant trail, shot from a low angle with side lighting to show movement
- Each confirmed entry point (crack, gap, pipe penetration) with something for scale — a coin or pen works
- The underside of the cage tray and the base of each stand leg
- Any food spill, seed accumulation, or moisture spot under or around the cage
During the removal and cleaning phase
- Before shot of the cage showing ant activity, then an after shot of the same angle once cleared
- The wiped trail area showing the clean baseboard or leg — this confirms the pheromone path is broken
- Sealed entry points before and after caulking, so you can check them later for gaps or shrinkage
- Bait station placement relative to the cage and trail — document exactly where you put them
During the proofing project build
- Materials laid out before assembly (helps you replicate the project if needed)
- Each major step of moat or barrier construction — especially the fit of the moat cup to the stand leg
- The finished moat or barrier installed, with the cage standing normally on top
- A 24-hour check photo after initial filling — moats evaporate faster than expected in warm rooms
Store your photos in a labeled folder or album on your phone. If you run into a broader bug situation beyond ants, these images become useful context, which connects naturally to the topic of general bugs in bird cages and how to troubleshoot insect access points across different pest types. See also our section on wire rope bird cage causes for how certain cage materials and construction details create access points for ants and other pests. See our troubleshooting guide on bugs in bird cage for help with other pest types and access-point fixes. For background, see the definition of bird caging wire rope to understand common cage construction and potential insect access points.
DIY ant-proofing projects: choosing the right approach
There are three main physical strategies for keeping ants off a bird cage: water moats on the stand legs, barrier wraps on the legs or stand, and raising the cage on a completely isolated platform. Each works on the same principle, create a gap or obstacle that ants physically cannot cross. The best choice depends on your cage setup, how your stand is built, and whether the cage is touching any wall or hanging from the ceiling.
| Method | Best For | Main Limitation | Cost Estimate | Difficulty |
|---|---|---|---|---|
| Water/ant moat on stand legs | Floor-standing cages with round or square legs | Must refill every 3–5 days; can spill | Under $10 DIY or $10–15 per commercial moat cup | Easy |
| Petroleum jelly or sticky barrier wrap | Supplemental use on smooth metal legs | Collects dust and debris; needs monthly reapplication | Under $5 | Easy |
| Raised isolated platform | Any cage; especially good for high-ant-traffic areas | Requires building or buying a platform stand | $15–40 for materials | Moderate |
| Double-sided tape barrier ring | Temporary fix while building a moat or platform | Loses tackiness quickly in heat or humidity | Under $3 | Very easy |
| Hanging cage from ceiling hook | Cages that can be safely suspended | Not suitable for heavy cages; ceiling must be solid | Minimal if hook is already there | Easy to moderate depending on ceiling |
My go-to recommendation for most setups is the water moat on each stand leg, combined with caulking the entry points you found during inspection. The moat is cheap, completely non-toxic, and physically reliable. I cover the full build below. If your cage stand legs are very close together or you cannot fit a moat cup under them cleanly, the raised isolated platform gives you more flexibility.
Project 1: Building a water ant moat, step-by-step
This is the most effective long-term bird-safe solution I have found for floor-standing cages. The idea is simple: each leg of the cage stand sits inside a small water-filled cup that ants cannot swim across. Commercial hummingbird feeder ant moats (typically around 2 inches in diameter and 2–2.5 inches tall, holding roughly 2 oz of water) work perfectly for thin stand legs. For heavier or wider legs, you build a larger version from plastic food containers.
Tools and materials
- 4 plastic cups or containers (one per stand leg) — small deli containers, plastic plant saucers, or commercial ant moat cups; diameter should be at least 1 inch wider than the leg base
- Waterproof epoxy putty or silicone sealant
- A drill with a bit matching your stand leg diameter (if using solid-bottom containers you drill a center hole)
- Sandpaper (120 grit) to roughen the leg surface slightly for a better seal
- Measuring tape
- Marker
- Small funnel or turkey baster for refilling
- Optional: a few drops of unscented dish soap per cup (breaks water surface tension so ants cannot walk on it)
Prep notes before you start
Measure the diameter of each stand leg at the point where it meets the floor. Most standard cage stands have legs between 3/4 inch and 1.5 inches in diameter. Buy or cut your cups so there is at least a 1-inch gap between the leg and the inner wall of the cup all the way around, that is the moat width that ants need to cross, and 1 inch is the reliable minimum. Anything narrower and large pavement ants or fire ants may bridge it with debris.
Step-by-step build
- PHOTO: Lay all materials out on a work surface and take a reference photo before you start. Label or note which cup goes to which leg if they differ in size.
- Mark the center of each cup bottom with a marker. Use your measuring tape to confirm it is centered, not just approximate — an off-center hole will cause the leg to press against one side and ants may find a dry path.
- PHOTO: Take a close-up of the marked center dot before drilling.
- Drill or punch a hole through the cup bottom at your mark, sized to fit the stand leg snugly. Test the fit: the leg should slide through with only slight resistance, leaving no visible gap around it.
- PHOTO: Dry-fit the cup on the leg and photograph it from above to show the even gap all around the leg inside the cup.
- Slide the cage stand slightly to one side and work on each leg in turn. Roughen the leg surface 2–3 inches up from the floor with 120-grit sandpaper to help the sealant bond.
- Slide the cup up the leg to your target working height — typically 1 to 1.5 inches above the floor, so the cup is not resting flat on the floor (which would let ants walk under the cup rim). Mark that height on the leg with your marker.
- Apply a bead of silicone sealant or a ring of epoxy putty around the leg at the marked height. Slide the cup down onto the sealant ring so the hole in the cup bottom seats over the sealant. Hold it level for 2 minutes or clamp lightly with a zip-tie above and below the cup bottom until it sets.
- PHOTO: Take a photo of the cup sealed in position on the leg, from the side, before the sealant fully cures.
- Repeat for all four legs. Let all sealant cure for the full time listed on the product label — typically 24 hours for silicone — before adding water.
- Once cured, fill each cup with plain water to within about 1/4 inch of the rim. Add 2–3 drops of plain unscented dish soap and stir gently. The soap reduces surface tension so ants cannot walk across the water surface.
- PHOTO: Take a final photo of all four moat cups filled and the cage standing normally in position. This is your reference image for checking moat levels at each refill.
- Check moat levels every 2–3 days. In warm or dry rooms, a 2-oz moat cup can drop to an unsafe level within 3–5 days. Set a phone reminder.
Troubleshooting the moat build
- Ants are still getting across: check whether cage legs or any part of the stand is touching a wall, baseboard, or other surface — ants will bypass the moat entirely using that contact point.
- Sealant is not holding and the cup is sliding: the leg surface may not have been sanded enough, or you applied sealant to a dirty or oily leg. Strip it back, clean the leg with rubbing alcohol, re-sand, and reseal.
- Water is evaporating in less than 2 days: you need a deeper cup or a wider-diameter cup that holds more volume. Swap to a 4-oz or 6-oz container.
- The cup is cracking or warping: thin-walled plastic deli containers can crack under the cage weight if the leg is pressing sideways. Switch to a thicker-walled plastic plant saucer or a small ceramic ramekin.
- Your cage stand has more than four legs or a base plate instead of individual legs: use the raised isolated platform method instead (place the whole stand on a solid tray that sits in a larger water-filled tray).
Project 2: Raised isolated platform (for wider or base-plate stands)
If your stand has a wide base, a cross-brace near the floor, or a flat plate rather than individual legs, individual moat cups will not work cleanly. Instead, place the entire stand on a solid platform (a piece of 3/4-inch plywood or a thick plastic cutting board) that sits inside a larger water-filled tray. The tray acts as a single large moat around the whole stand base. Use a plastic storage tote lid or a shallow cement-mixing tray as your outer water tray, it needs to be at least 2 inches wider than your platform on all sides and at least 1 inch deep.
Cut the platform to fit inside the tray with at least a 1-inch gap on all sides. Fill the tray gap with 3/4 inch of water and add a few drops of dish soap. The stand sits on the dry platform island and the water ring surrounds it completely. Check that no part of the stand, cage, or any cord or cover touches the floor or wall outside the tray, those contact points become ant bridges.
Cleaning routines and ongoing prevention
Physical barriers only stay effective if you are also removing the food and moisture signals that attract ants in the first place. This is where routine cage cleaning overlaps directly with pest prevention, and it is worth being specific about what to do and how often.
| Task | Frequency | Why It Matters for Ant Control |
|---|---|---|
| Remove uneaten fresh food (fruit, vegetables, soft food) | Within 2 hours of feeding | Rotting fruit and wet food are extremely high-value ant attractants |
| Clear spilled seed from the cage tray and floor below | Daily | Seed oils and husks attract grease-seeking species like pavement ants |
| Wipe water dish rims with a dry cloth | Daily | Moisture trails around water dishes recruit Argentine and odorous house ants |
| Full tray liner swap and tray scrub | Every 2–3 days | Fermented seed and droppings generate odors that attract foragers |
| Wipe cage bars and stand with warm soapy water | Weekly | Removes pheromone trails that ants left on previous visits |
| Inspect and refill ant moat cups | Every 2–3 days | Moats below the safe fill line are no longer effective |
| Check and reapply entry-point caulk or sealant | Monthly | Sealant shrinks and cracks; gaps reopen |
| Full deep clean of cage and accessories | Monthly | Removes accumulated grease, oils, and residue that build up below daily-cleaning threshold |
Feeder and perch placement also matters. Keep water and food dishes away from the cage walls and off the cage floor if possible, dishes sitting directly on the cage tray are the most accessible point for ants entering from below. Hanging dishes from the cage bars mid-height gives ants fewer direct routes to the food. This kind of placement thinking is the same logic that applies to general bird cage cleaning tips and mess control: reducing contact between food and cage surfaces reduces both cleaning time and pest attraction.
Safe products and what to avoid
The single most important product rule for bird owners: no sprays, aerosols, foggers, or any airborne insecticide anywhere in the same room as your bird, or in any room that shares air circulation with the bird's space. Birds have highly efficient respiratory systems and are disproportionately sensitive to airborne toxins, pyrethroids, fipronil, organophosphates, and even many plant-based pesticide sprays can cause respiratory distress or death in birds at concentrations that are harmless to humans or dogs.
- SAFE: Water moats with plain dish soap (no fragrance, no antibacterial agents)
- SAFE: Sealed commercial ant bait stations placed well away from the bird and cage (at least 3 feet, behind furniture where the bird cannot access them)
- SAFE: Silicone caulk and epoxy putty for sealing entry points (fully cured before bird returns to the room)
- SAFE: Diatomaceous earth applied to cracks and wall voids behind furniture — not on cage surfaces and not where it will become airborne in the bird's breathing space
- AVOID: Any aerosol insecticide spray, including 'natural' pyrethrin or citrus-based products
- AVOID: Open granular ant bait — birds can and will eat it
- AVOID: Sticky traps inside or directly under the cage where a bird could contact them
- AVOID: Essential oil diffusers or scented plug-ins promoted as 'natural' ant repellents — many are toxic to birds
For Pharaoh ants specifically: do not use any contact spray at all, even outside the room. Pharaoh ant colonies bud under chemical pressure, meaning a spray that kills foragers will cause the queen groups to scatter and create multiple new satellite colonies throughout your home. Gel bait stations that foragers carry back to the colony are the only recommended approach for Pharaoh ants. Place them along the active trail and leave them undisturbed for several days. See UF/IFAS publication, Pharaoh Ant (and IPM baiting guidance) for IPM recommendations to place baits on active trails, monitor bait acceptance before wide application, and avoid contact sprays that repel ants and can cause colony budding UF/IFAS publication — Pharaoh Ant (and IPM baiting guidance).
Seasonal protection and cage placement
Ant pressure changes through the year. In late spring and summer, colonies are actively expanding and foraging heavily, this is when most bird owners notice the problem. In early spring after rain, moisture-seeking ants move indoors in large numbers. In autumn, ants are storing food and may target cage seed supplies more aggressively. Winter pressure drops in cooler climates but stays high indoors in warm homes and in southern U.S. climates where Argentine ants and Pharaoh ants are active year-round.
Cage placement makes a significant seasonal difference. Avoid placing the cage directly against exterior walls, especially ground-floor walls, ant entry routes run along foundations and wall voids, and a cage touching an exterior wall can become a direct food source for outdoor colonies. Keep at least 6 inches of clear space between the cage stand and any wall. If the cage is near a window that you open seasonally, make sure window sill gaps are caulked before warm months.
In summer, inspect moat cups more frequently, heat accelerates evaporation and water levels can drop to ineffective depths within 48 hours in a warm room. In spring, do a perimeter check of your room's baseboards and door frames and reapply caulk to any cracks that opened over winter. These are small seasonal tasks that prevent a large problem from developing.
When to call a vet or a professional exterminator
Call an avian vet immediately if your bird shows any of the warning signs listed earlier in this article, especially open-mouth breathing, collapse, swelling, or sudden refusal to eat after an ant exposure. Do not wait to see if the bird rallies, birds mask illness and decline quickly once symptoms appear. The ASPCA Animal Poison Control Center is also available 24 hours a day if you need guidance on a specific toxin exposure while you are waiting to reach a vet.
Call a licensed pest management professional if: you identify or strongly suspect fire ants anywhere near your cage or in your yard; your Pharaoh ant infestation is spreading despite correct baiting and the colony has clearly budded into multiple sites; you cannot locate the nest or entry point after two thorough inspections; or the infestation is coming from a structural source like a wall void or ceiling space that you cannot safely access or seal yourself.
When you do call a professional, tell them upfront that you have pet birds in the home. A reputable pest control company will select treatment methods that do not involve broadcasting sprays or foggers in bird-occupied spaces, and they should be willing to work room by room with the bird safely relocated during any treatment. If a company dismisses your bird safety concern, that is a sign to find a different provider.
FAQ
What immediate risks do ants pose to pet birds and why should I act quickly?
Ants can bite or sting, causing local pain, swelling or, in severe cases, systemic allergic reactions. They can contaminate food and water with bacteria, stress birds through repeated harassment, and, in rare cases (e.g., fire ants), cause fatal envenomation of nestlings or injured birds. Using household sprays near birds can create toxic airborne residues — so rapid, bird‑safe removal and exclusion are essential.
How can I identify the likely ant species around my bird cage and why does it matter?
Common indoor species in the U.S. include odorous house ants, Argentine ants, pavement ants and Pharaoh ants; fire ants are a dangerous outdoor species where present. Identification clues: size and color (Pharaoh ants are tiny and yellowish), smell when crushed (odorous house ants smell like rotten coconut), trail behavior (pavement ants form predictable nighttime runways), and attraction to sweets or proteins. Species matters because control differs: Pharaoh ants can worsen with improper spraying and fire ants require urgent exclusion and professional control.
How do I safely inspect and find ant entry points and trails without disturbing the birds?
Inspect during low light or at night with a flashlight from outside the cage. Follow visible trails backward toward walls, floors, baseboards, or the cage stand. Use non‑toxic monitoring: sticky cards near suspected runways, talc/chalk tracking patches, or photos to map routes. Do not spray while examining; if birds are active, remove or cover them and relocate to a safe room before close work.
What are safe, immediate steps to remove ants from inside a bird cage?
1) Move the bird to a separate, safe, ant‑free room or cover and hold it while you work. 2) Remove all food/water bowls and cover or seal them. 3) Manually remove visible ants with gloved wipes or a paper towel; a handheld vacuum with a long nozzle can pick ants up if used from outside the cage and emptied outdoors. 4) Clean spilled seed or residues with warm soapy water, rinse thoroughly and dry. 5) Place sealed, child‑proof ant bait stations away from the bird area (not open toxic baits near birds).
Which cleaning routines and tools should I use after an ant incident?
Tools: disposable gloves, scrub brush, mild dish soap, white vinegar (diluted 1:4 with water), warm water buckets, old towels, microfiber cloths, handheld vacuum, sealable bags for debris. Routine: remove bird, empty cage trays and wash with soap and water, scrub perches/feeders, rinse well, dry completely, replace tray liners, vacuum surrounding floor, inspect for and clean crevices weekly for a month after activity. Schedule: immediate cleanup after sightings, daily checks for 3–7 days, then weekly inspections as ongoing prevention.
What DIY ant‑proofing projects work well for bird cages (ant moats, barrier wraps, raised stands) and how do I build them?
Ant moat: place a water moat between the cage legs and the ground by fitting commercial cup moats around each leg or fashioning waterproof trays that hold 1–2 in of water; refill and clean every 2–3 days. Barrier wrap: wrap each cage leg with a smooth, nonporous tape (e.g., PET tape) then place a band of petroleum jelly sparingly or a non‑toxic adhesive (staking preference: keep sticky barriers away from bird reach). Raised stand: mount cage on a metal or plastic stand with legs that fit into moats; ensure stand is stable and stand legs are smooth (not wood) to reduce climbing. For all projects: avoid open insecticide placement and ensure no moats or barriers allow birds to access standing water or sticky substances.